Skip table of contents

PAR Brink

About

Brink POS from Partech is a cloud-based point of sale system built on the Windows OS.

Launched
March 2024

Article Last Updated
May 2024

Category
POS


What’s Supported?

Feature

Supported

Not Supported

PAR Ordering Channels

PAR Brink POS

(Cashier Facing display only. Customer Facing Display is not supported)

  • Kiosk

  • Digital Ordering

Spendgo Loyalty Features

  • Accrue points for loyalty claimed orders

  • Claim receipt to accrue points for orders not claimed at the store

  • Redeem Spendgo offers/rewards

  • Combine Spendgo rewards with non-Spendgo rewards

  • Loyalty reversal when order is refunded.


Base Program Types

  • Points Banking

  • Shop with points

Basket Level Rewards/Offers Types

  • $ Discount (Rebate)

  • % Discount (Discount)

  • Bonus Points


Item Based Rewards/Offers Types

  • BOGO

  • Free Item

  • $ Discount

  • % Discount

  • Bonus Points

  • Price Adjustment


Rewards shown for selection

  • When the Member rewards are looked up after adding items to the order, only the rewards applicable to the order are displayed. This may not reflect the entire list of rewards that are available to the Member at the location because there may be a few rewards that do not qualify for the order.

  • All rewards available to the Member at the location can be looked up by doing the Member look up when the order is empty. However when the order is empty, the rewards are listed as “view only” and cannot be applied.

  • After applying a reward if the order is changed, the applied reward is removed. The rewards will have to be re looked up and reviewed for applying.


Discount code requirement

  • A discount code is setup in Brink as part of enabling the POS integration, but there is no need to input a Discount Code when creating rewards or offers in the Spendgo Dashboard.

  • Discount code may needs to be setup in Brink and associated with the Spendgo Rewards while enabling Loyalty on other ordering platforms (such as Olo) that connects Brink POS. However, please note any discount code included in the reward setup would be numeric only. Brink does not support alphanumeric discount codes.

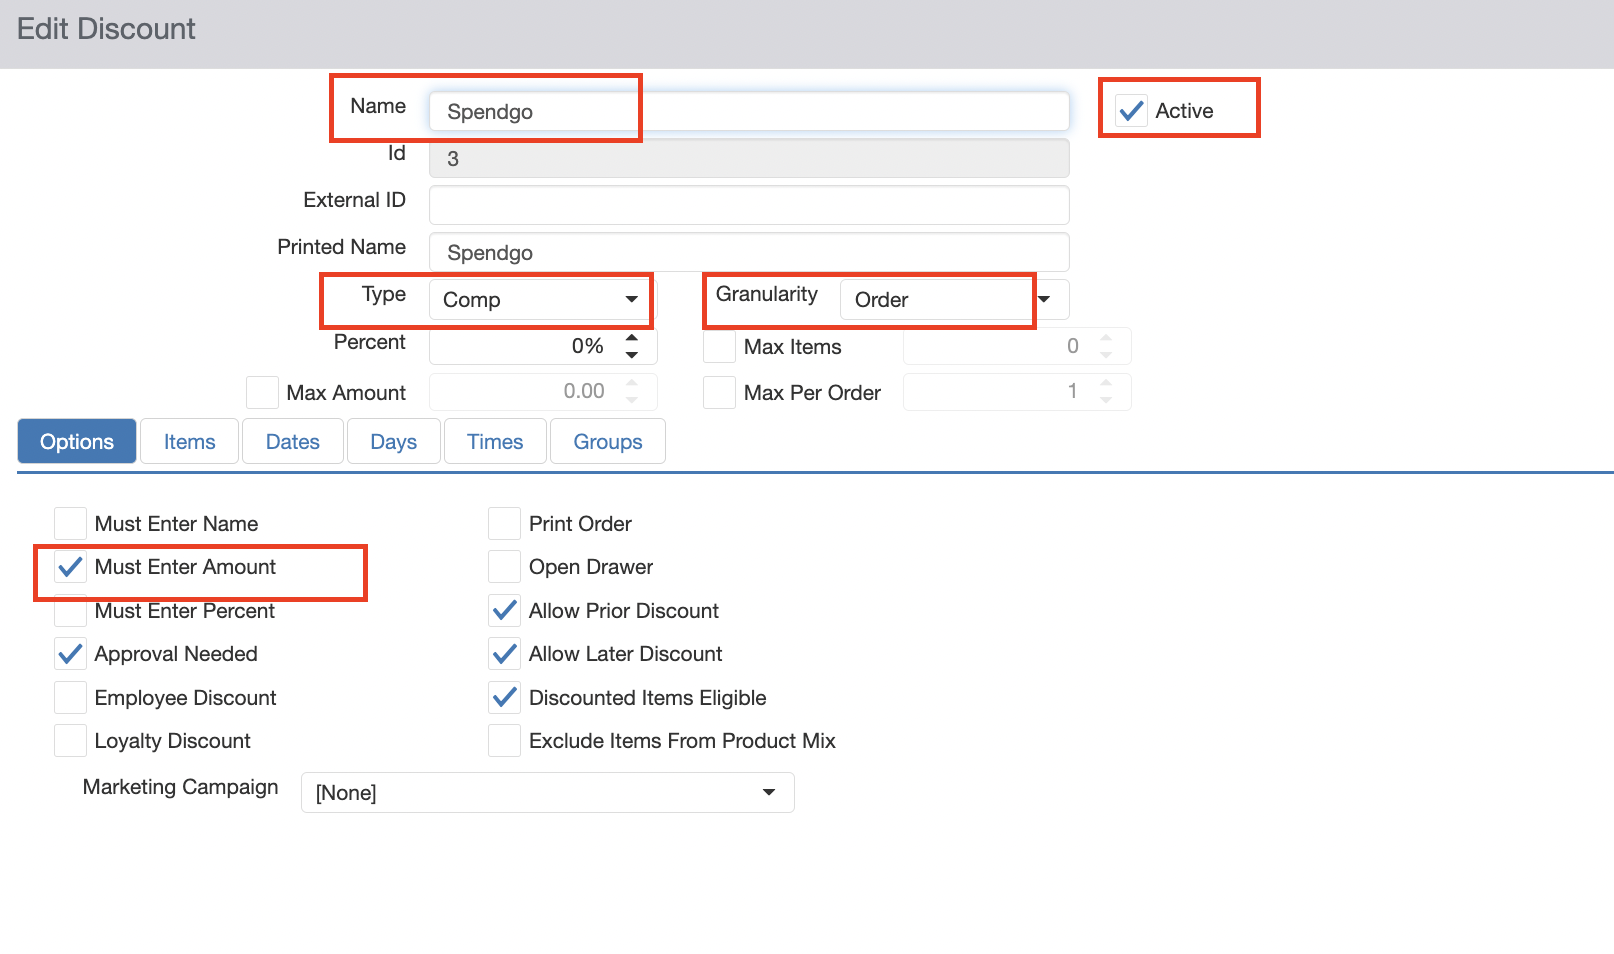
Please refer to the documentation of the Online Ordering platform for the steps to setup Brink discount code. Typically this involves setting up an Open $ discount in Brink as shown below. You can use an existing $ discount. We recommend that you create a new discount for reporting purposes.
  1. Log in to the Brink Admin Portal

  2. Click Configuration and then open the Settings Editor

  3. Click Discounts in the left-hand menu

  4. Click Add New Discount. Give the discount a name and save it with a default values. Please note that the below fields are required.

  5. Enter the following information:

    • Name: <Discount Name>

    • Type: Comp

    • Granularity: Order

    • Must Enter Amount: Enable this checkbox

    • Active: Enable this checkbox

image-20241104-161355.png
  1. Save and publish.

  2. Copy the ID and save it with the Online Ordering and Spendgo.

Online and In-Store Ordering Platforms

Olo


Things to Know

  • Support for Voids/Refunds: This is what happens to loyalty on the order after a closed order is reopened and modified in the POS.

Action

Loyalty Processing

Order is fully refunded

Loyalty on the order is revered.

  • Points accrued on the order is reversed

  • Any Spendgo Reward applied to the order is added back to the Member’s balance

Order is partially refunded

Partial loyalty reversal is not supported in Spendgo. Partial refund is also treated same way as the full refund.

In order to keep the loyalty on the partial refund to be processed correctly, it is recommended to fully refund the order and create a new order with the updated order details.

Order is updated

Any further loyalty update on a closed order is not supported in Spendgo API and may result in inconsistent result.

In order update the loyalty on the order, it is recommended to void the order and create a new order with the updated details.

  • Order ID Format:

Brink POS orders show up with a 12-14 digit numerical ID such as 9323073767425. This is a unique Order ID created by Brink and varies from Merchant to Merchant.

image-20240522-163210.png
  • Notes about the order receipt on Spendgo Dashboard

  1. Receipt Subtotal :

    1. The Subtotal shown on the Dashboard receipt matches with the Subtotal on the Brink receipt.

    2. Brink’s subtotal reflects the sum of line items and not the applied rewards/discounts/coupons.

    3. Also note that the points accrued on the order does not always match with the subtotal. This is because Spendgo does not compute points based on the receipt subtotal, but based on the sum of prices of items marked as qualifying for points.

  2. Receipt Total:

The Total shown on the Dashboard receipt matches with the Total on the Brink receipt. Receipt total reflects the sum of line item prices including modifiers + Tax + Tip minus the applied rewards/discounts.
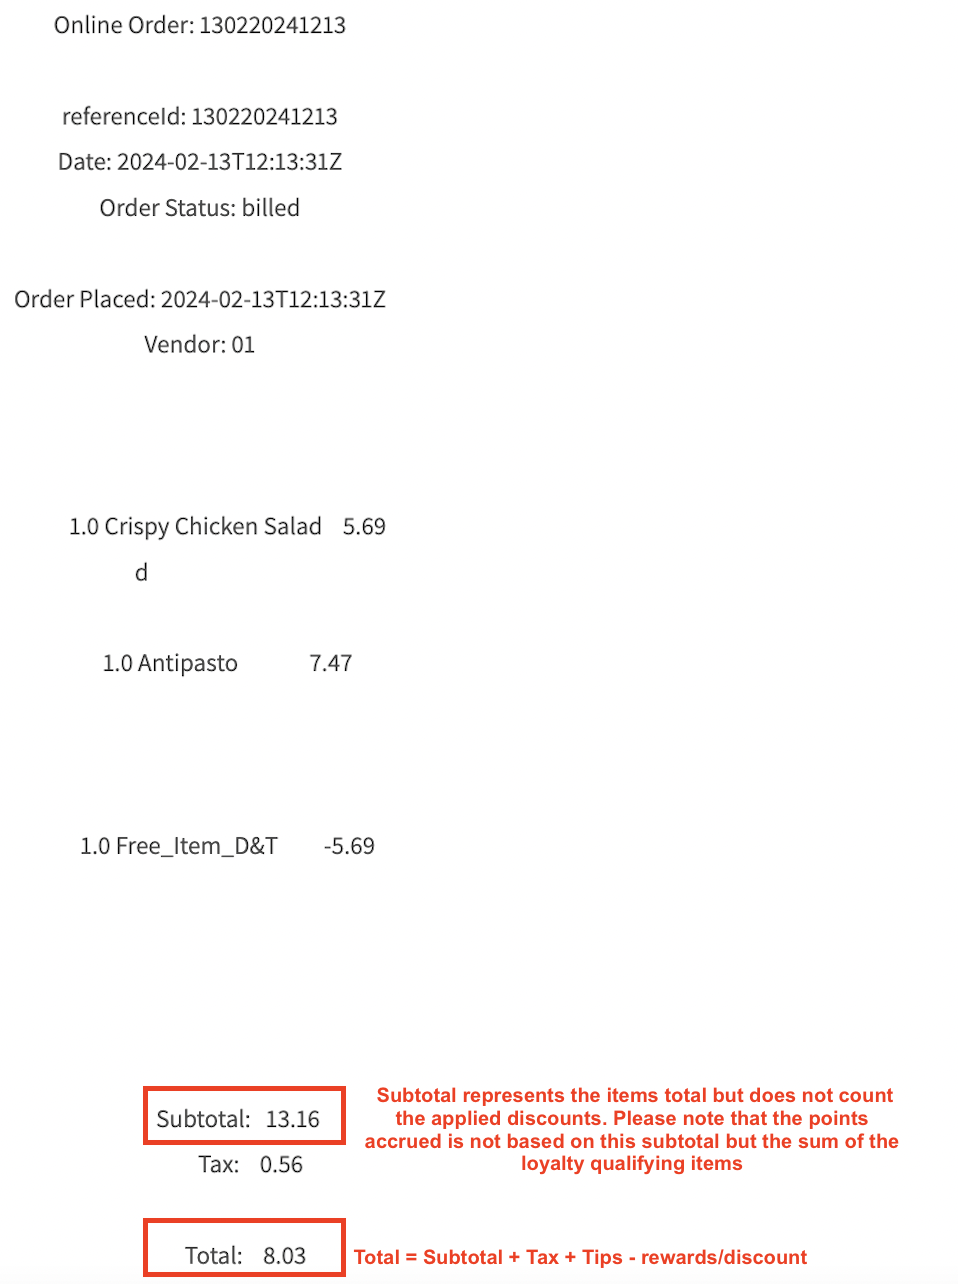
image-20240301-011415.png

Integration Setup

Requirements

Brink Requirements:

  • POS Release 5.0n is needed. If any of the POS is running an older version, the Merchant should follow up with Brink support to get the POS version upgraded.

  • If the Brink POS is being setup new, make sure that POS setup is completed and tested.

  • Spendgo integration can be enabled by individual location from the Brink Admin Portal. The Merchant contact needs to have access to Brink Admin Portal is needed for enabling the integration.

  • We recommend that if the Brink test lab is available, the integration is enabled and tested at the lab before rolling out to other locations. 

Spendgo Requirements:

  • Make sure that the Spendgo Merchant account, loyalty program and the rewards are setup.

If you are switching to Spendgo from Brink Loyalty, please note that all locations need to migrate from Brink Loyalty to Spendgo. You cannot have few locations running Brink Loyalty and few other locations running Spendgo.

How to Enable the Integration

Step 1. The Merchant confirms the location(s) is ready for setting up the integration.

Task Owner

The Merchant

Required Input

The locations to enable the integrations are identified.

Procedure

Review the requirements mentioned above and confirm the location(s) is ready for enabling Spendgo Integration

Step 2: The Merchant sends a request to PAR API support team to enable Generic Loyalty for the location

Task Owner

The Merchant

Required Input

Locations meet all the requirements.

Procedure

Send the request to Par API support team. (api.support@partech.com) and indicate the location(s).

Data to share

Location list to enable the integration.

Step 3: PAR API support team enables the Generic Loyalty for the location

Task Owner

PAR API support team

Required Input

Authorization and the locations list from The Merchant.

Data to share

After enabling the locations, send the confirmation back to The Merchant.

Step 4: The Merchant Informs Spendgo CSM to initiate the integration setup

Task Owner

The Merchant

Required Input

Identify the locations to enable the Spendgo Integration.

Procedure

  1. Inform Spendgo Customer Success Manager (CSM) (csm@spendgo.com) the list of locations that needs to be enabled and if the Brink location name is not already shared at the time of initial setup, share the Brink location names.

To find the location name to share:

1a. Login to Brink Admin Portal. It brings up the Dashboard in the admin portal.

1b. From the locations dropdown, select the location.

1c. Copy the location name as shown, and strip off the asterisks ( * ) at the beginning and end. In the example shown below the location name is “***API-LAB-01***”, so the applicable part of the name after stripping off the *s is “API-LAB-01”
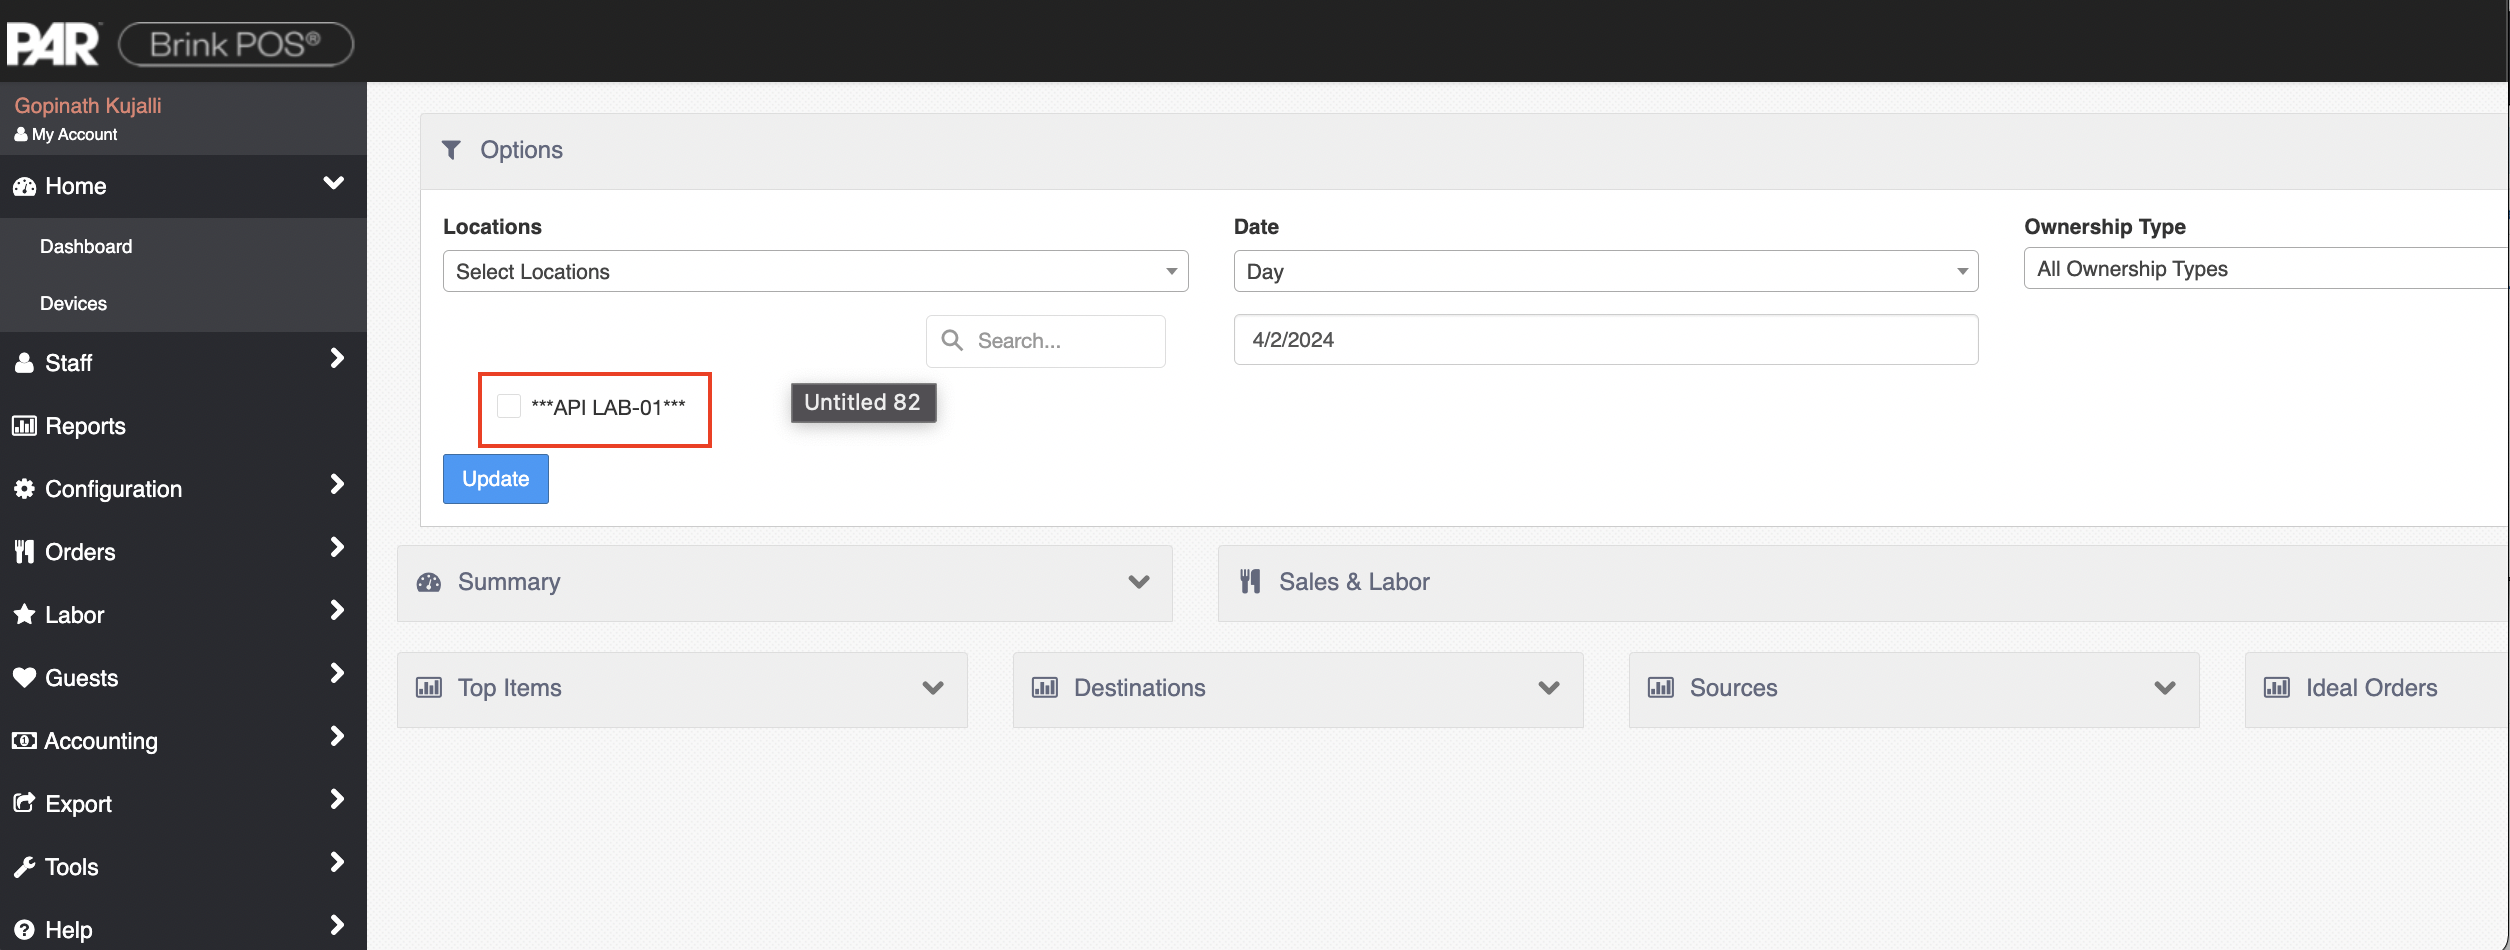
image-20240403-051931.png

Data to share

Location list to enable the integration.

Step 5: Spendgo CSM co-ordinates integration setup activities.

Task Owner

Spendgo Customer Success Manager

Required Input

Authorization from the Merchant to enable the integration

Procedure

  1. Co-ordinate with the Merchant the date and time for setting up the integration.

  2. Evaluate if there is any testing required after the integration.

    1. If any testing is required, setup the testing time.

  3. From the Spendgo Admin Portal, Map the Brink location code shared by the Merchant in step 4.

  4. If the integration has not already been enabled for any of the Merchant locations

    1. Obtain the Merchant contact to whom the Spendgo API credentials be sent to.

    2. Instruct the Integrations team to setup and share Spendgo API credentials with the Merchant.

Data to share

Share with the integration team Merchant contact to whom the API credentials should be sent.

Outcome

  1. The time slot for enabling the integration is setup with the Merchant.

  2. Working session is setup with the Merchant for testing, if required.

  3. Instructions sent to the integration team, if required.

Step 6: Spendgo Integration team shares API credentials with the Merchant

Task Owner

Spendgo Integrations Team

Required Input

Authorization from CSM and the Merchant contact to send the credentials to.

Procedure

  • Before starting, make sure that the the the “Brink Store ID” is mapped in the store configuration to match with the Brink location name shared Step (4). If it is not already configured, configure it.

  • If the Brink location name is not available, follow up with the Merchant contact to set obtain it and configure it. Without this mapping the integration will fail, so if you are sharing the credentials without this mapping is in place, make sure that the Brink Store ID is mapped before the Merchant step (7).

If the credentials are already not shared with the Merchant,

  1. Setup the API keys in Spendgo Admin portal

  2. Add the API secret to the Merchant config in Spendgo Admin portal.

  3. Make sure that the Brink Store ID in the Store Configuration is mapped. If not, make sure that the Brink Store Id is mapped. This should be available in the Account Configuration sheet or obtain it from CS.

  4. Share the API credentials securely in a 1Password link with the Merchant contact. Include the below information in the 1password secure note.

  • End Point URL

  • Api Key

  • For each location - Store ID (Please note that this is what is mapped in the Brink Store Id field in step (3), not the Spendgo Store Code.

Refer to internal documentation for detailed instructions.

Data to share

API credentials and Store IDs with the Merchant in the secure 1Password note.

Outcome

Merchant has all information needed to setup the integration.

Step 7: The Merchant enables the integration from the Brink Admin Portal

Task Owner

The Merchant

Required Input

Spendgo API Keys

Procedure

The integration is setup location by location. For setting up a location follow the below steps in the Brink Admin Portal.

  1. Login to Brink Admin Portal and switch to the location.

  2. Spendgo integration is implemented as a Brink’s “Generic Loyalty integration”. So if the default Brink Loyalty integration enabled, it should be disabled first. To do this, from the Brink Admin Portal, Open Configurations → Settings Editor, browse to Options → Loyalty. If it not already set to “None”, set it to “None”.

image-20240401-200712.png
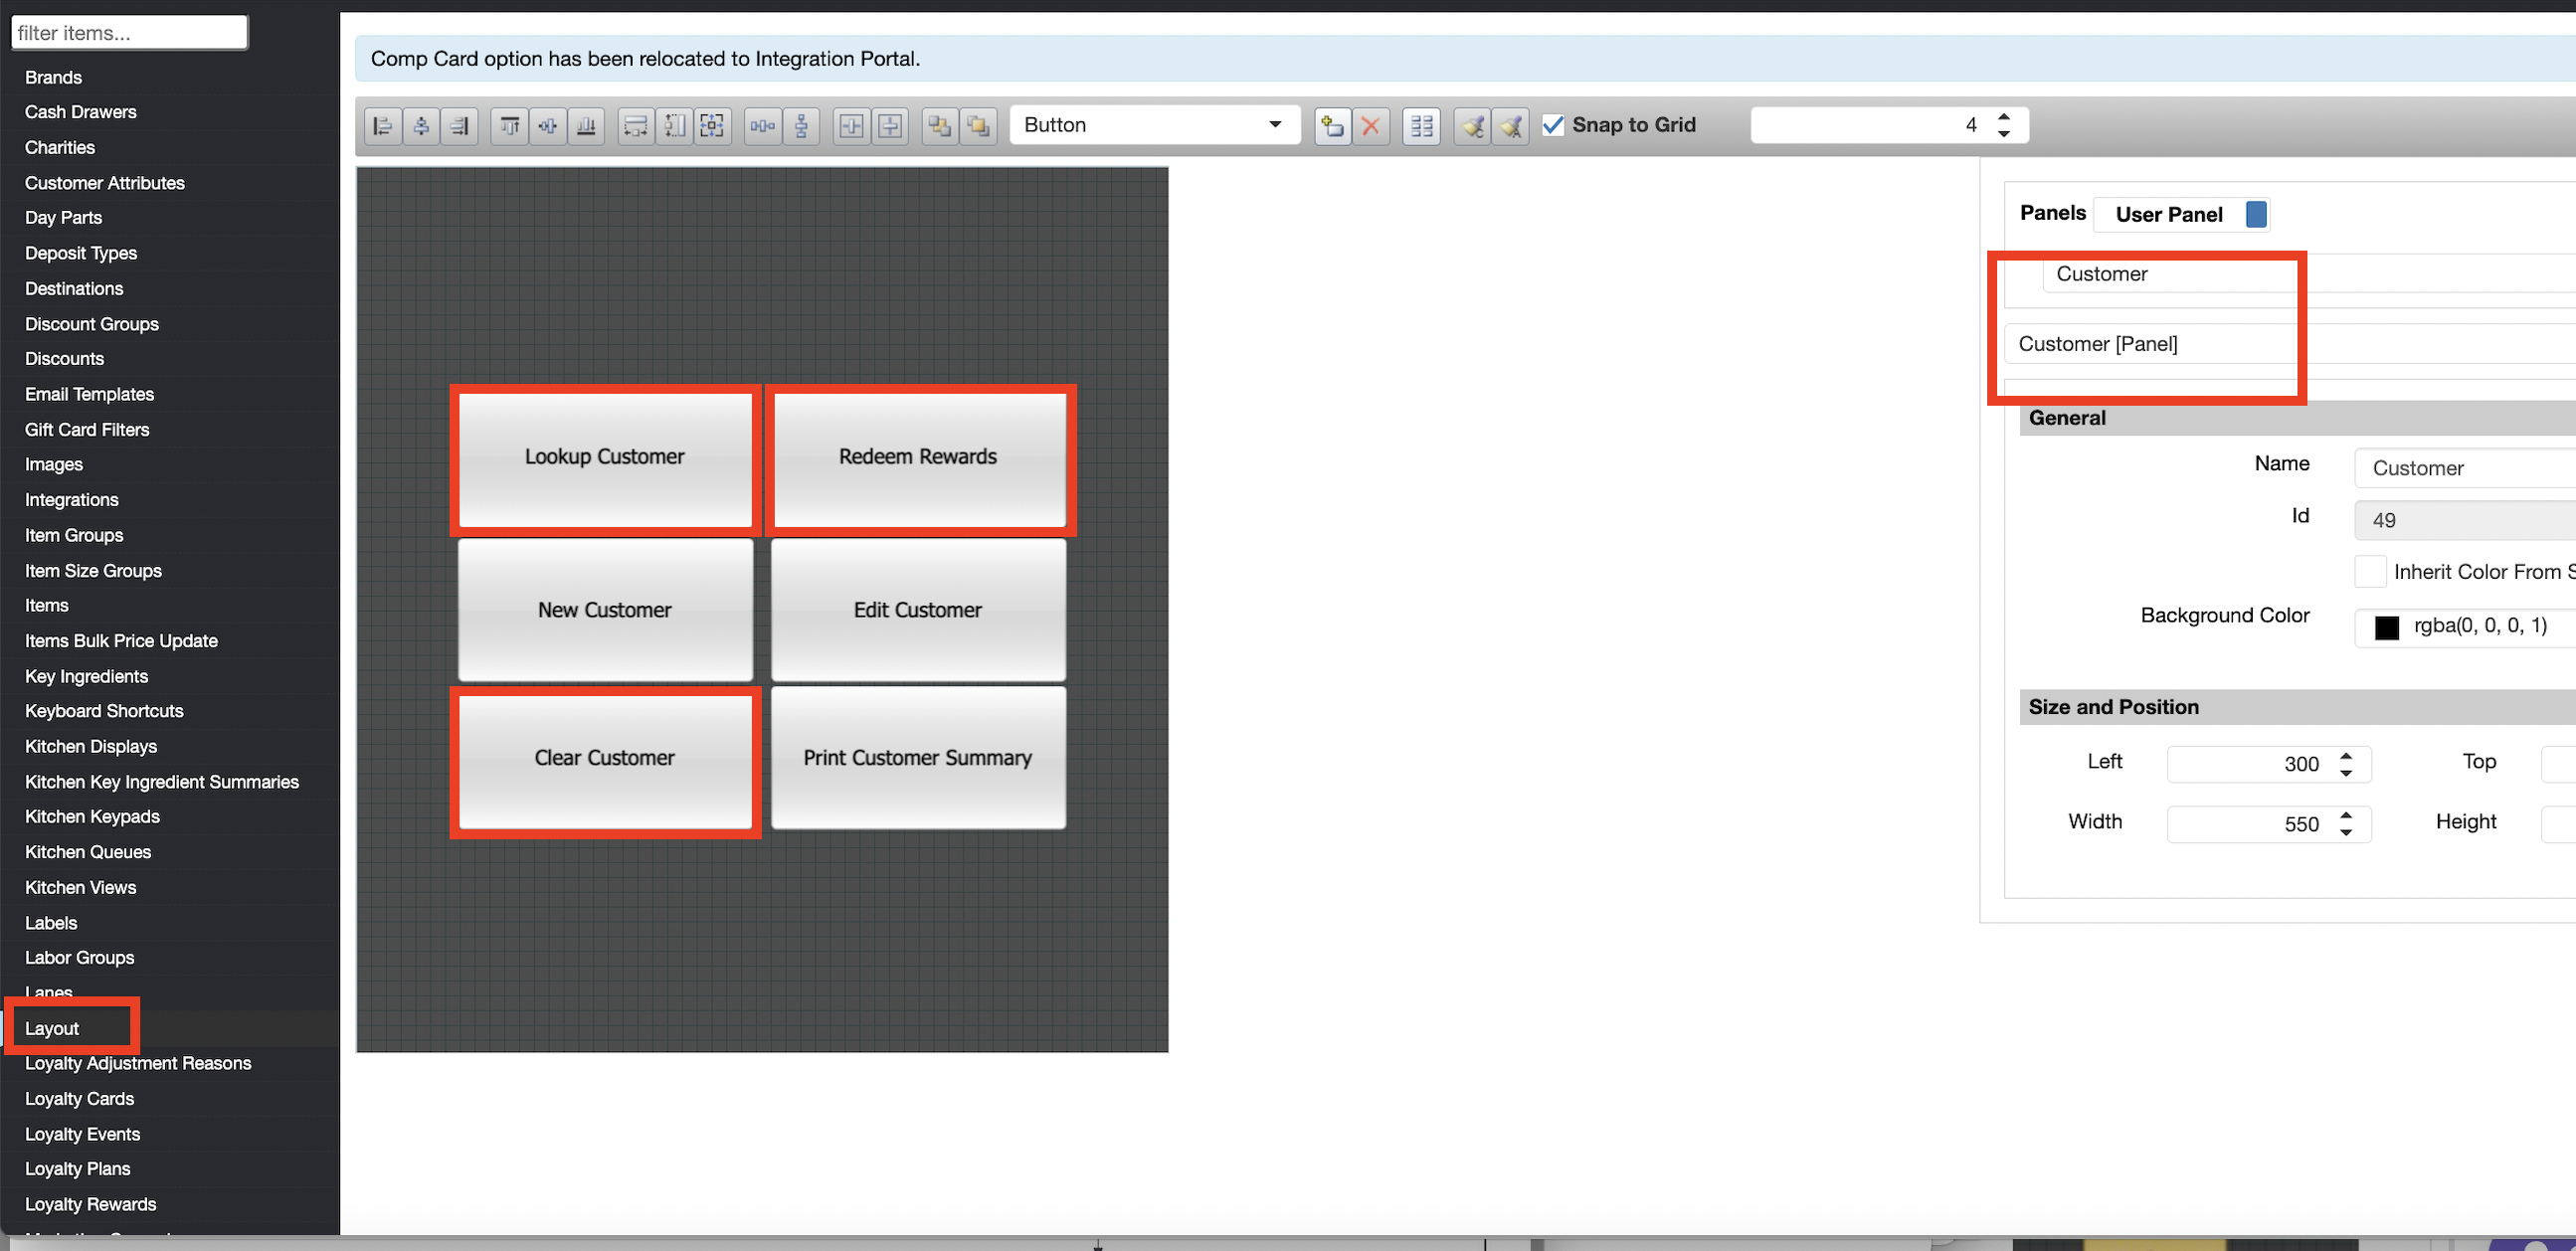
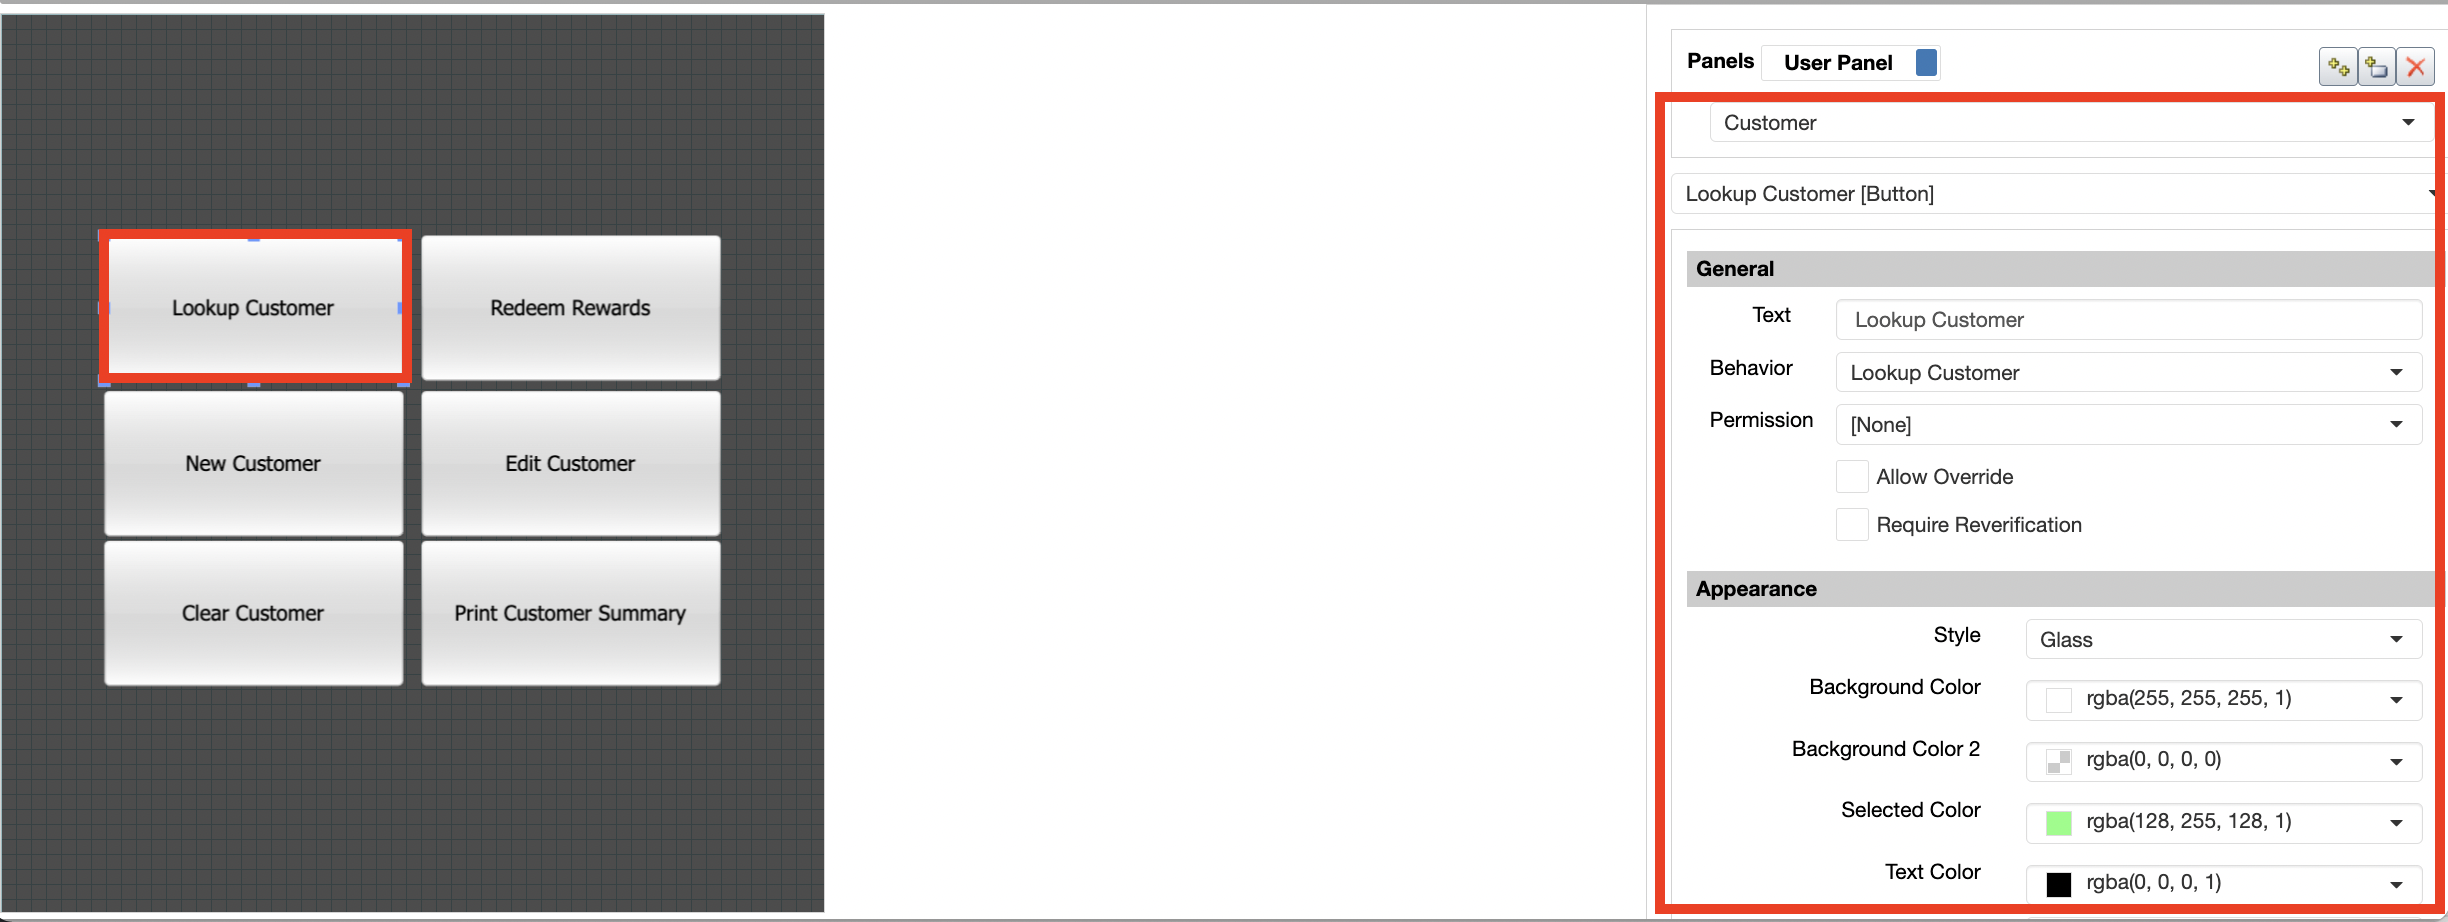
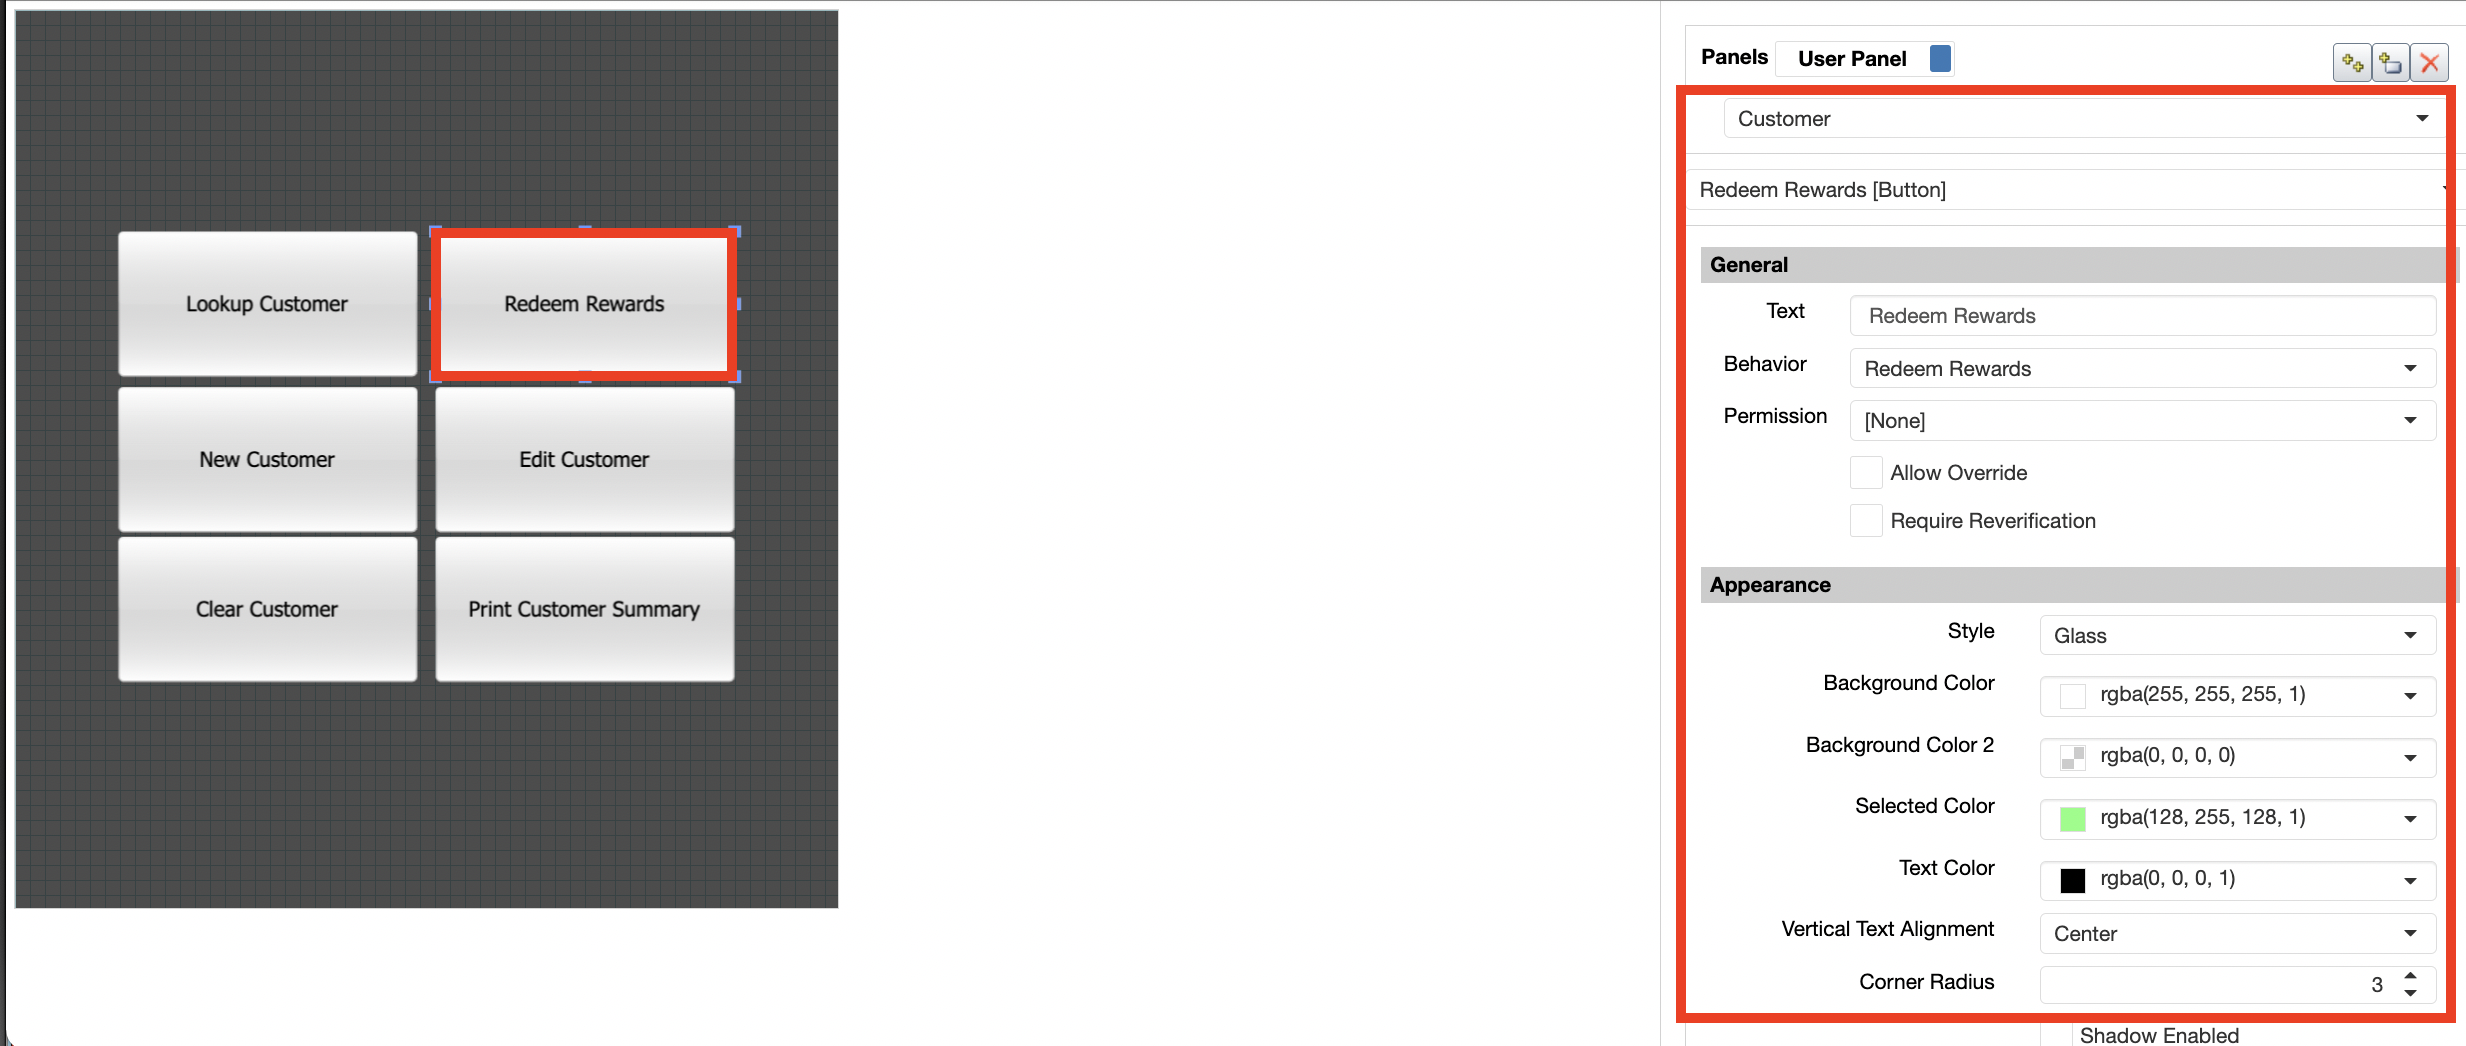
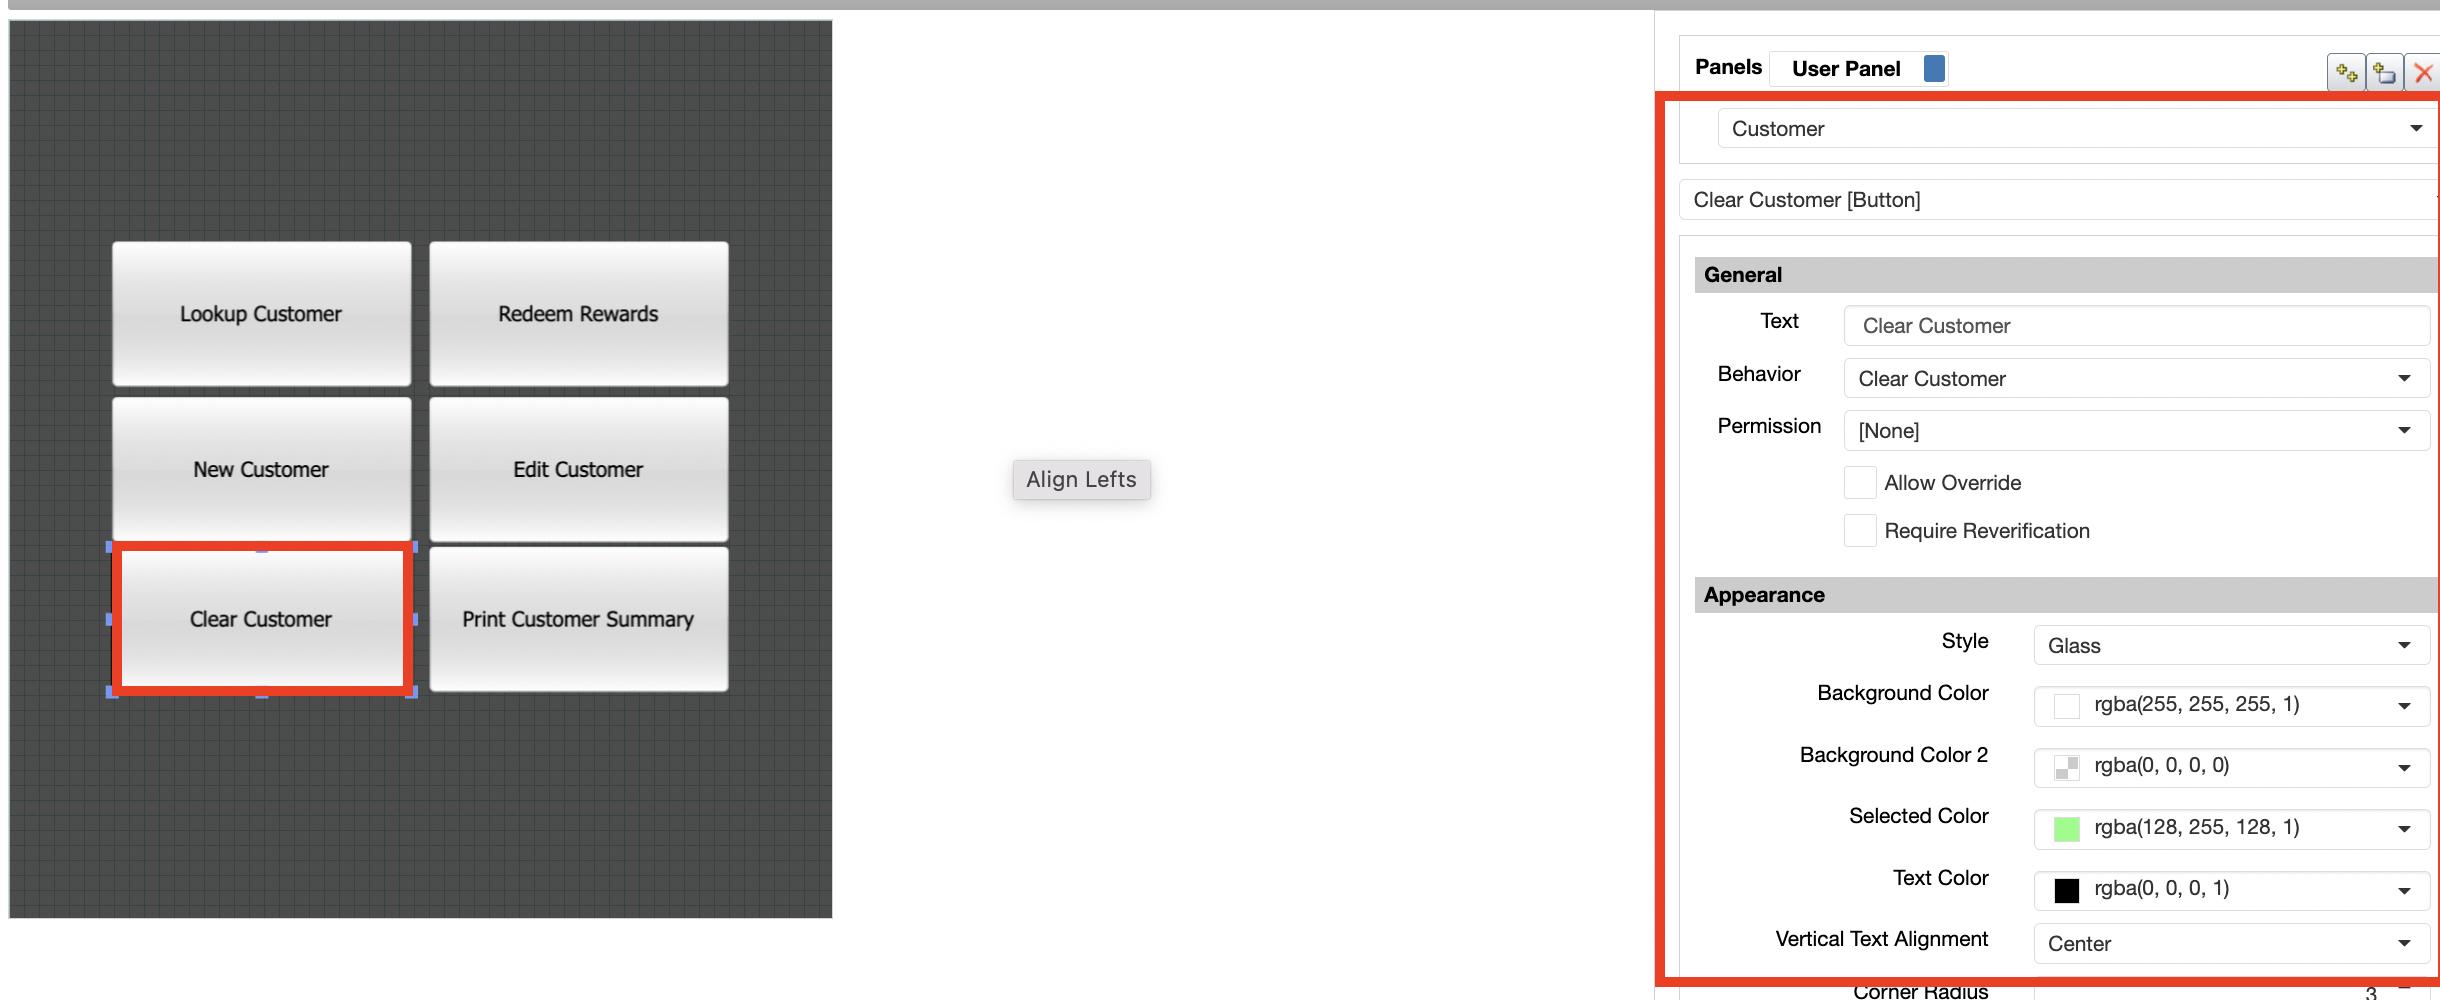
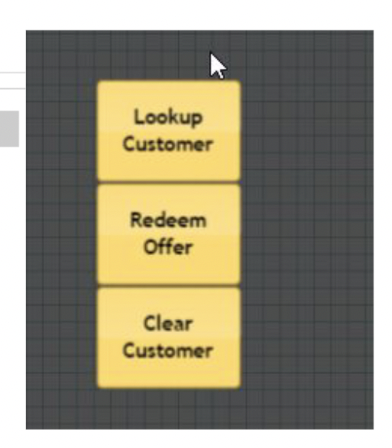
  1. Add the Loyalty buttons in the Layout setup: At the payment step, in order for the cashier to be able to look up the loyalty member, look up and redeem available rewards etc.,

    1. from the layout editor choose the right layout and add the following 3 buttons. These buttons may be already existing or may just need to be renamed. The example shown below is with the buttons added on the “Customer” panel.

      1. Lookup Customer

      2. Redeem Rewards (or Redeem Offers)

      3. Clear Customer

image-20240801-180534.png
  1. The example shown below is with the buttons added on the “Customer” panel. Please note that “Edit Customer” and “New Customer” button is not required.

image-20240801-175228.png

image-20240801-175456.png

image-20240801-175906.png
image-20240801-180507.png

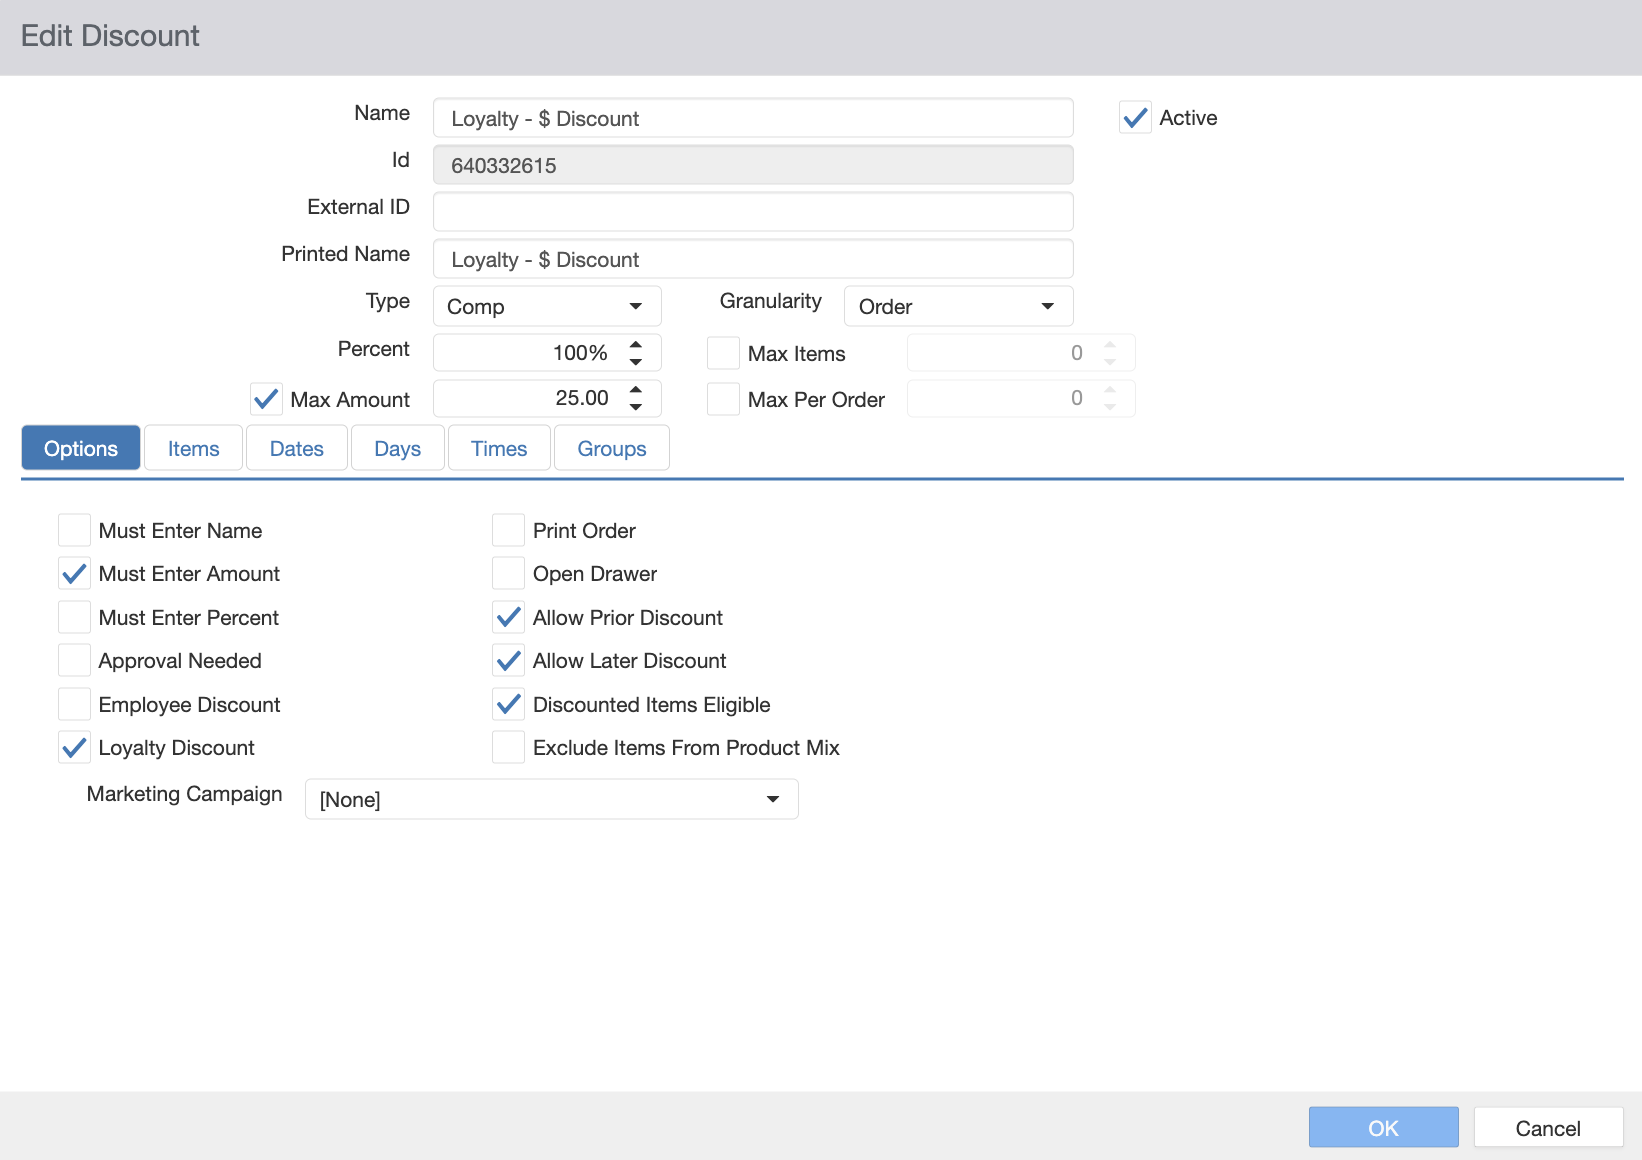
  1. Identify/Setup a discount to be associated with Spendgo: This could be an existing discount code or you can create a new one.

    1. If creating a new discount (Configurations → Settings Editor → Discount → Add New Discount)make sure the discount has the configuration as per the below screenshot. If using an existing discount then open it and make sure that the configuration matches this.

image-20240305-005849.png
  • Name:

    • <Name of the discount>

  • Id

    • Automatically assigned by Brink

  • Printed Name

    • Loyalty $Discount

  • Type

    • Comp

  • Granularity

    • Order 

  • Percent

    • 100%

  • Max Items

    • Leave the default value

  • Max Amount

    • Leave the default value

  • Max Per Order

    • Leave the default value

  • Options: Check the following boxes:

    • Active

    • Must Enter Amount

    • Loyalty Discount

    • Allow Prior Discount

    • Allow Later Discount

    • Discounted Items Eligible

  1. Enable the Spendgo Integration from the Integration Portal:To enable the integration

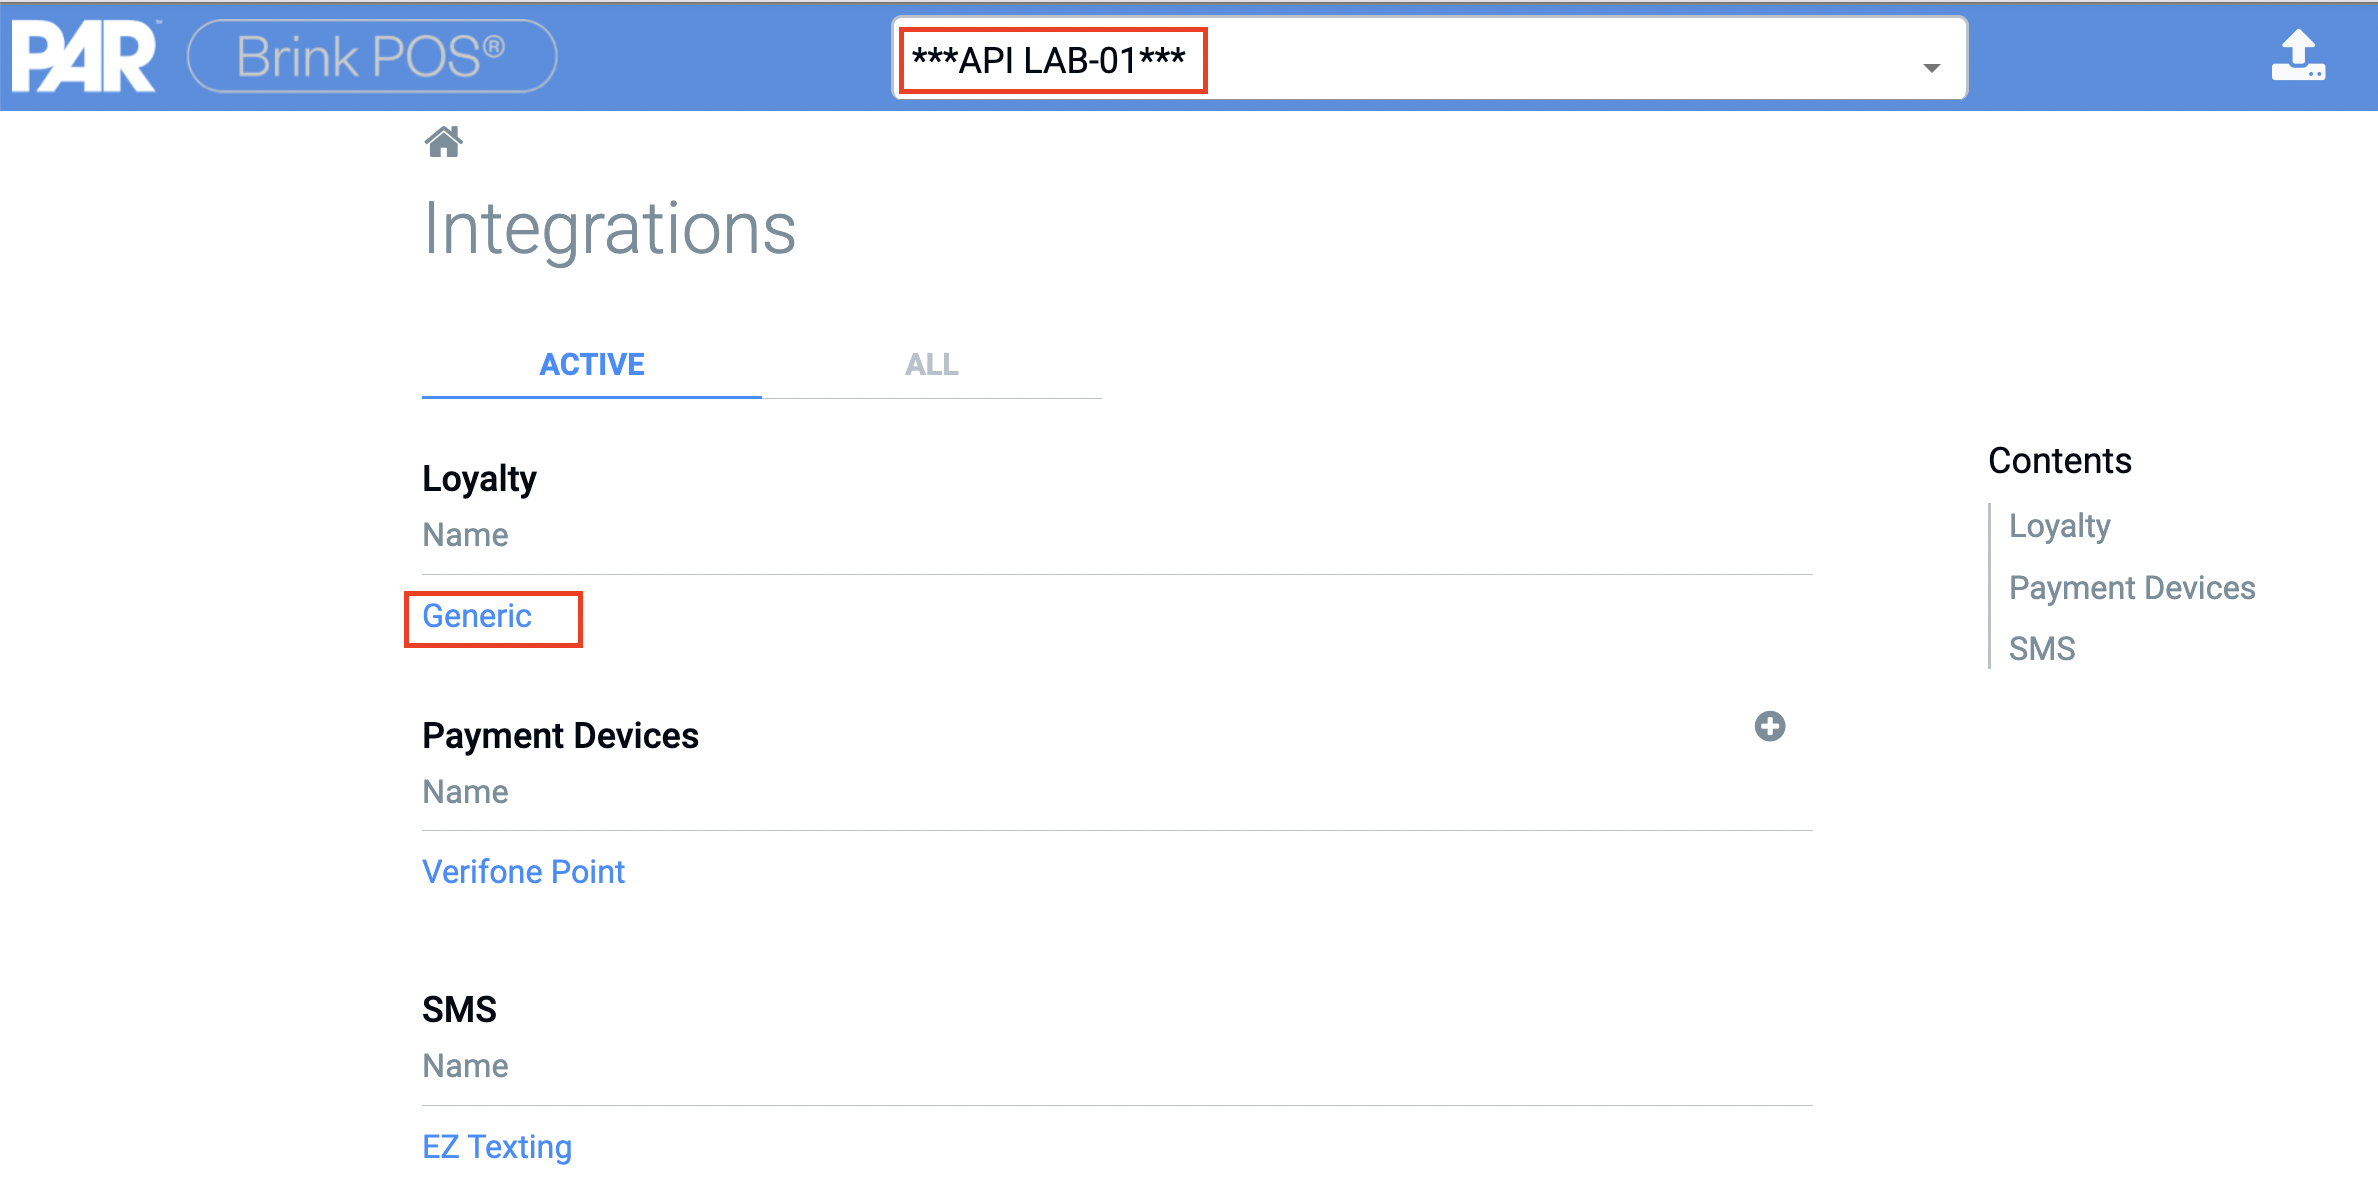
  2. From the Brink Admin Portal, navigate to Configurations → Integration Portal

  3. Select the location and click on “Generic“

image-20240305-013243.png

c. Setup the Integration as follows.
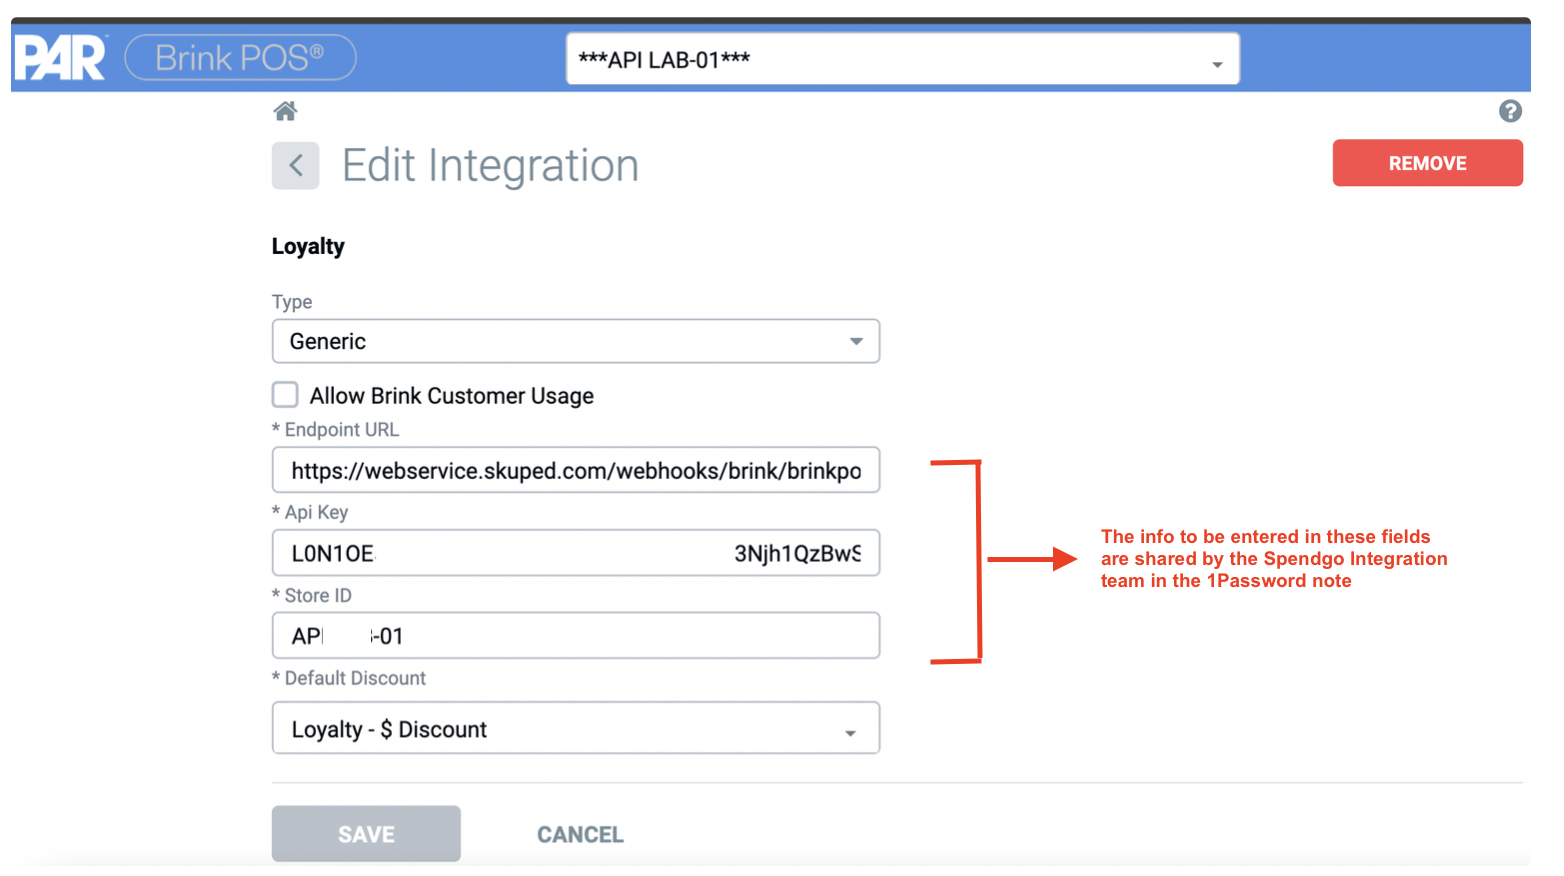
image-20240523-233850.png
  • Type:

    • Leave as “Generic”

  • Allow Brink Customer Usage

    • leave unchecked

  • Endpoint URL

    • Shared by Spendgo Integration team in the 1Password note

  • Api Key

    • Shared by Spendgo Integration team in the 1Password note

  • Store Code

    • Shared by Spendgo Integration team in the 1Password note

  1. Publish Configurations: Finally, publish the configurations in Admin Portal so that configuration changes are pushed to the POS stations. Integration should be enabled on the POS stations after this step.

Outcome

The integration setup is complete

Step 8: Verify the Integration

Task Owner

The Merchant

Procedure

After setting up the integration, quickest way to check if the integration is working is to do the Loyalty Member look up. Please refer to the “Loyalty Member Lookup” in the “Loyalty Flow” section below.

  • If the “Lookup Customer” button is showing and brings up the customer lookup window when clicked, enter a 10 digit US/Canada phone number. If it results in an error then there is an issue with the integration. Please report to Spendgo Customer Success Manager (csm@spendgo.com) and Spendgo Integration team (integrations@spendgo.com).

  • If the basic validation is successful and if this is the first location (preferably the lab store) inform the Spendgo Customer Success Manager. Spendgo Customer Success Manager follows up with the Merchant to complete the testing.

  • If this is not the very first location and the basic validation is successful, the completed orders should start showing up in Dashboard. Wait for a few orders to be completed on the POS stations inform the Spendgo CSM (csm@spendgo.com). Spendgo CSM can look up in the Dashboard that the orders are coming in and being processed correctly.


How to Disable the Integration

To Disable the integration, remove Generic Loyalty configuration from the Integration Portal.
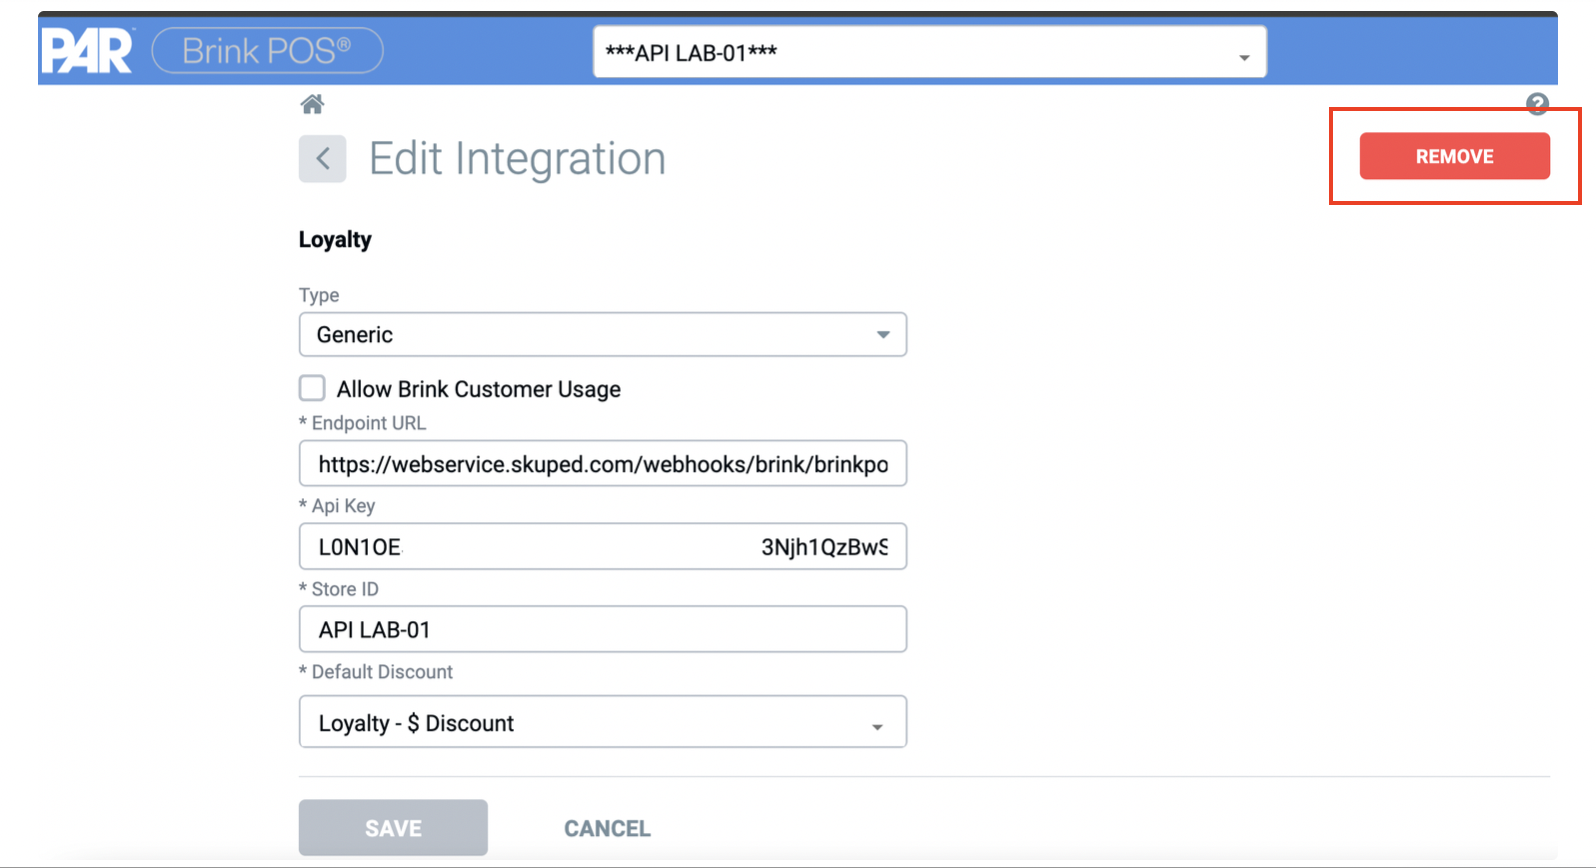
image-20240408-160128.png

Loyalty Flow

Loyalty Member Lookup

  1. Add items to the order

  2. Click on “Customer Lookup” and then click “Lookup Customer”
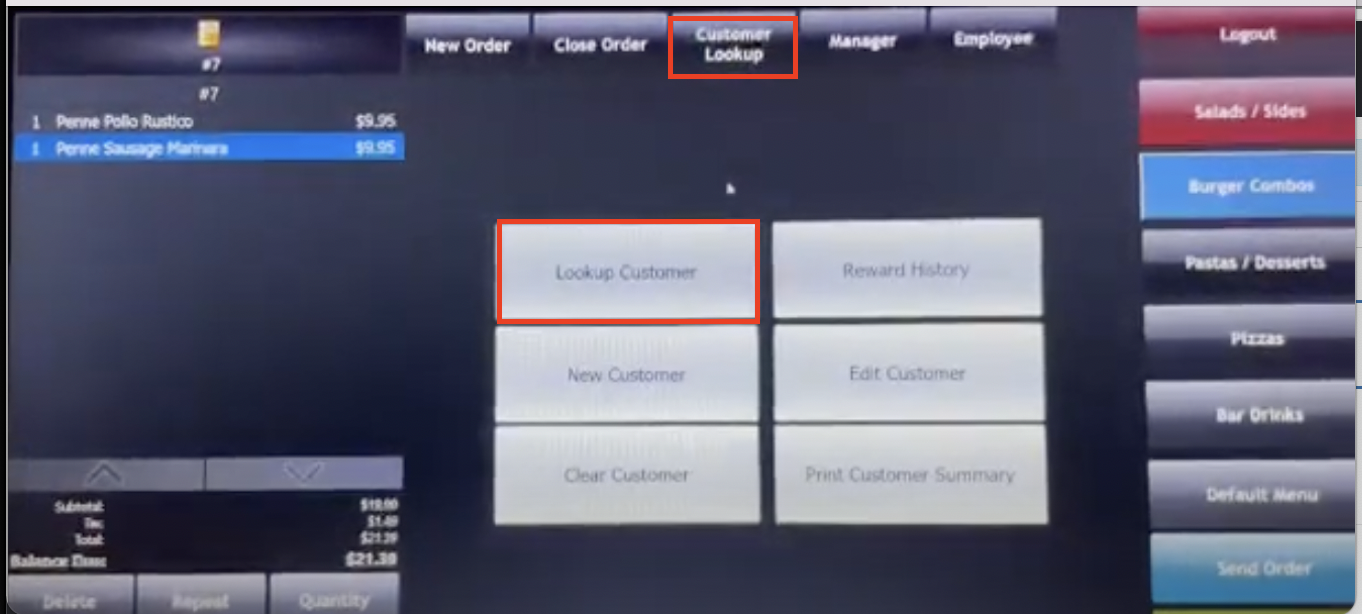
image-20240305-161454.png

  1. Enter the 10 digit phone number and click on Done. Please note that only looking up by Phone Number is supported.
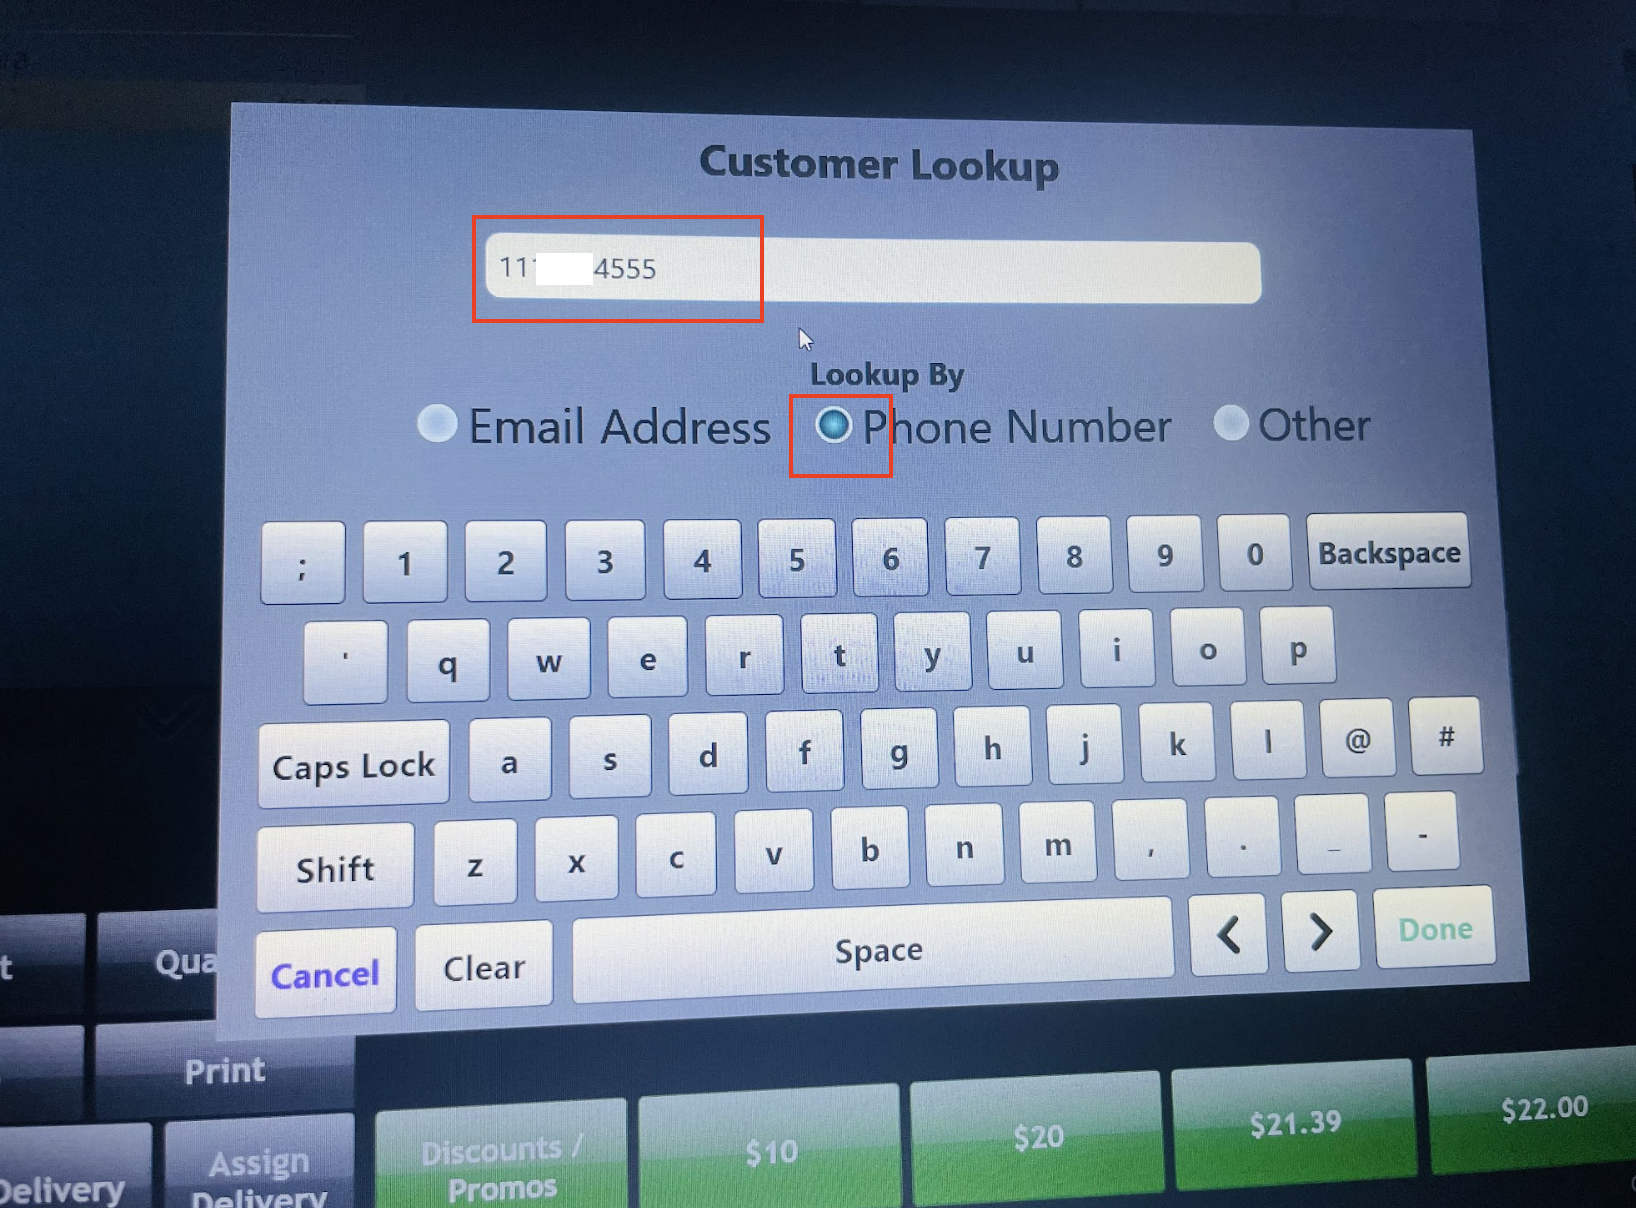
image-20240328-193102.png

  1. If an invalid phone number is entered (for ex: it is not 10 digits) then a “There was an error processing the user lookup!” message displays.

  2. If is is an existing loyalty Member, among the rewards available to the user, the ones that are applicable to the order are displayed for selection.
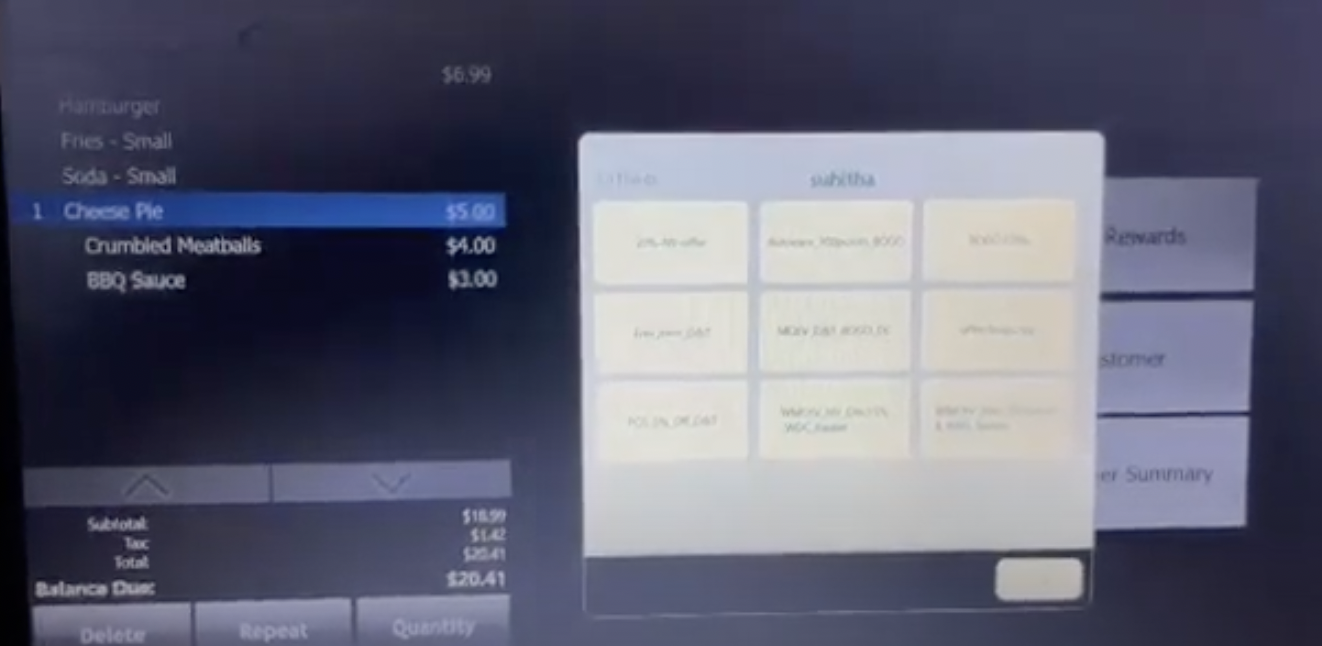
image-20240305-162235.png
  1. If if it is not an existing loyalty Member, a new “starter” Member is created. The Member will have to complete the registration process become the “Registered” loyalty member.

Applying a reward

  1. After the Member lookup, select the reward of choice from the rewards listed. The reward applies to the order and the updated order is shown.
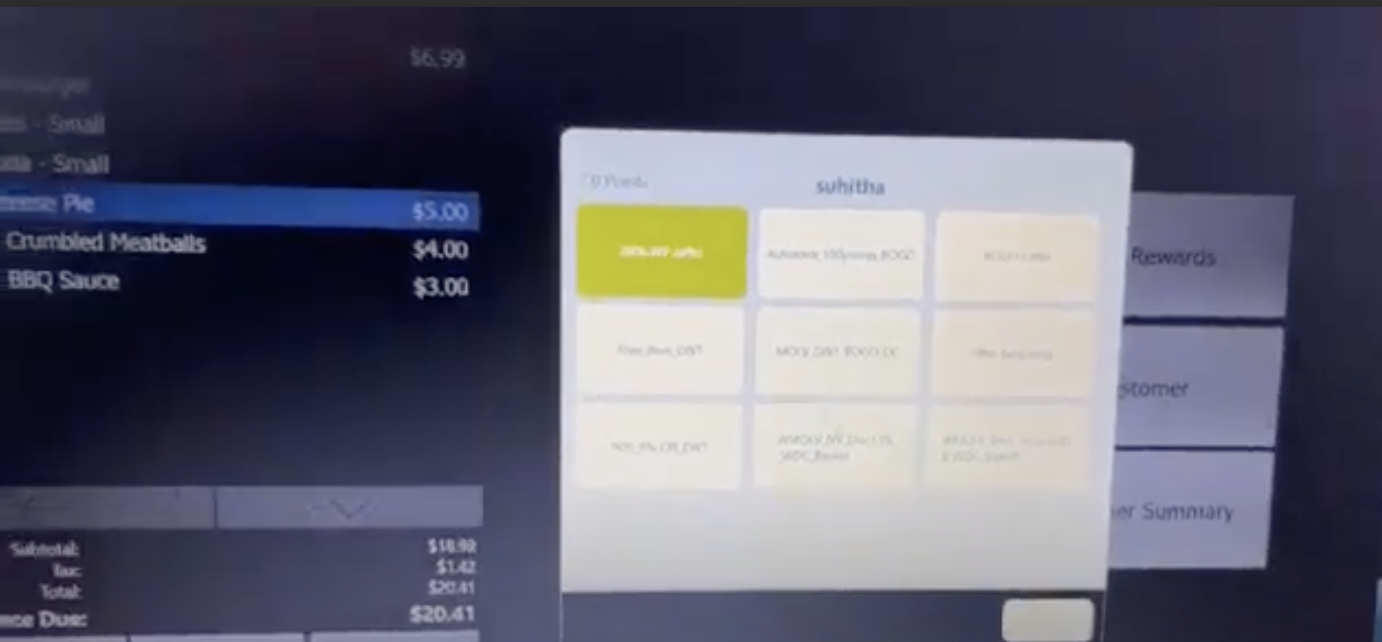
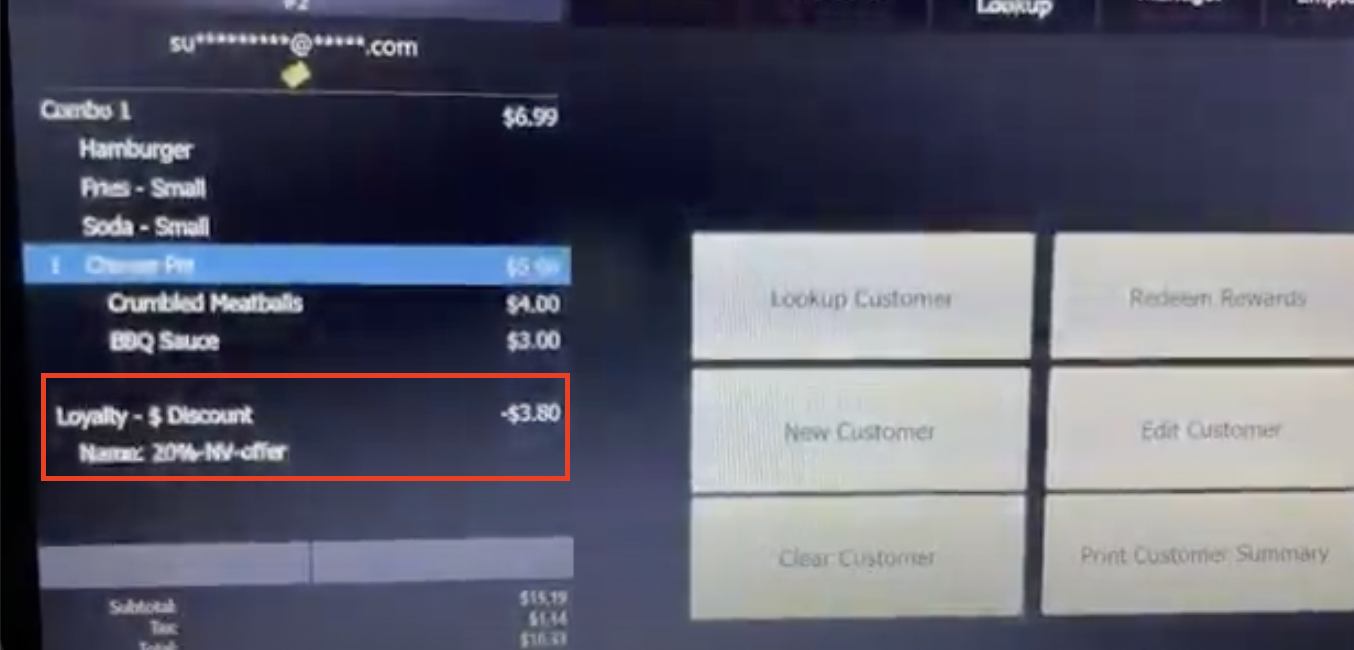
image-20240305-162628.png

image-20240305-162823.png
  1. Now close the order by completing the payment.

Updating the check after applying the reward

If the order is to be updated after applying the reward, the applied reward may no more be applicable or the order may qualify for some additional rewards. So, the applied reward is automatically removed. Re-look up and review and apply the rewards again.

Applying non Spendgo Discounts/Promo along with Spendgo Reward

  1. Please note that only one Spendgo reward can be applied to the order. However, additional non Spendgo discounts/promo can be applied along with Spendgo Reward.

  2. The order can have only one Spendgo Reward. It can also have only non Spendgo Discount/promo(s) or Non-Spendgo rewards can be added along with the Spendgo reward.

  3. Spendgo and non Spendgo Discount/Promo can be added to the order in any order.

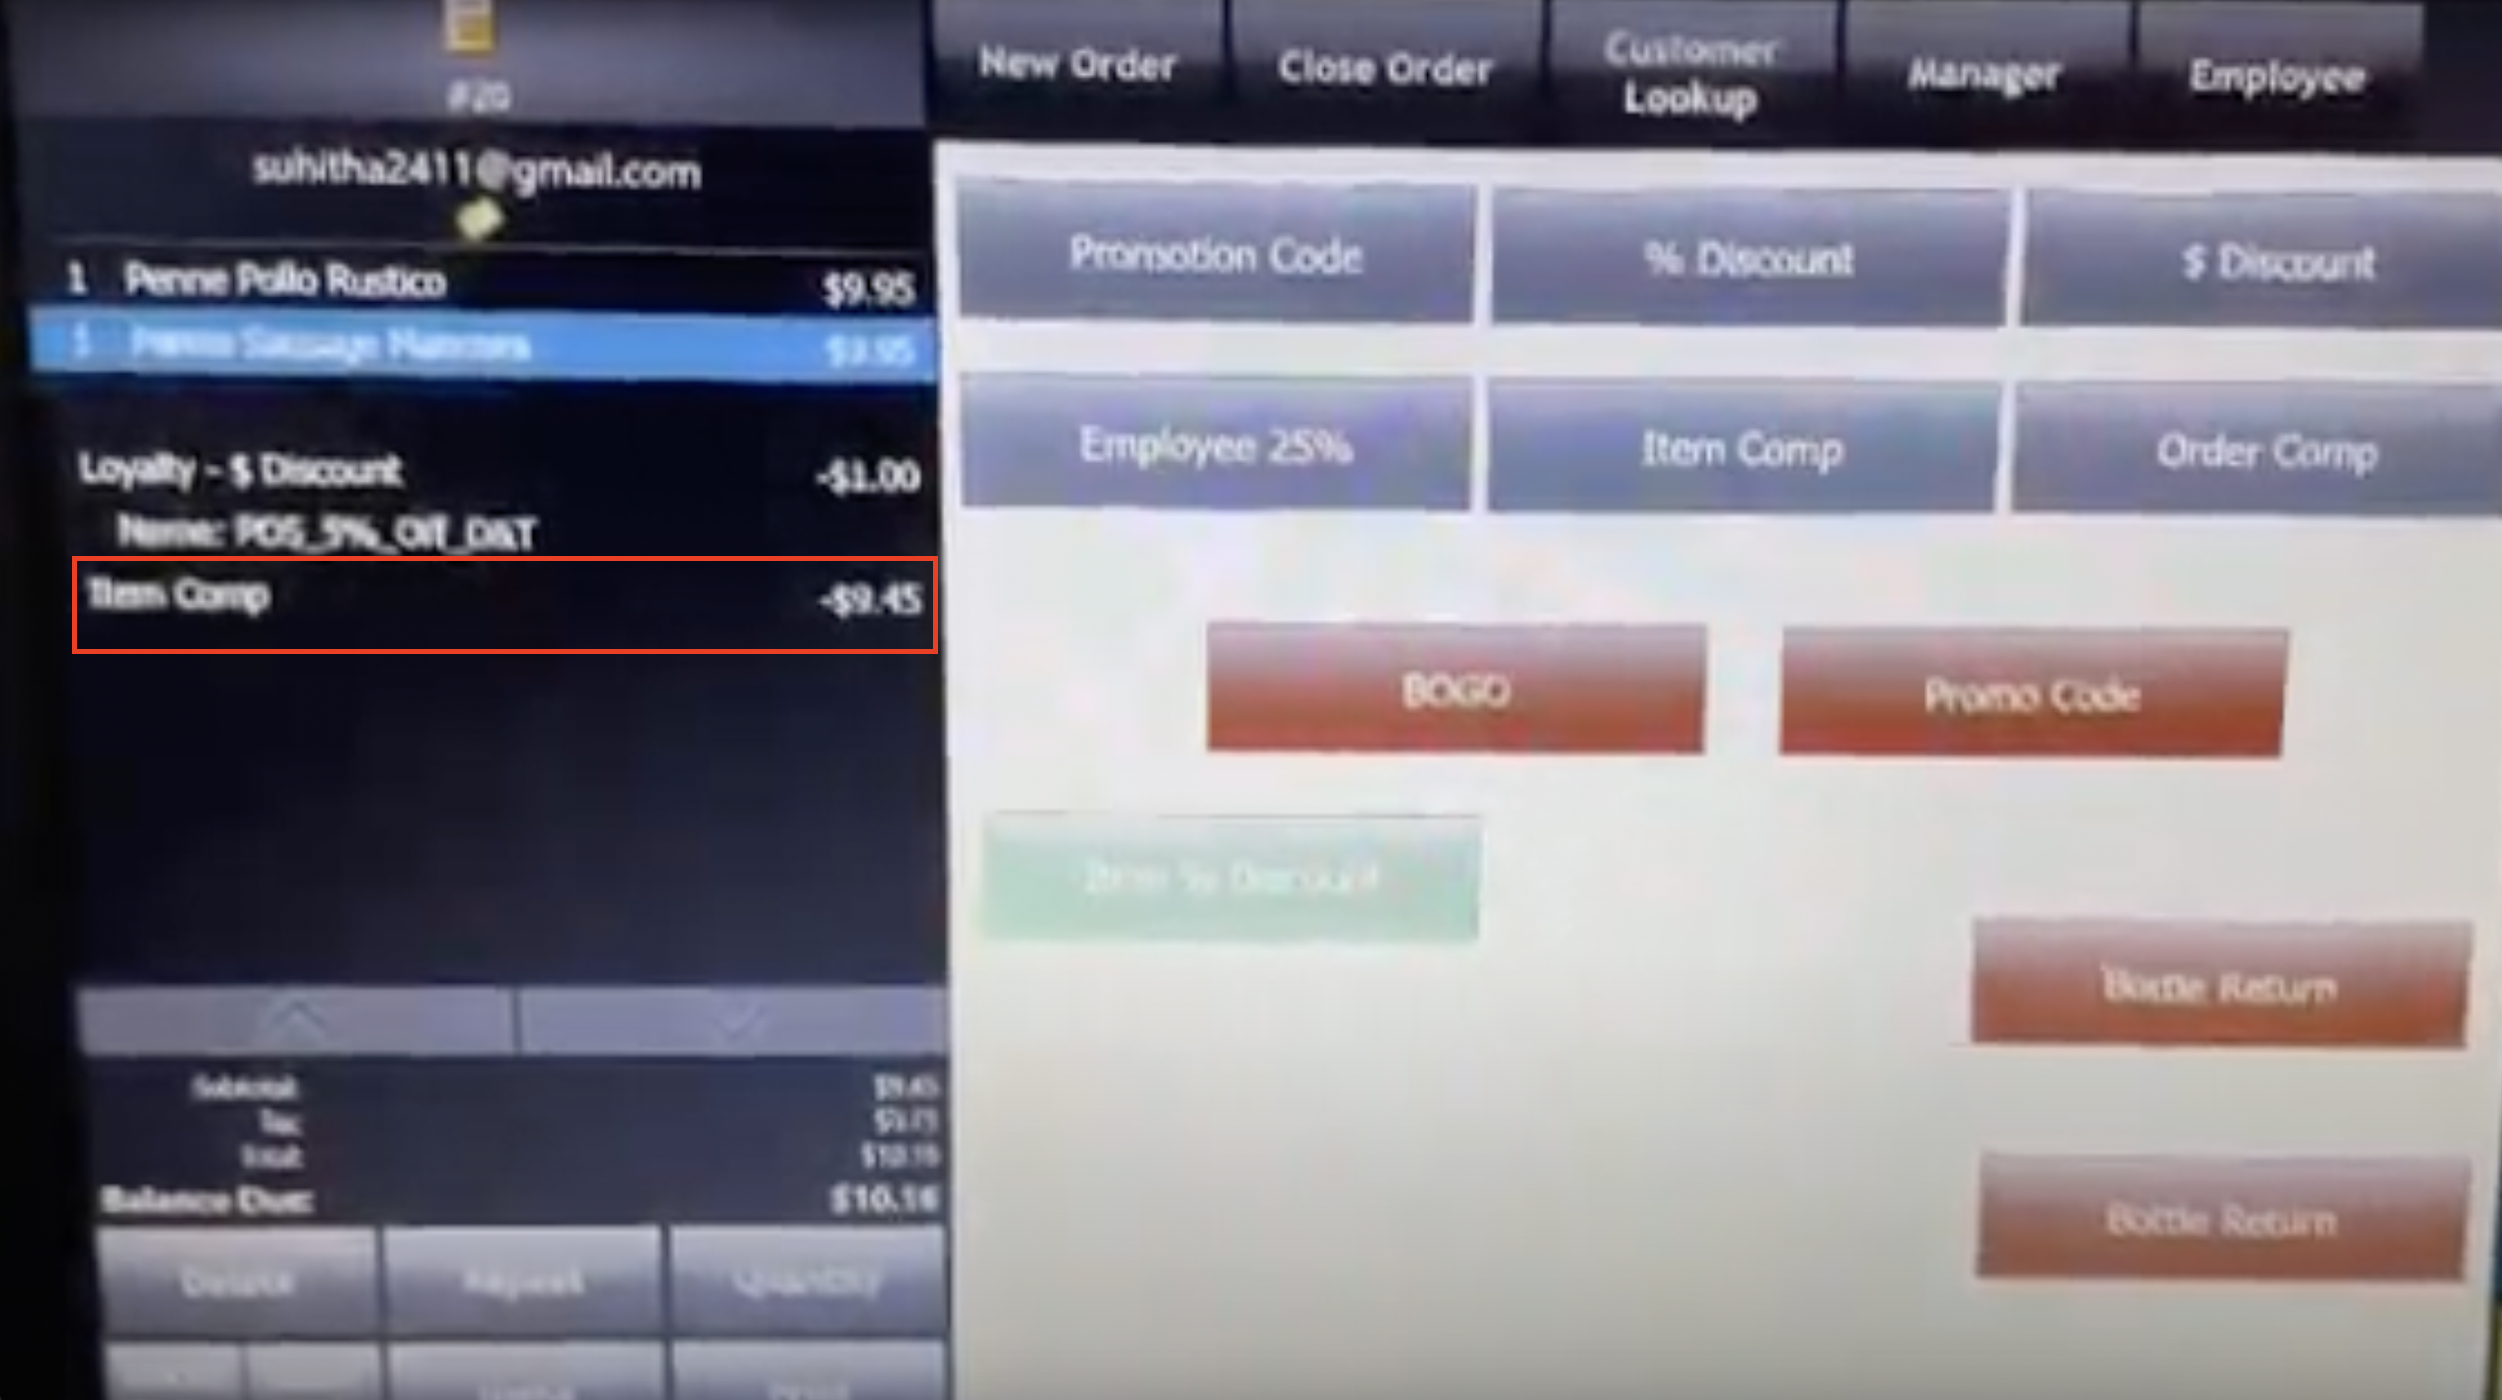
  4. In the below example, the Spendgo reward is added to the order first. After applying the Spendgo reward, click on the “Discount/Promo” button and select the discount to be applied.
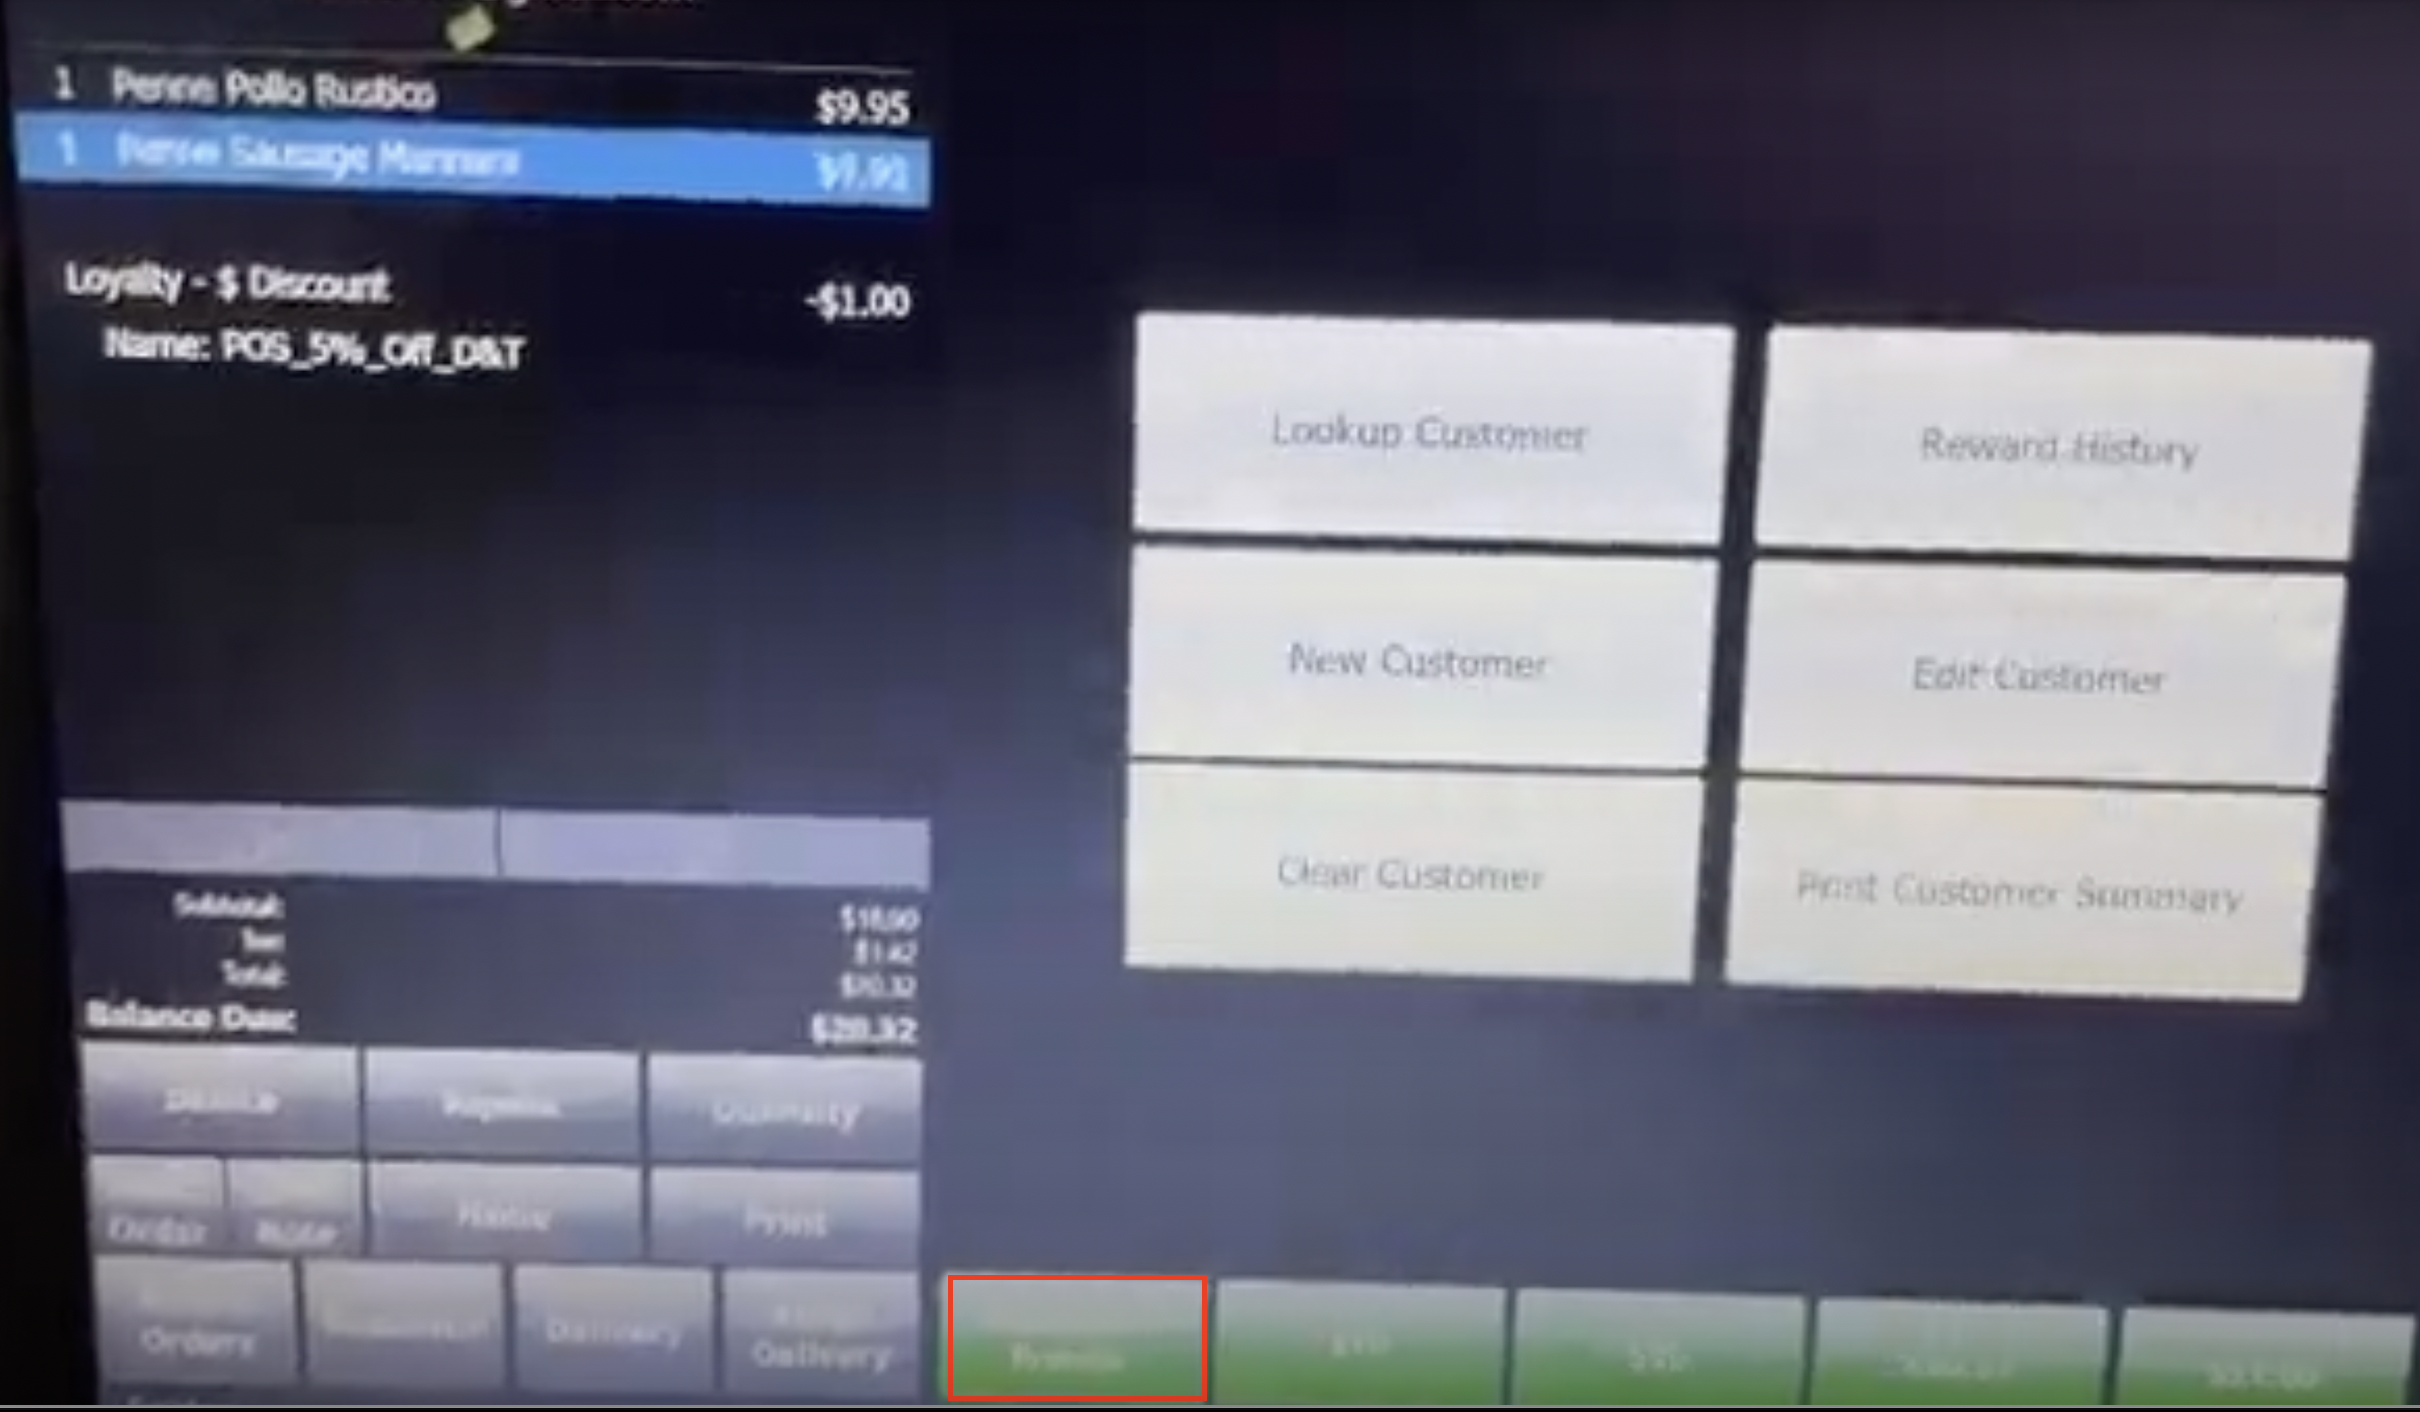
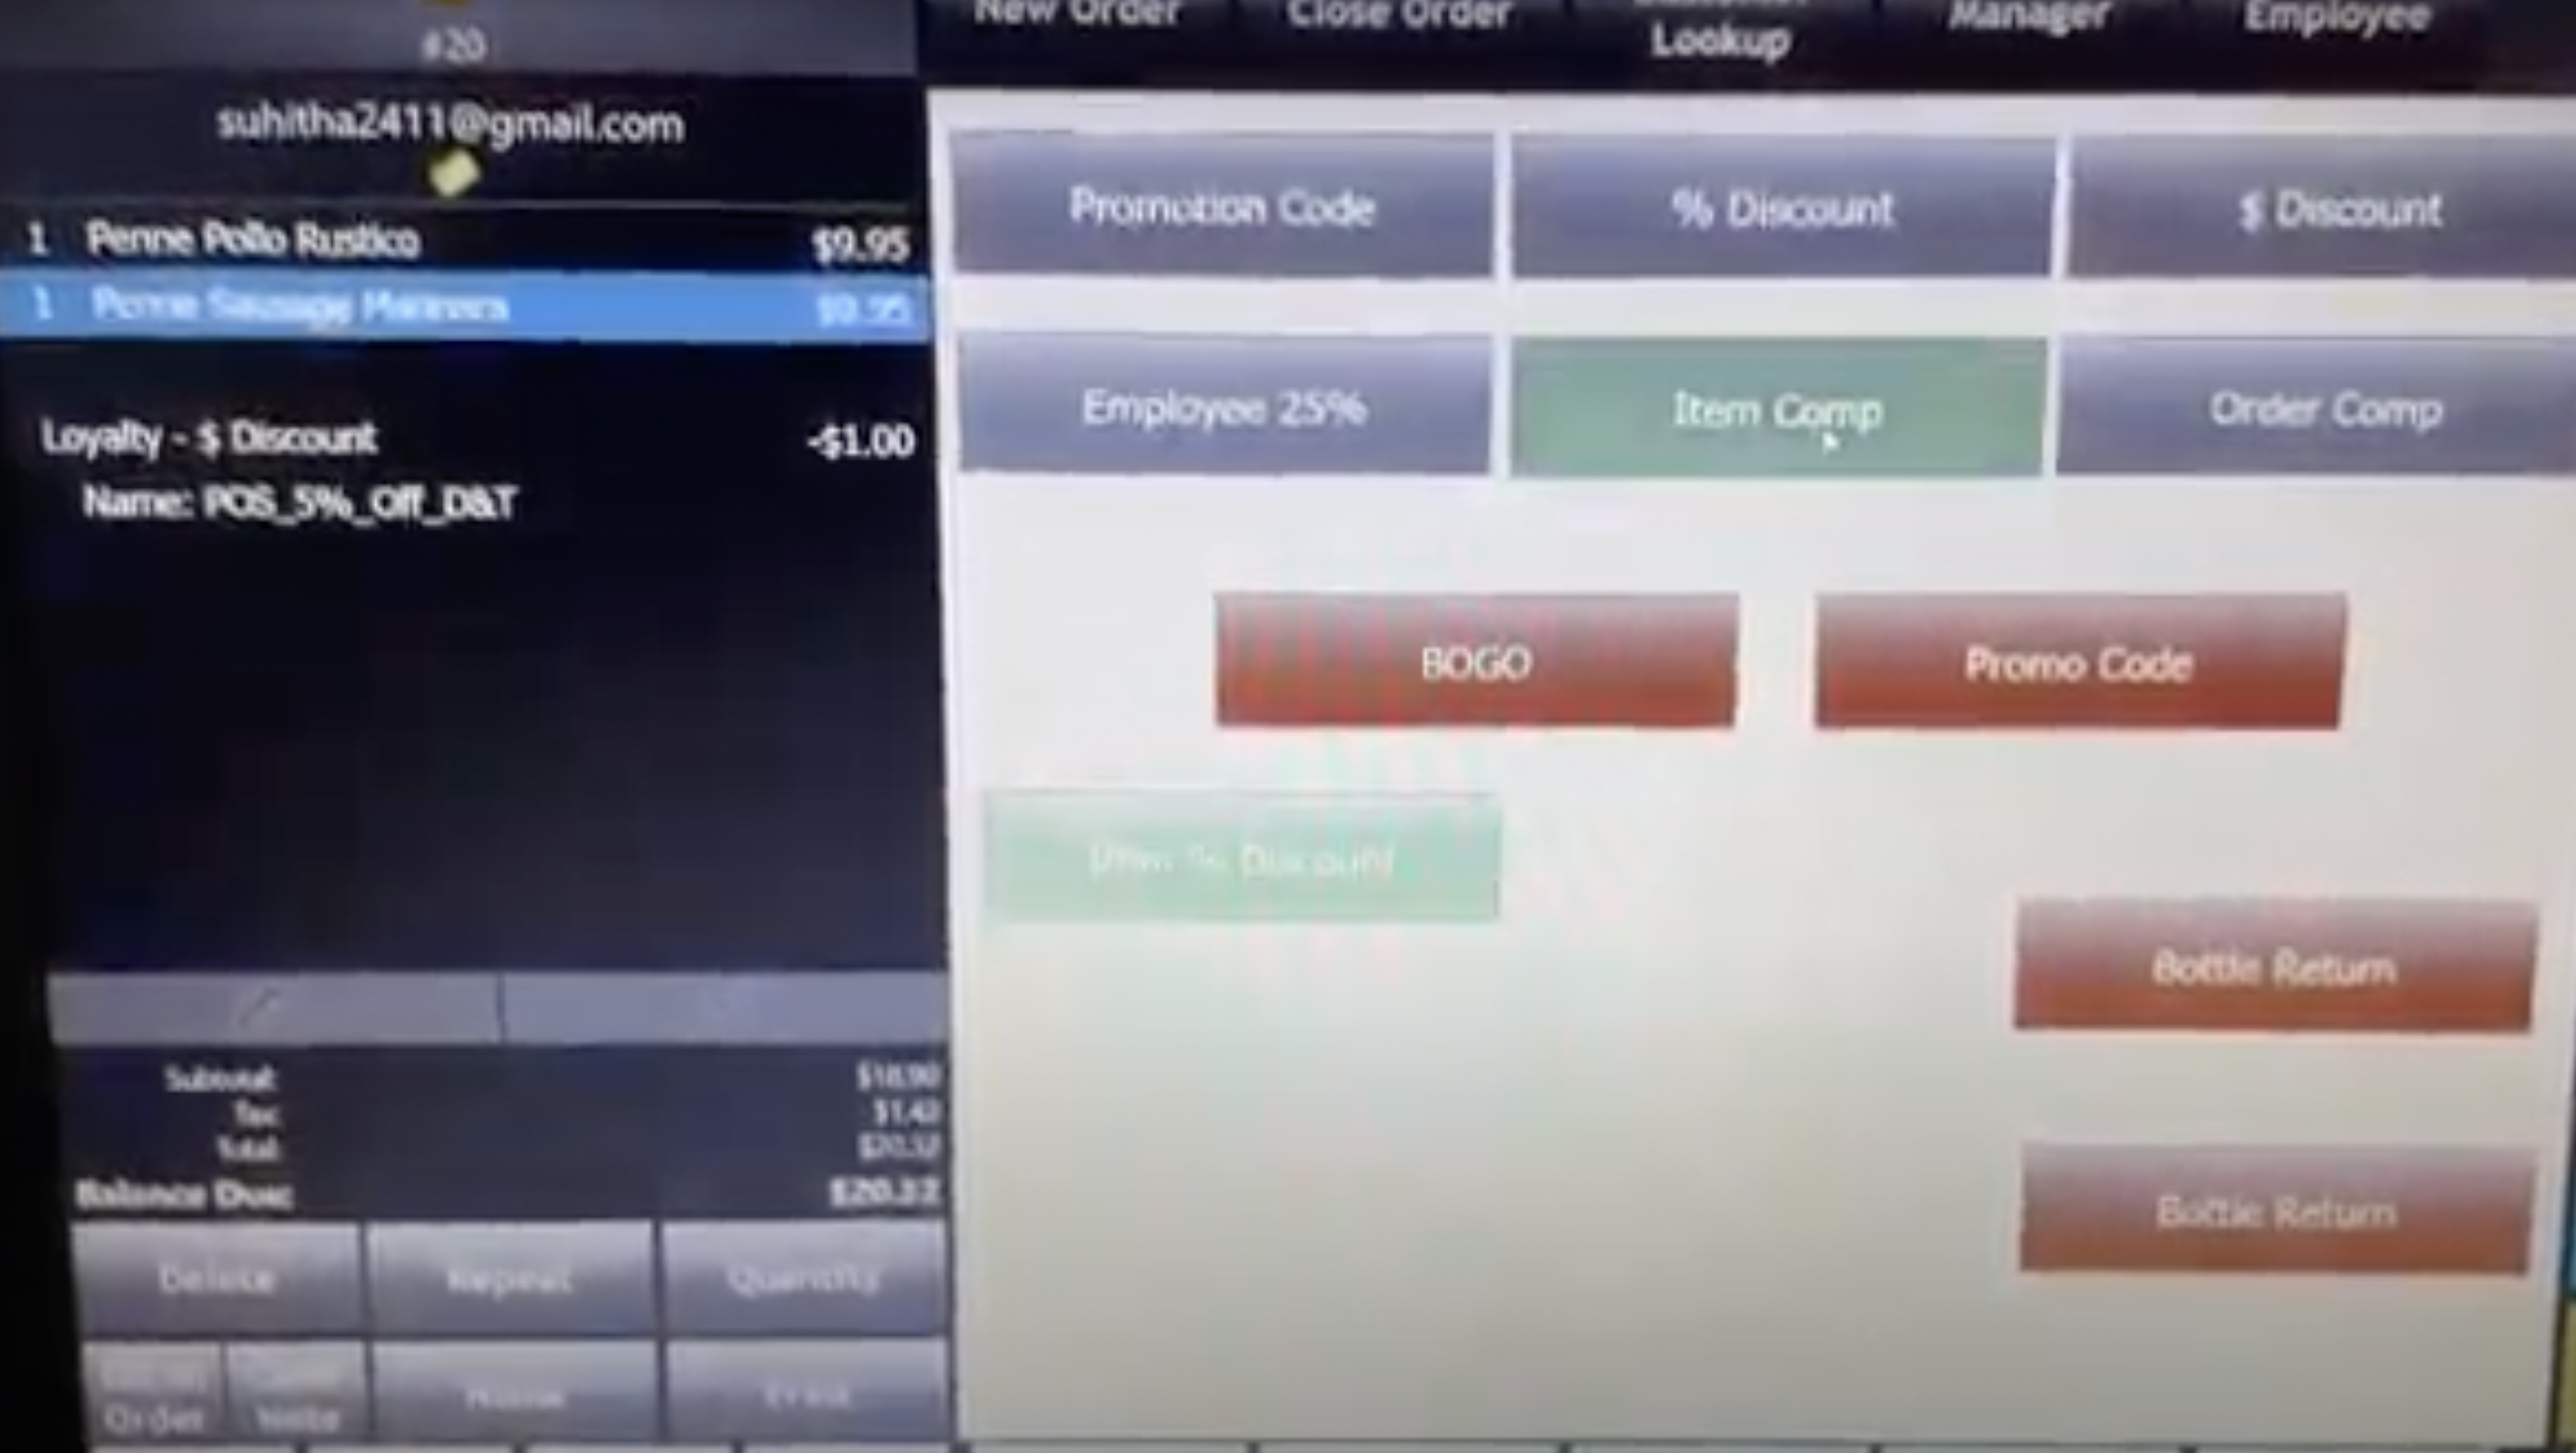
image-20240305-170205.png

image-20240305-170310.png
image-20240305-170553.png

Loyalty Reversal on Refunds

Process the order refunds using the normal refund process in the POS. When the order is fully or partially refunded, any loyalty applied on the order gets reversed.

JavaScript errors detected

Please note, these errors can depend on your browser setup.

If this problem persists, please contact our support.