Toast POS
1. About
 | Toast is a cloud-based restaurant management software company providing an all-in-one point of sale system built on the Android operating system. Launched Article Last Updated Category |
2. Integration Summary
Feature | Supported | Not Supported |
|---|---|---|
Ordering Channels |
| |
Spendgo Loyalty Features |
| |
Base Program Types |
|
|
Basket Level Rewards/Offers Types |
| |
Item Based Rewards/Offers Types |
| |
Rewards shown for selection |
| |
Discount code setup | A discount code is only needed if using an online ordering or third party in-store or payment platform integration which requires discount codes (such as Olo and Bbot)
 | |
Online and In-Store Ordering Platforms |
| |
** At the Koisk the Member can lookup by Phone No or scan a QR code(Requires Spendgo ID (version 2 or later) to be available as a scannable QR Code.)
3. Things to Know
Refunds: Refunds are supported only for the same day orders.
Processing Refunds or updates to a closed order: Here is what happens when a completed order is reopened for update or refund.
Action | Loyalty Processing |
|---|---|
Order is fully refunded | Loyalty on the order is revered.
|
Order is partially refunded | Partial loyalty reversal is not supported in Spendgo. Partial refund is also treated same way as the full refund. In order to keep the loyalty on the partial refund to be processed correctly, it is recommended to fully refund the order and create a new order with the updated order details. |
Order is updated |
|
When an order is fully or partially refunded, the points accrued on the order will be canceled and any Spendgo Rewards applied will be added back to the Member’s account. It is recommended to “Void” the order and create a new order.
Stacking of multiple Spendgo rewards are not supported
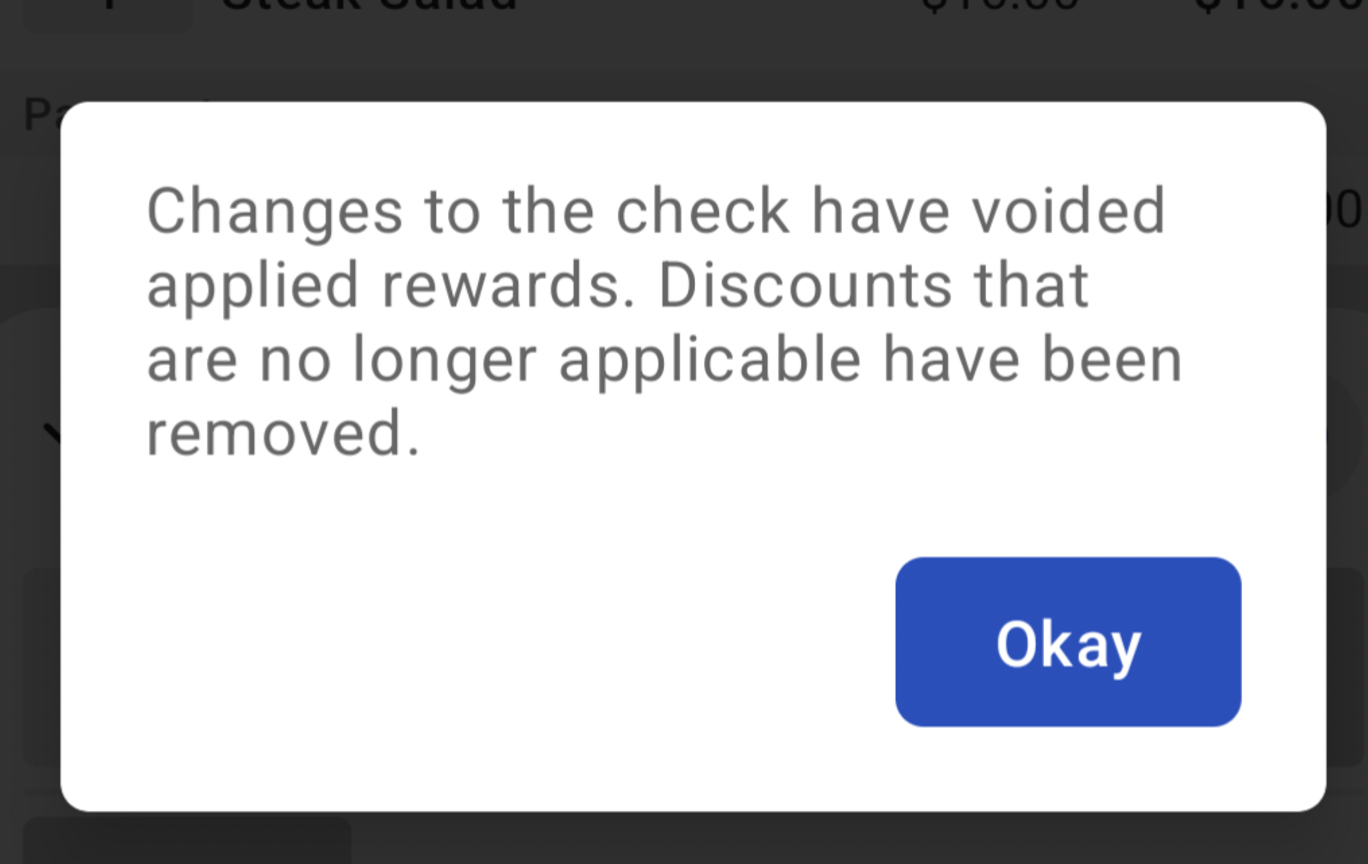
Please note that the Toast UI allows applying multiple Spendgo rewards to an order but if you try to place the order with multiple rewards applied, an error message is displayed and the applied rewards are removed. A reward will have to be re-applied before placing the order.
Handling of Combo Menu items: When a combo menu item comprising of other items in the menu is created,
The combo item price is attached with the main combo item and all sub items prices are all rolled up into the combo.
The item based reward can be created based on the Combo item name.
Individual items within the combo and their prices do not come into Spendgo from Toast separately and hence do not show up in the Dashboard receipt.
If an item based reward is defined on a menu item, the reward is applicable only when the item is on the order individually, not when it is part of the Combo.
Handling of priced modifiers
The price of any priced modifier is not rolled up into the price of the main item. The main item and the modifier prices come into Spendgo from Toast separately.
Toast does not allow any priced modifier to be added to the item free of cost.
Double counting of transactions when Spendgo integration is enabled both in StoreFront and Toast POS at the location.
The order sent by Storefront and Toast have different orders IDs and hence gets created as separate orders in Spendgo.
As of now, only Member orders are supported in the Storefront integration. When the same orders come through from Toast, it comes in as a Guest orders. So, even thought order is counted and shows in the Spendgo Dashboard twice, this does not result in double awarding of points to the Member (Unless the Member actually also goes into the Member portal and make a loyalty claim on the Toast receipt).
However, since the orders are counted twice - this causes over-reporting of sales and orders counts.
Discount Code:
When the location specific discount code set up in Toast, If the discount code is not correctly mapped in Olo, it will result in the below error showing up when the Order is placed from Olo.

This error needs to be reported to Olo.
Order ID Format:
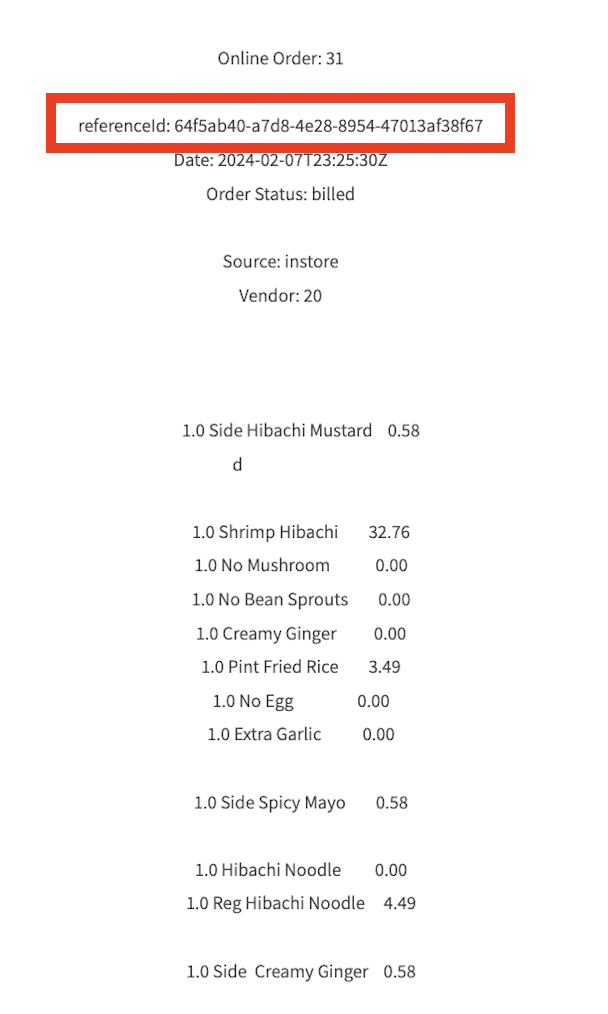
Toast orders show up with a short (1-4 digits) ID. The short IDs are not unique to Toast. However, you can identify it as a Toast order by opening the Receipt View and looking up the “ReferenceID” in the GUID format, as shown below.

4. Integration Setup
4.1 Requirements
Ensure Toast and Spendgo accounts are fully set up. A Spendgo Customer Success Manager will inform you when your Spendgo account is ready to enable loyalty with Toast.
If migrating from Toast Loyalty or any other third party loyalty vendors to Spendgo Loyalty, ensure all locations in the Toast Loyalty group are ready to migrate.
Toast does not allow different locations within the Loyalty group to have different loyalty vendors.
Ensure that there are no unpublished changes in the Toast Admin Portal.
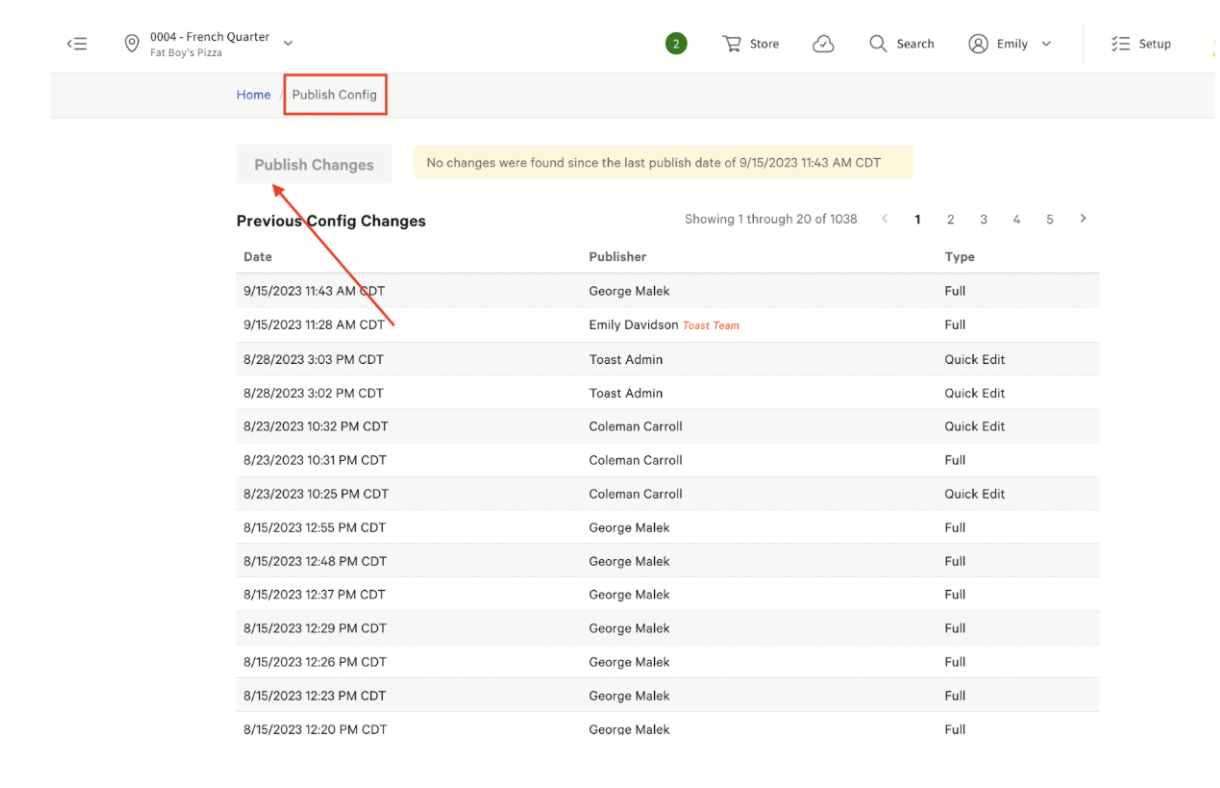
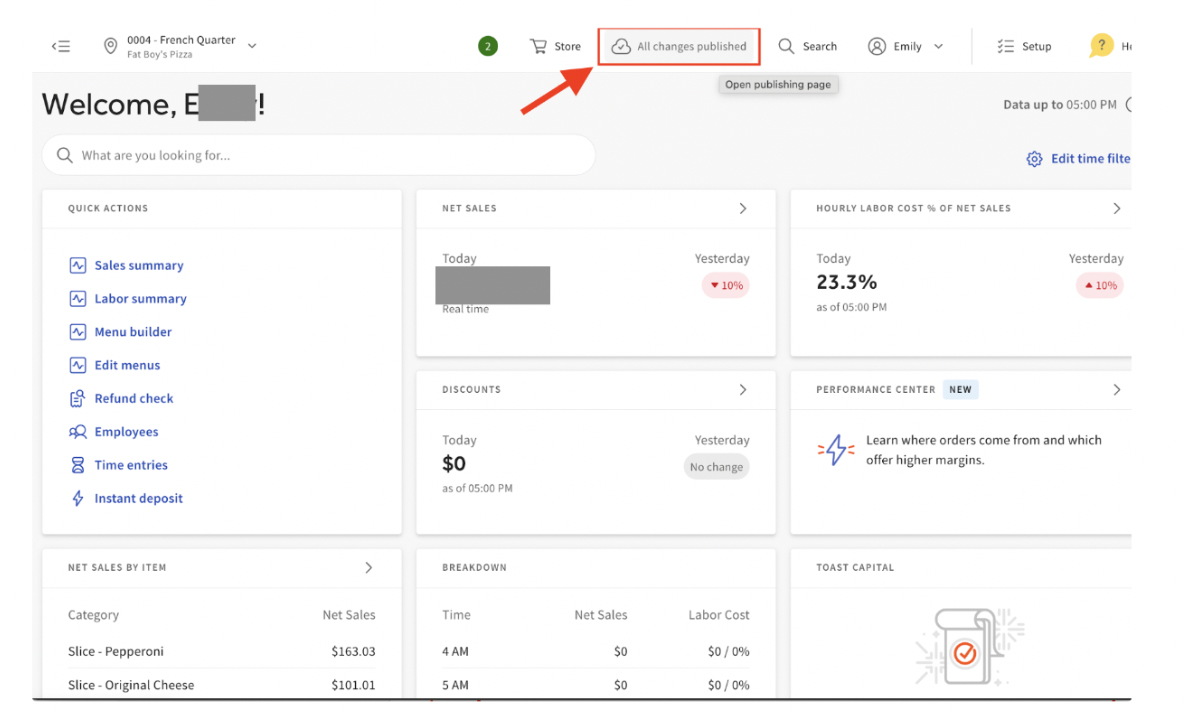
If using Olo or Bbot for online ordering:
Ensure that the Toast integration is enabled on Olo or Bbot.
Ensure that the discount code is setup in Toast and shared with Olo and Spendgo.
Please refer to Toast Documentation for setting up the discount code.
4.2 How to Enable the Integration
As part of the Account setup or when ready to enable the integration, Spendgo Integration team sets up the Loyalty POS API credentials in Spendgo.
Once Spendgo confirms the account is setup, Merchant sends an email request to Toast and Spendgo to enable the integration using the email template below.
To: | |
Cc: | |
Subject: | Authorization to Enable Spendgo Loyalty Integration |
I grant Toast permission to grant Spendgo with API access to my Toast instance for the following locations: (list location names as they appear in Toast) | |
4.3 If Disabling the Integration
Send an email request to Toast and Spendgo to disable the integration using the email template below:
To: | |
Cc: | |
Subject: | Authorization to Disable Spendgo Loyalty Integration |
I grant Toast permission to revoke Spendgo with API access to my Toast instance for the following locations: (list location names as they appear in Toast) | |
Toast Integration Support team enables/disables the integration and informs the Merchant and Spendgo (integrations@spendgo.com, csm@spendgo.com) the Toast GUID of the locations that are enabled/disabled.
When the email is sent to integrations@spendgo.com, it automatically creates a Toast Central ticket. Spendgo is copied on the ticket but has no access to the ticket to track all the updates happening on the Ticket.
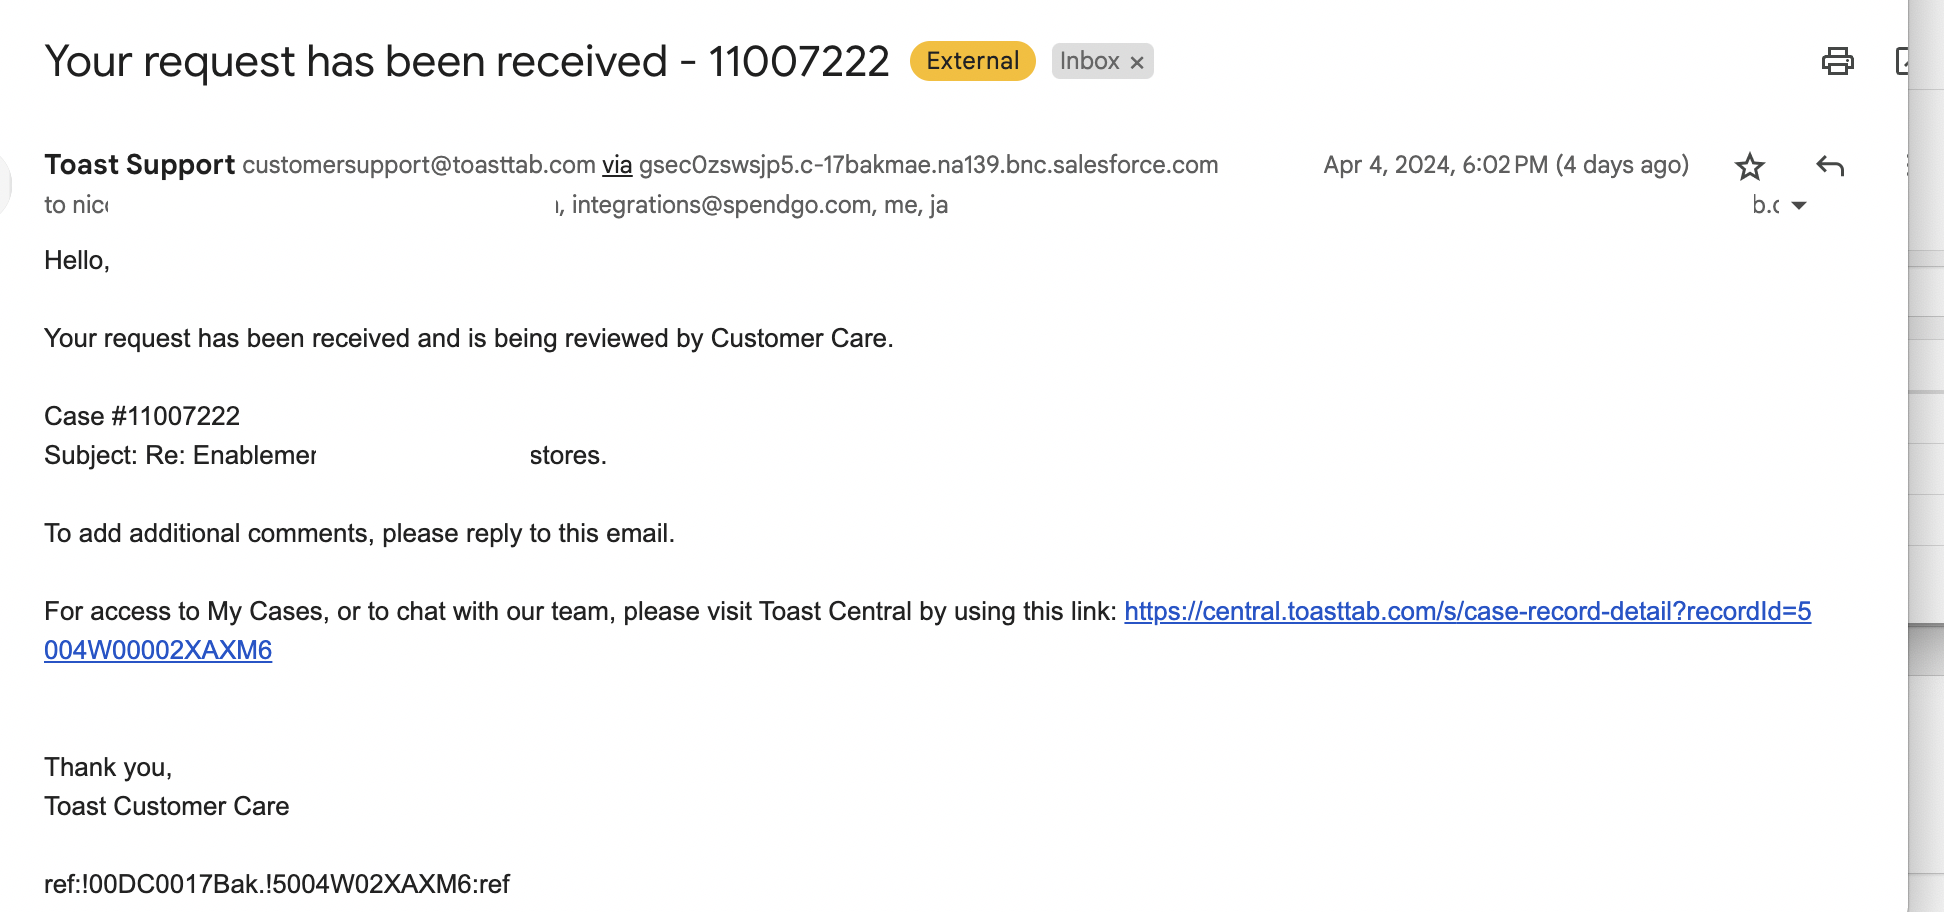
The integration team takes up to 5 business days to work on the ticket. Please note Toast cannot provide a specific time window for enabling the integration and this may happen any time during the day. If switching to Spendgo from Toast or other third party Loyalty, plan accordingly.
If enabling the integration the Merchant maps the Toast GUID to the location from the Spendgo Dashboard. If it is being disabled remove the mapping.
Settings → Stores → Manage Edit
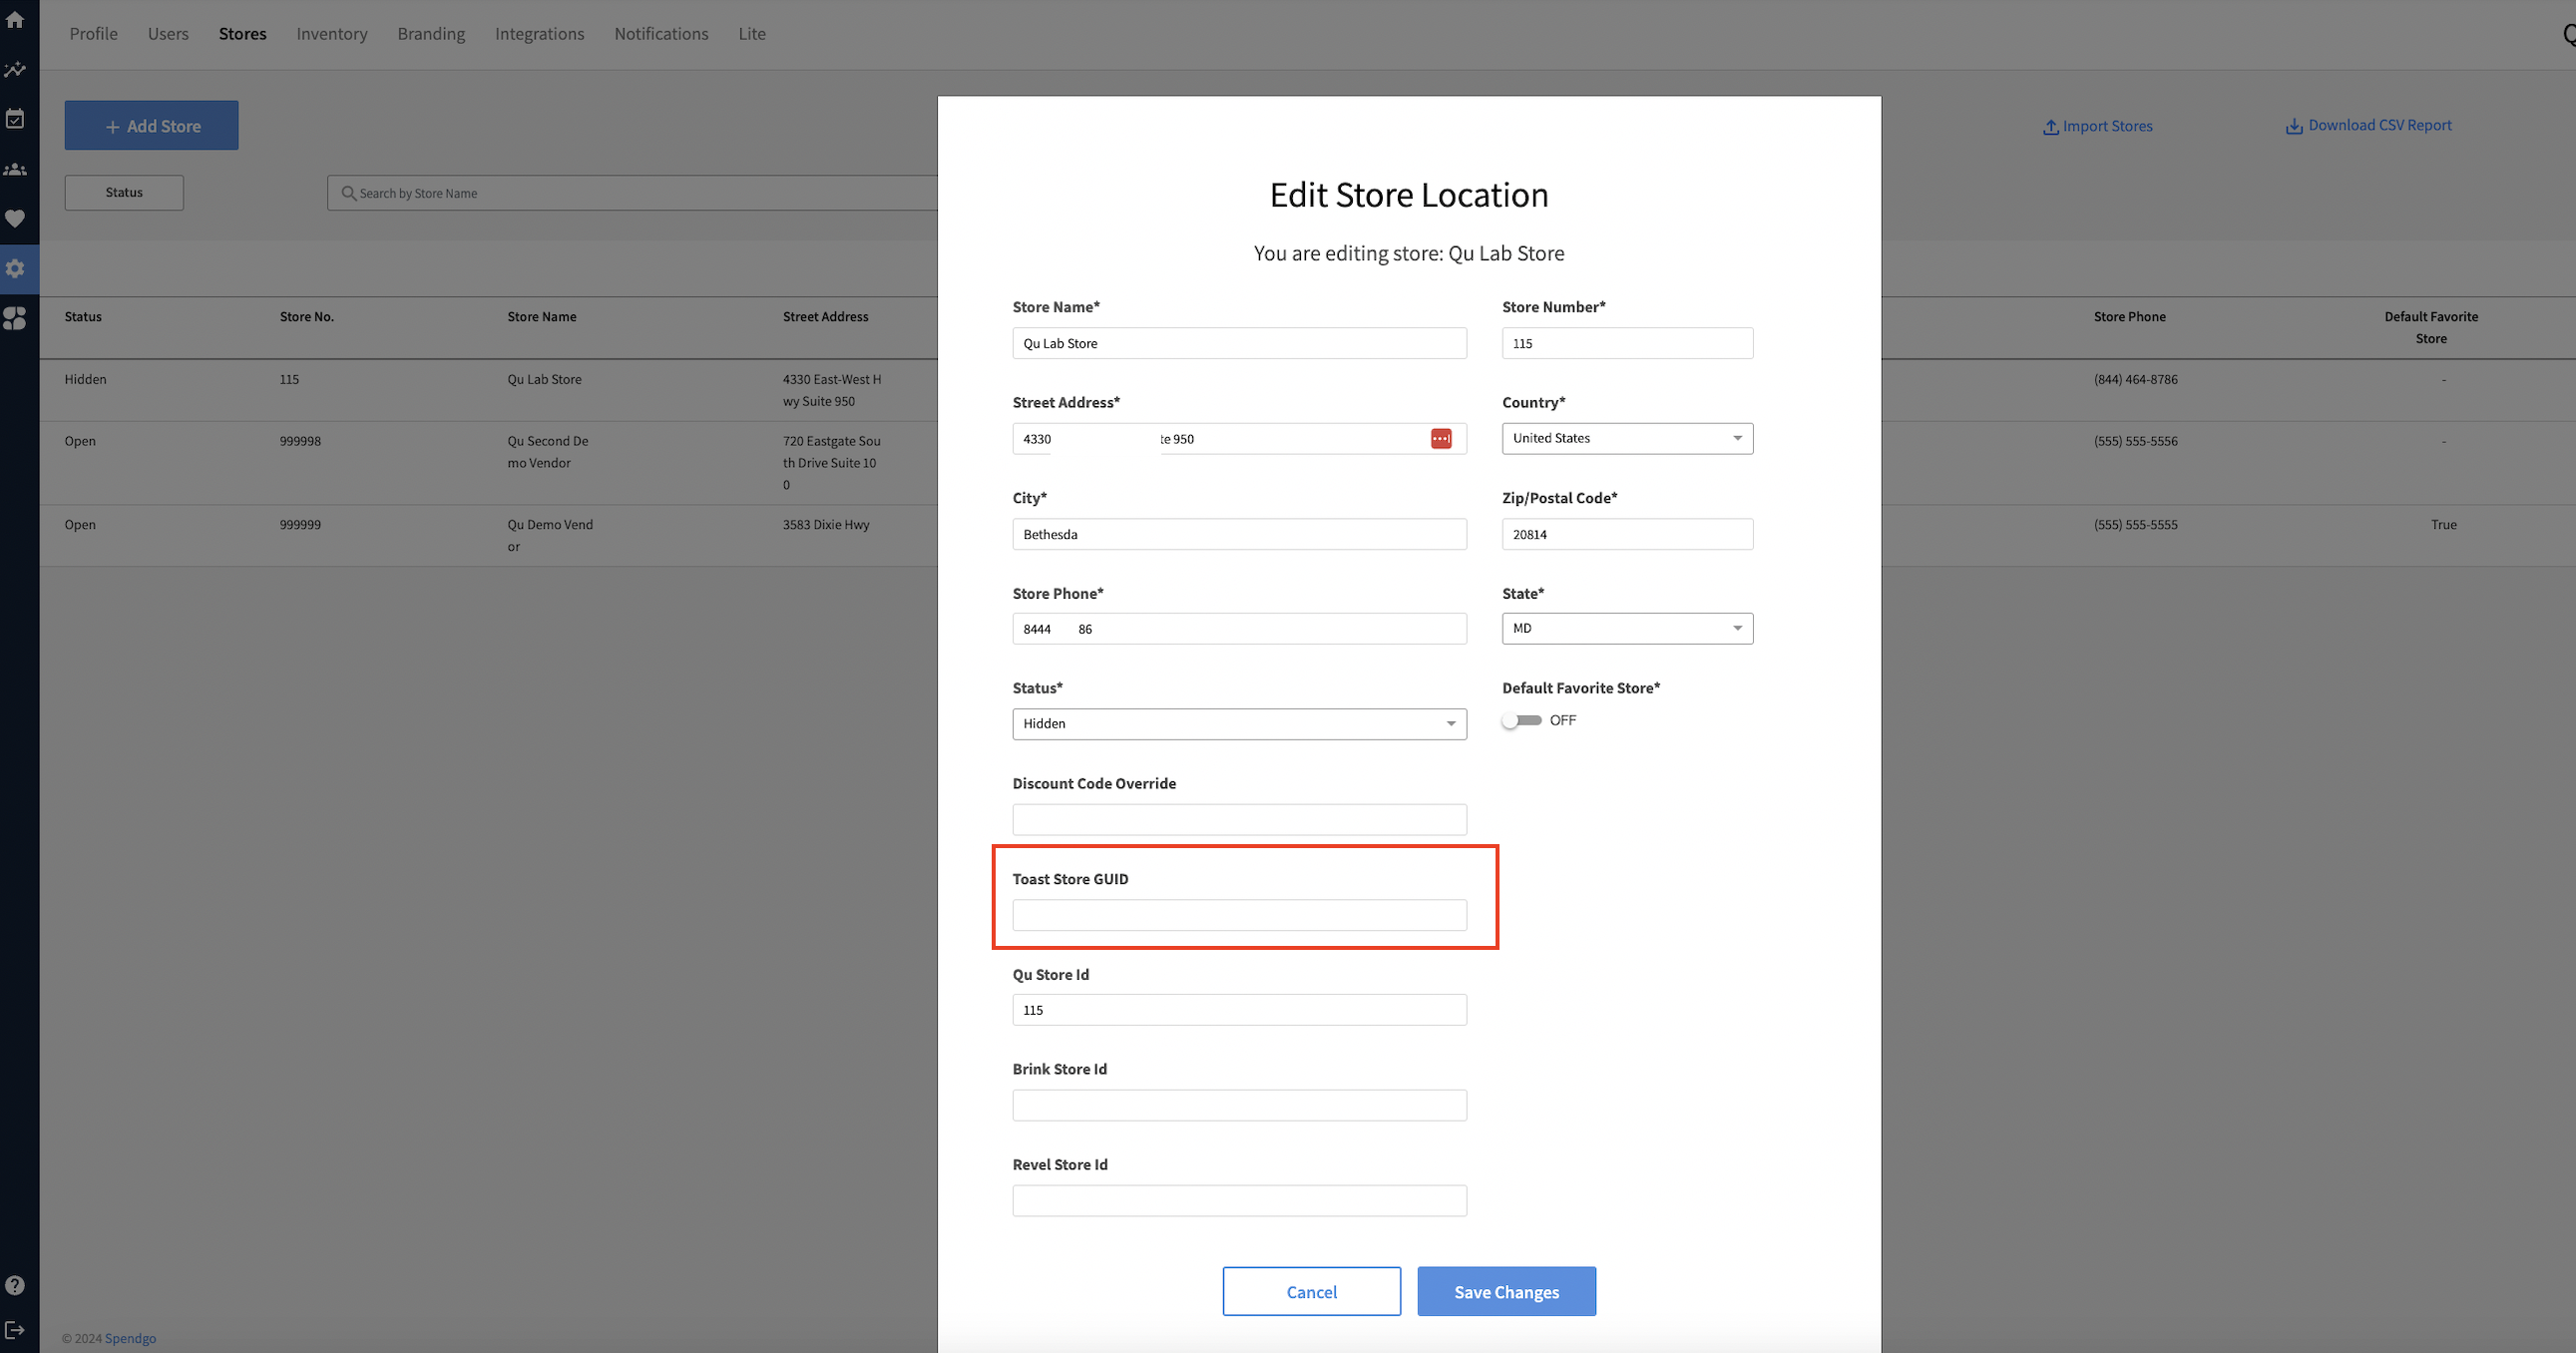
If this is Lab or the first location, Spendgo CSM co-ordinates with the Merchant to run some tests to confirm the integration and the rewards are working as expected.
4.4 Quick validation steps after enabling the integration:
Once the integration is enabled, it enabled the “Rewards” button on the POS. This is first step to validate that the integration is enabled.
Once the integration is enabled, the order data starts flowing from Toast to Spendgo, but the Loyalty is not processed in Spendgo unless the Toast GUID is correctly mapped to Spendgo Store location.
If the integration is enabled and location is mapped, the guest orders should start appearing in Spendgo Dashboard.
If the guest orders are not showing in the Dashboard,
Confirm that the “Rewards” button is enabled in the POS. If not, update the Toast Central ticket to let the Toast Integration support team know.
If the Rewards button is enabled but no orders are showing in the Dashboard,
Confirm that the location is open and receiving orders.
If the orders are being placed on the POS but it is not showing up in Spendgo Dashboard,
Confirm that there are no unpublished changes in Toast Admin Portal.
Update the Toast Central ticket and also let Spendgo Integrations and CSM (integrations@spendgo.com, csm@spendgo.com) know by email.
5. Loyalty Flow
5.1 POS Flow
A “Reward” button will show in the Toast POS when Spendgo Loyalty is enabled.
5.1.1 Looking Up the Loyalty Member
The below screenshots are created from the mobile phone and the actual layout on the POS may vary slightly.
Option 1: Employee looks up Member by phone number on the POS
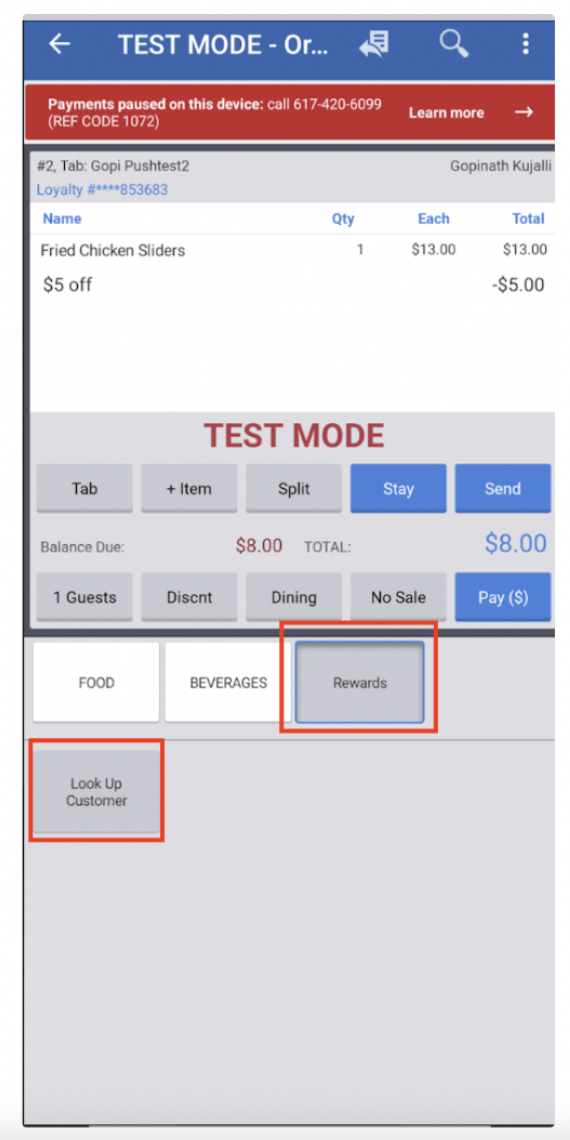
After ringing in the items and before payment, if the Member wants to make a loyalty claim, bring up the Loyalty Lookup window by clicking on “Rewards” → “Lookup Customer” → Lookup, enter the phone number in the “Search Phone #" and click “Done.”
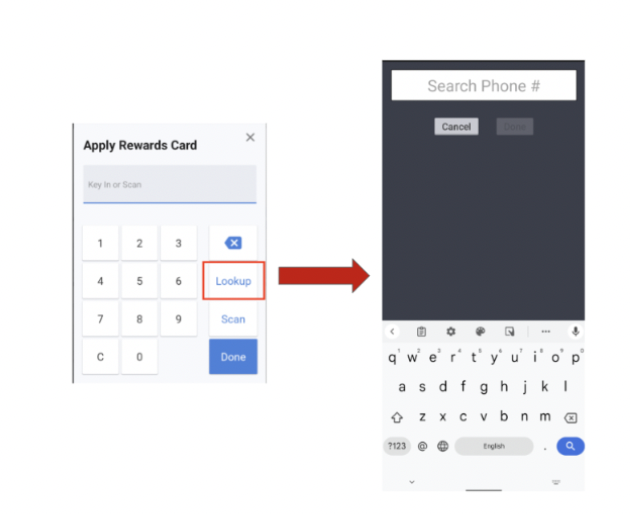
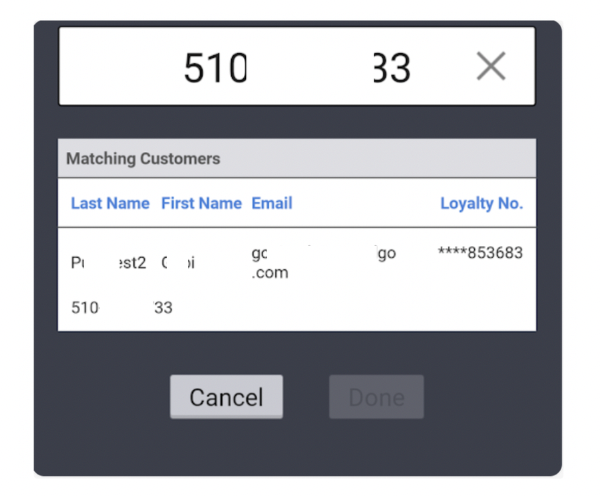
If it is an existing Spendgo Member, the Member details are displayed.
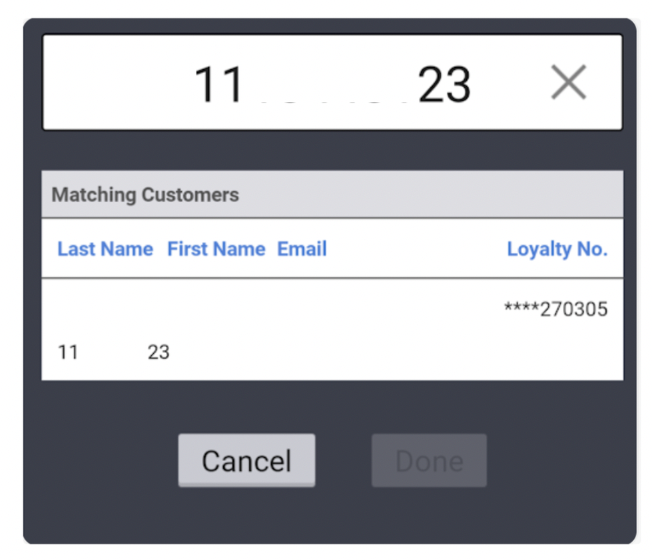
If the phone number does not exist in the Spendgo network, a “Starter” Member is created and displayed. Starter Members can begin earning points immediately.
For full membership benefits, such as eligibility for certain rewards or rewards redemption, brands may require the Member to complete registration.
Review the Member details, click on the listed Member, and click “Done.”
Option 2: Member scans a QR Code in a Mobile Pass or App
If a QR Code is made available to a Member in the Mobile App or via a Mobile Pass, the Member can scan the QR Code to make the loyalty claim.
2A) Scan using the barcode reader device:
After ringing in the items and before payment, if the Member wants to make a loyalty claim, bring up the Loyalty Lookup window by clicking on “Rewards” → “Lookup Customer” and then scan the QR Code.
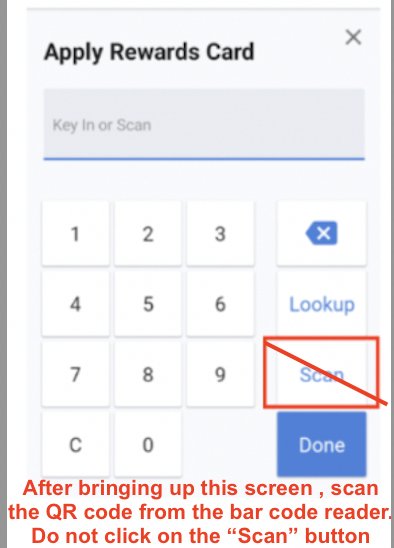
It will present the Member detail window, as shown above.
Click on the listed Member, then click “Done.”
2B) Scan using the POS:
After ringing in the items and before payment, if the Member wants to make a loyalty claim, bring up the Loyalty lookup window by clicking on “Rewards” → “Lookup Customer” and click on “Scan” to bring up the scanner, then ask the Member to scan.
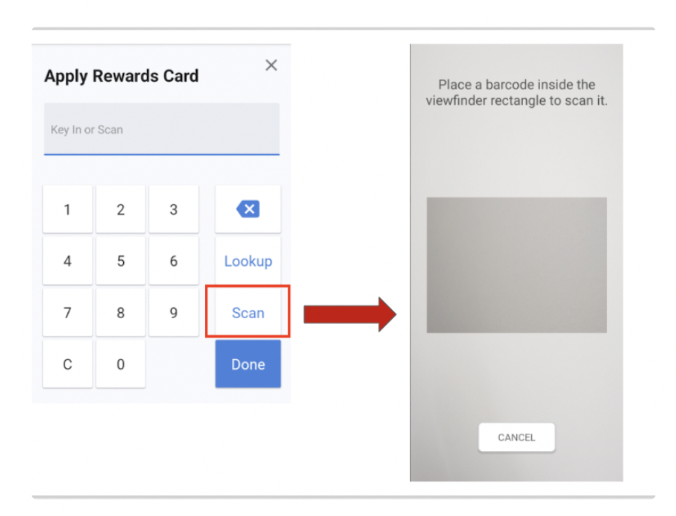
Click on the listed Member, then click “Done.”
5.1.2 . Applying the Spendgo Reward
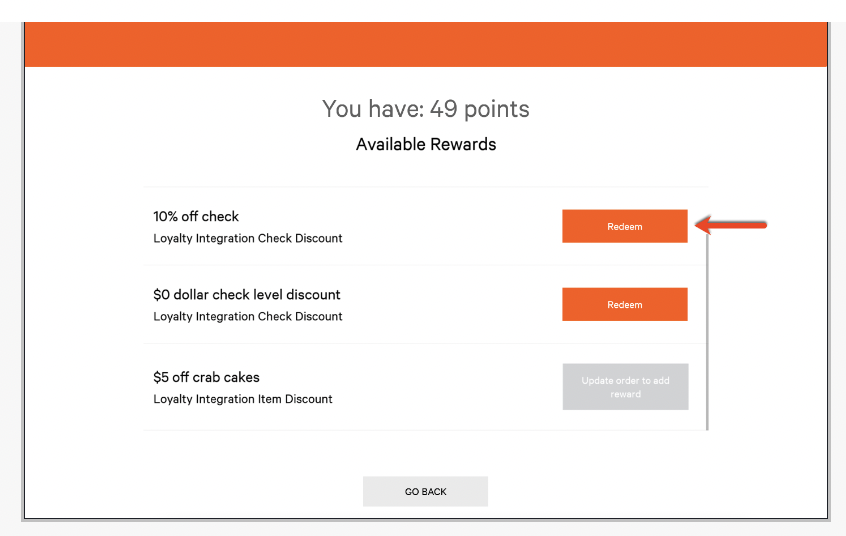
Once the Member is located, any reward available to the Member to apply on the order is listed in alphabetical order. Only rewards that can be applied to the transaction will appear in the list.
If it is an Item Level reward, the qualifying item must be present in the cart at this step to appear as a redemption option.
If the Member wants to apply any of the rewards, click on “Redeem.”
Only one Spendgo reward can be applied per order.
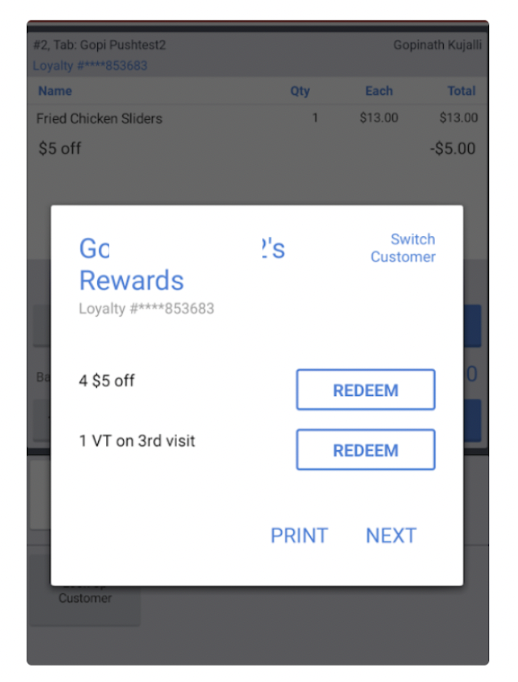
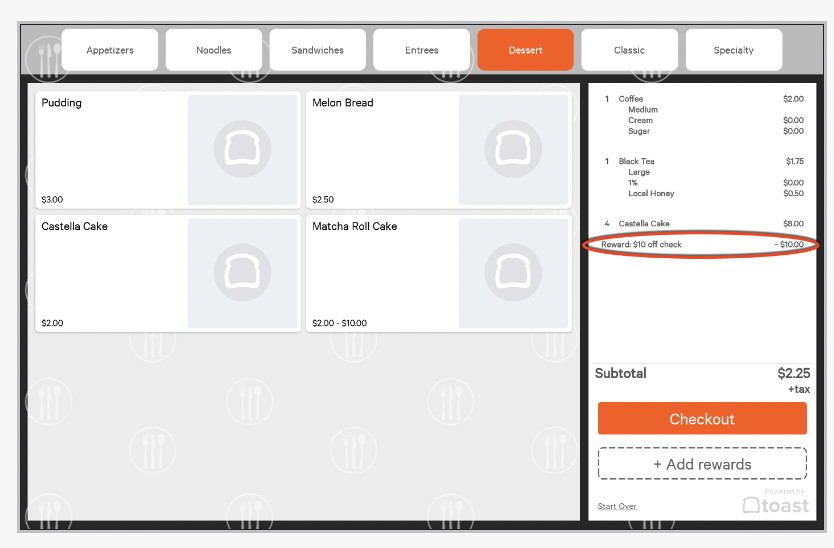
The reward is applied to the order and the updated order is displayed.
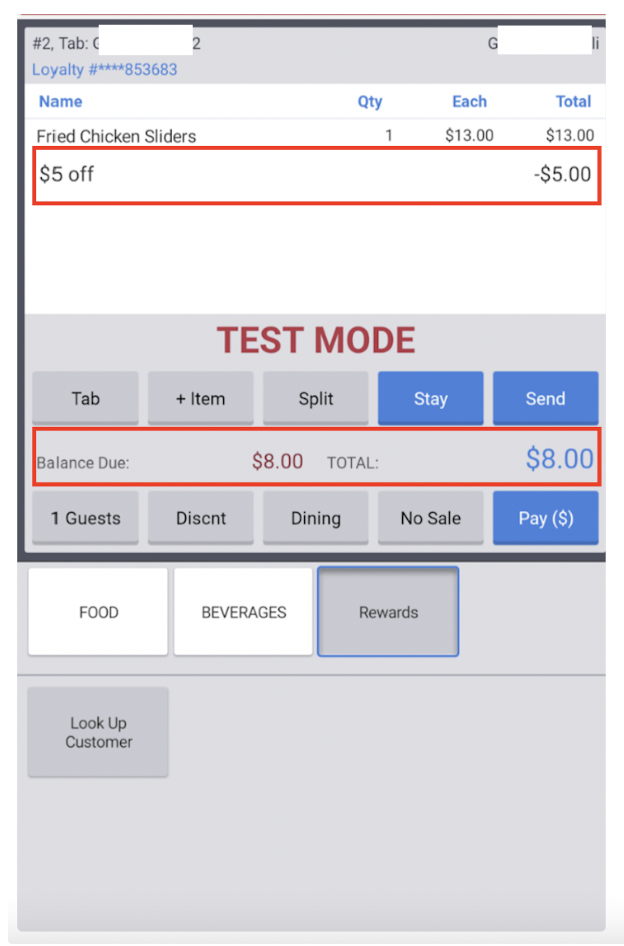
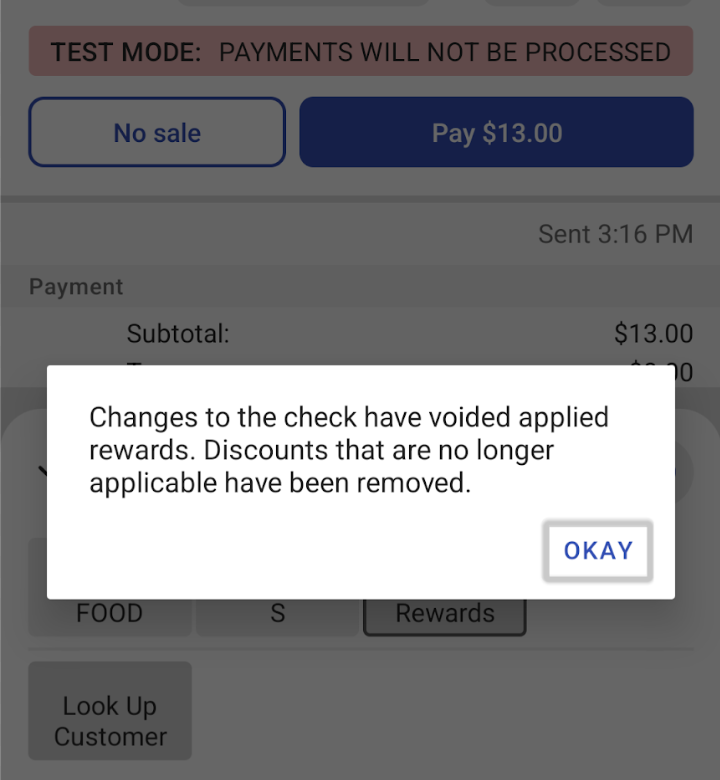
Please note that even though Spendgo doesn’t support applying multiple rewards to the order, Toast UI does allow adding more than one reward to the order. However when trying to close the order, Toast notices that the Spendgo is returning an error and so removes the applied rewards and keeps the order open. Reward will have to be looked up and applied again.
Complete the payment and close out the transaction.
5.1.3 . Removing an applied reward:
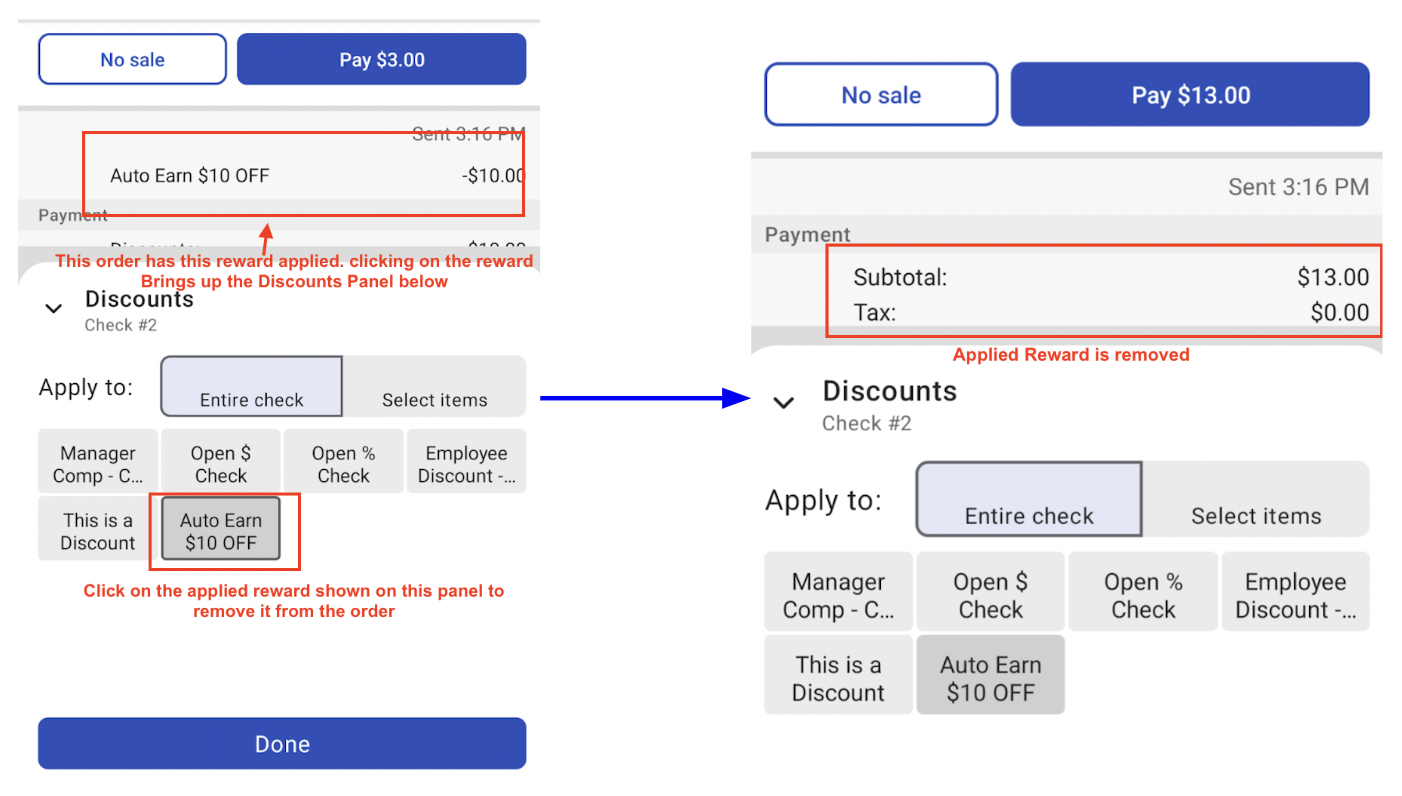
If the Reward needs to be removed click on the applied reward. In the Discounts panel the applied reward is highlighted. Click on the reward to remove it.
5.1.4. Adding additional non-spendgo discounts along with the Spendgo Rewards
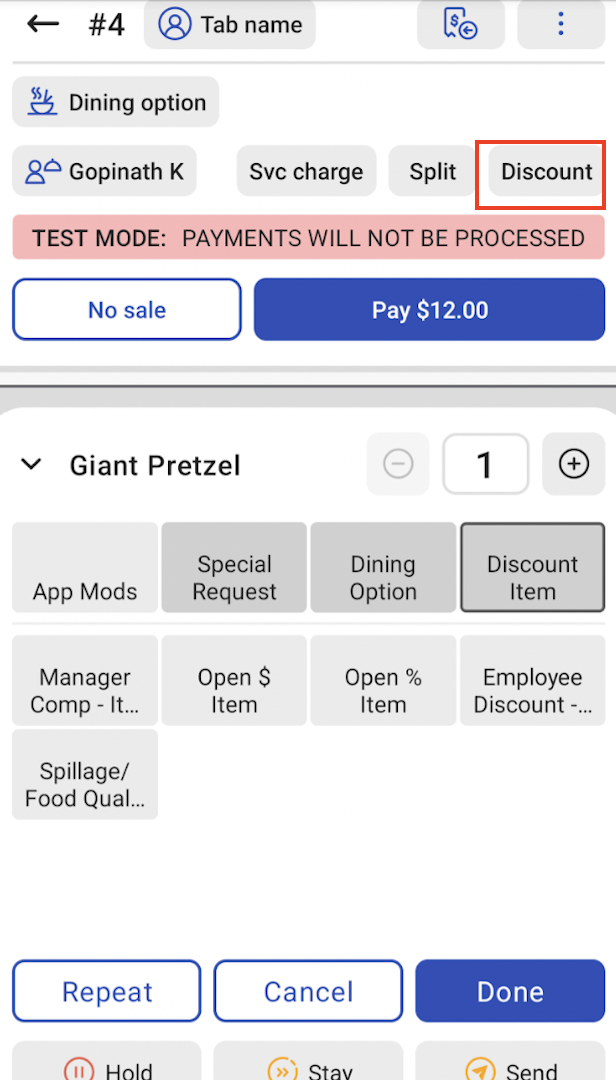
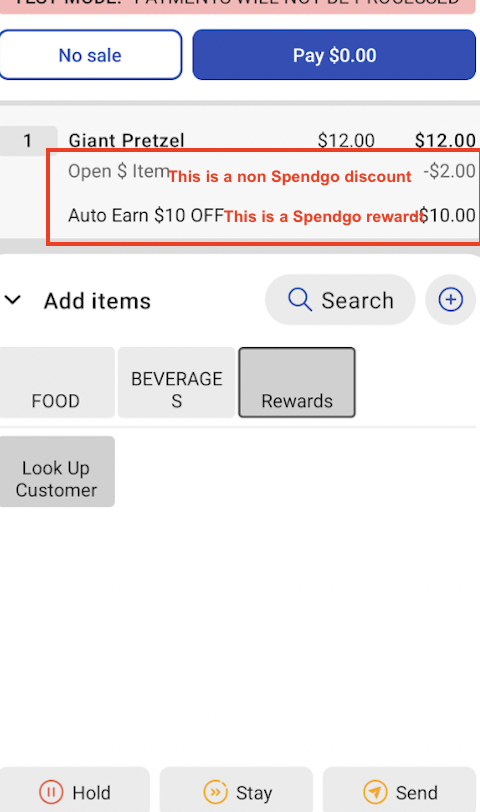
An order can have additional non-spendgo discount(s) added to the order along with a Spendgo reward. To add additional discount, follow the regular steps for adding non spendgo discount. i.e once order has items, click on the “Discount” button to bring up the discount panel and then select discount(s) to be applied.
Here is how the order looks after applying a Spendgo reward and an additional discount.
5.1.5. Updating an Order after applying the reward:
The order can be updated after applying the reward. However when new items are added or removed, or because the order subtotal has changed, it is possible that either the applied reward is no more applicable or order qualifies for some different reward(s). So, before or after updating the order, remove the applied reward and after the order is updated do a fresh rewards look up.
5.1.6 Switching/Changing the reward:
If a reward needs to be changed, remove the applied reward and do a fresh rewards lookup.
5.1.7. Switching the Loyalty Member
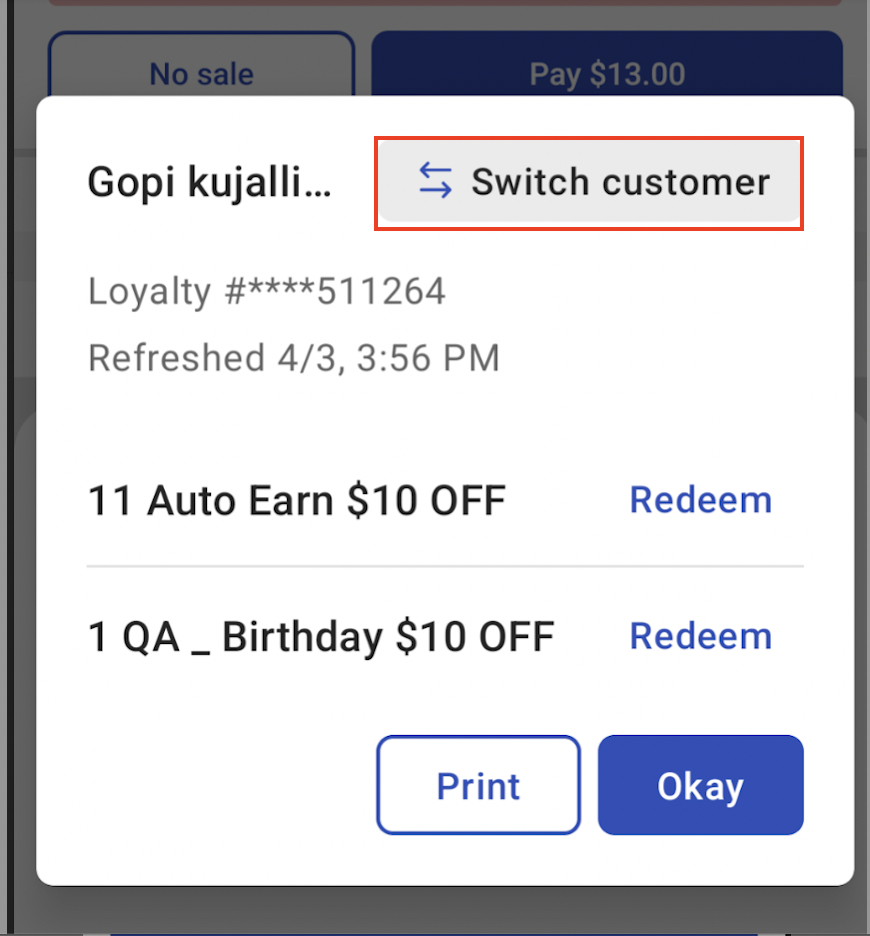
Please note that once the Loyalty member is looked up, the Member is attached to the order. Order can be completed without applying any reward and the order is counted as a loyalty order and the order accrues loyalty points. There is no way to remove the Loyalty Member from the order once attached. However, if the Member needs to be changed, bring up the look up screen and click in the “Switch Customer” and re-enter the phone number.
5.1.8 Viewing all rewards available to the member
Please note that when the rewards are looked up after adding items to the reward, only the rewards applicable to the order listed. There may be some rewards that is available to the Member but does not show up because the order does not meet the requirements to qualify for some of the available rewards. If the Member wants to know all available rewards, it can be looked up by following the rewards look up flow (Step 5.1.1) without ringing any item in the order. In this scenario the rewards listed for viewing only and cannot be applied.
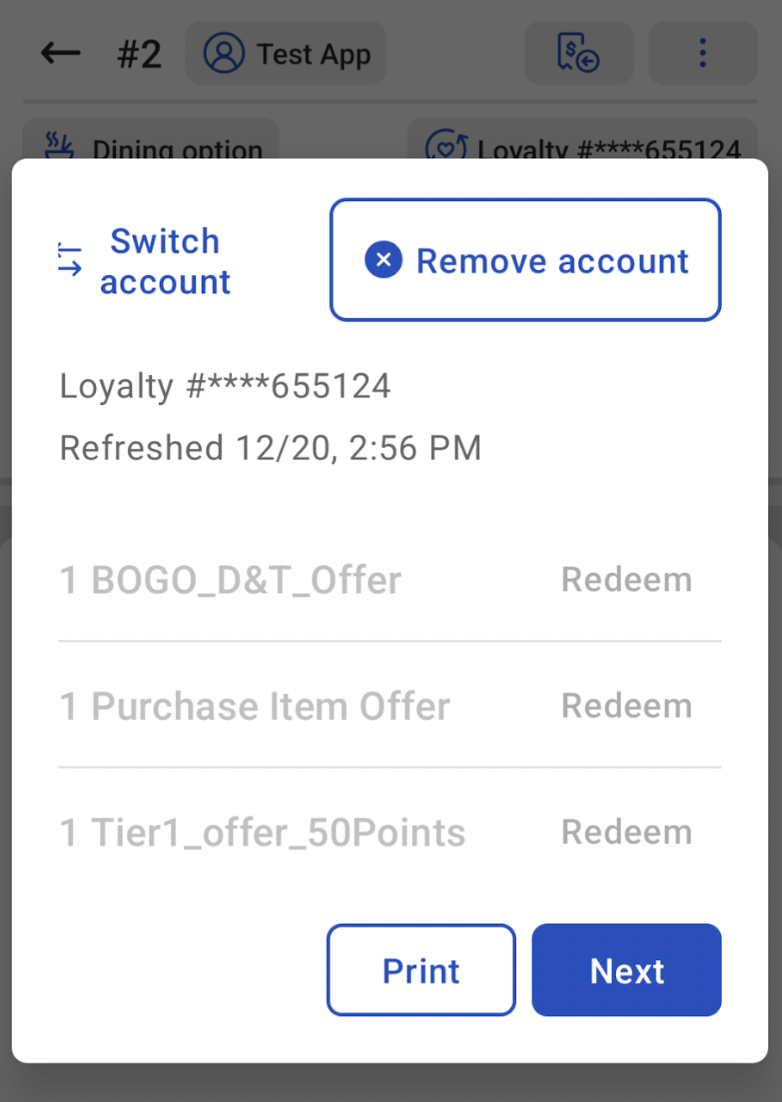
The listed rewards do not include:
Any store specific reward that does not apply to the location the Member is at.
Any Point Banking reward defined at higher points tier than the Member’s current points balance. For example if Member’s points balance is less than 100, only the Point Banking rewards defined at points tier less than 100 are shown. If the Member points balance is zero, then no Points Banking reward is shown.
Even though the rewards can be looked up without adding items to the reward, it should be for looking up the rewards only. For applying the reward the rewards need to be look up again after adding items to the order.
5.1.9 Processing Voids/Refunds:
Spendgo does not support partial loyalty reversal or partial voids/refunds on a completed order. If a partial void/refund is processed on an order, any loyalty points or rewards are reversed as if it is a fully voided/refunded order. If a partial void/refund is needed, it is recommended to fully refund the order and begin a new order.
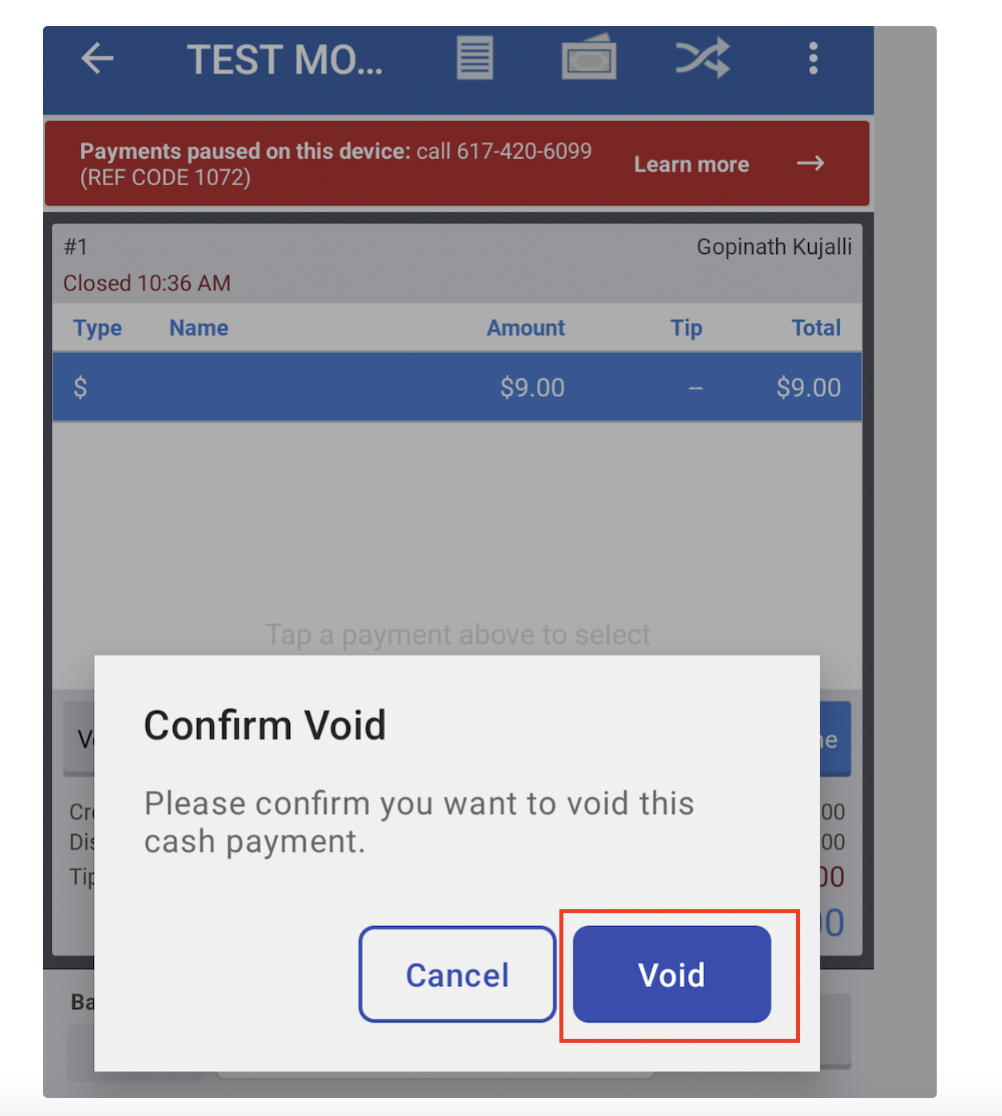
Select the Closed Check to Void/Refund.
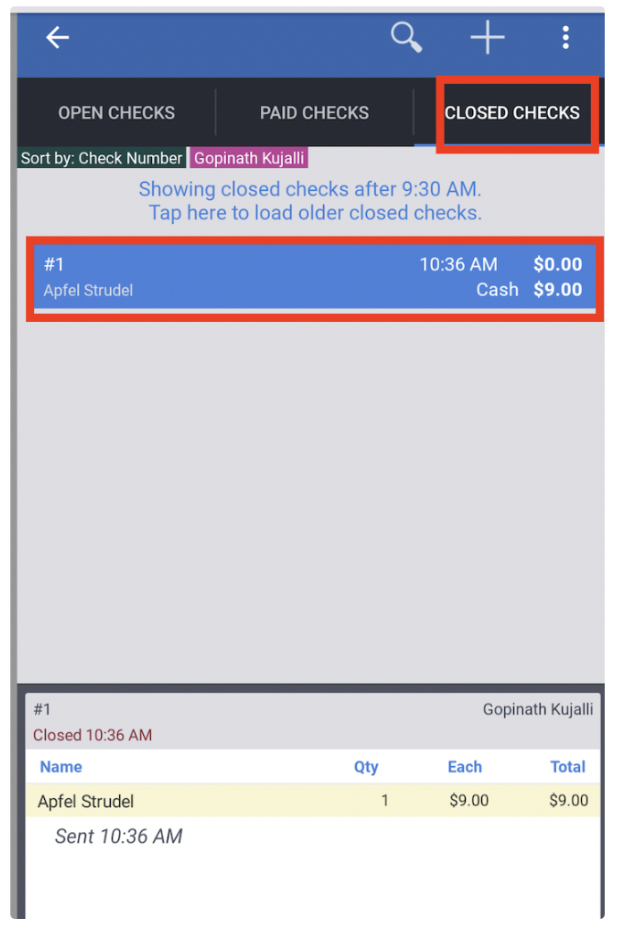
Click on the available options (3 dots on the top right); select “Void Order” and click on the “Void” button.
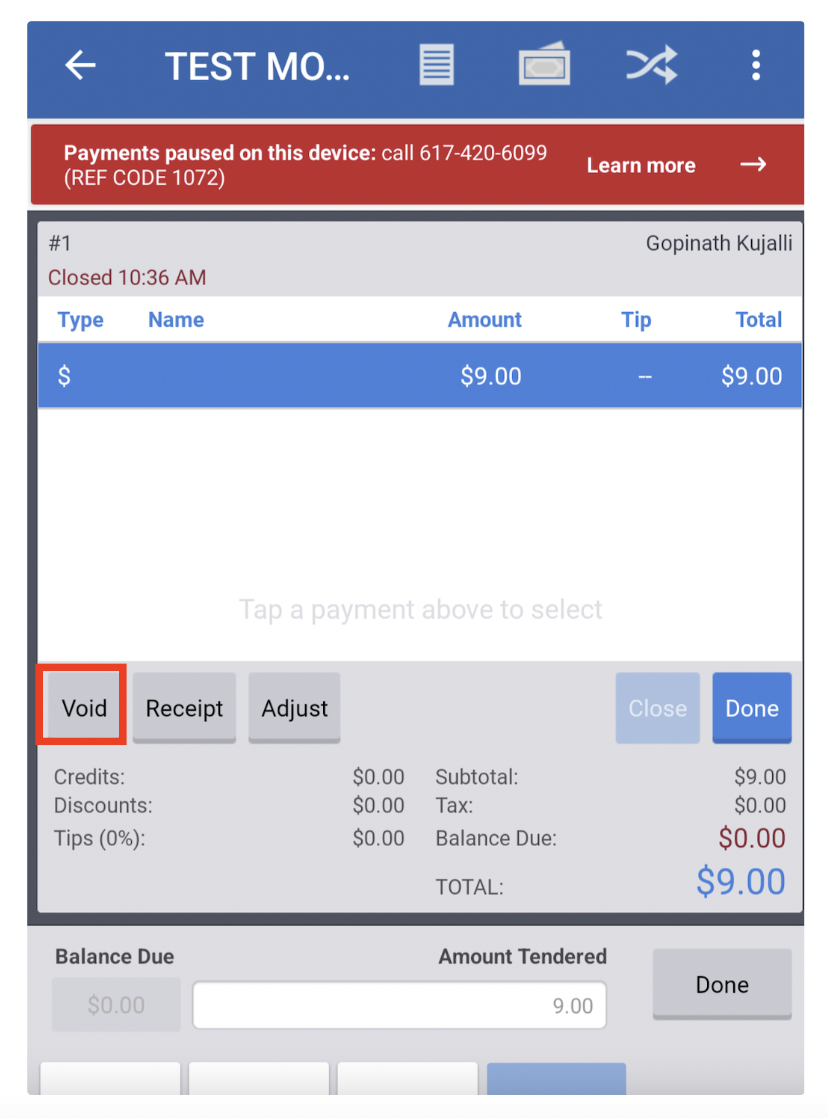
Click “Void” on the “Confirm Void” window, then click “Done.”
5.2 Kiosk Flow
On the Kiosk device, the Member taps the Start button and then adds items to the order.
Member taps on the “Rewards” button.
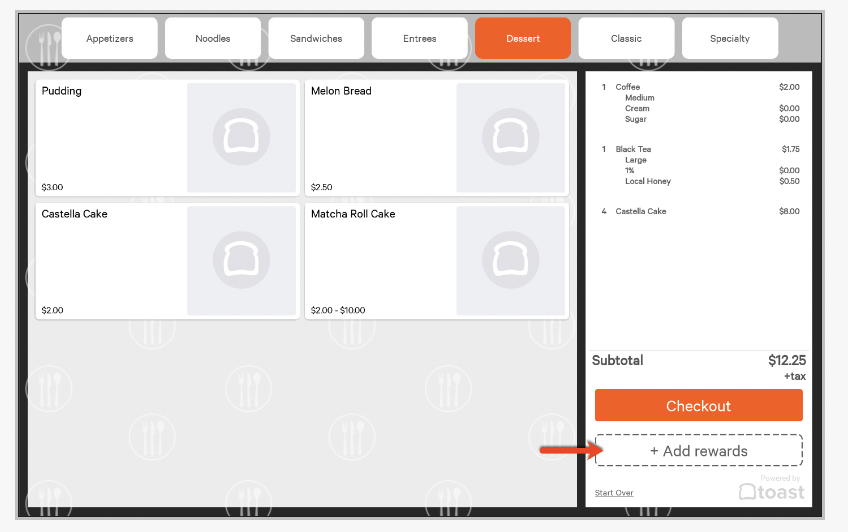
The Member can select the “Phone number” as a look up type and then enter the Phone number on the lookup screen.
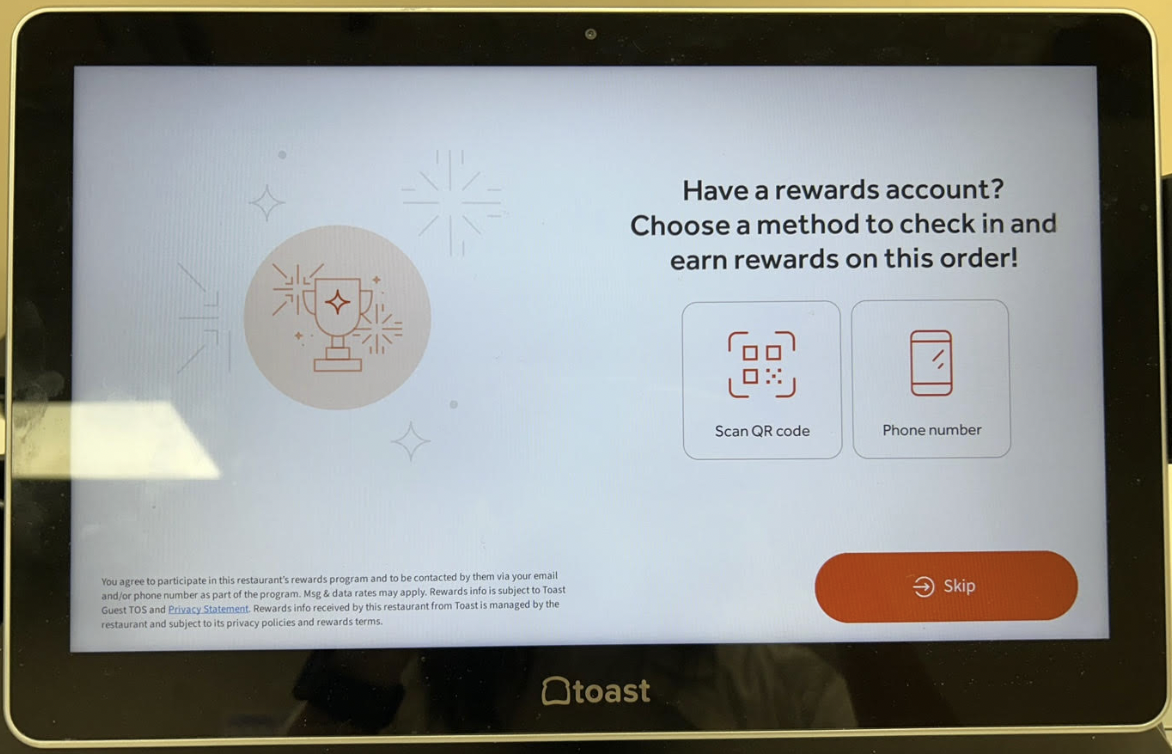
If there is a Mobile App available with the QR code, then the The Member can also choose the “Scan QR code” method.
The QR code should contain the second generation Spendgo ID to for scanning. If the QR code is generating using the Phone number then it will not work on the Kiosk
4. The Member will be presented with the rewards that are available to the Member for the order. A reward of choice can be applied to the order.
