Notifications
Notifications are automated messages sent to Members when a specific event occurs.
Campaign Notifications are marketing messages, and the content options are more flexible. They can be sent periodically based upon the Member’s loyalty activity. For instance, if a Member earns a specific offer, you can trigger an email message to notify them each time the offer is earned encouraging them to make a purchase and redeem it. Campaign notifications always require the Member to be subscribed to send them the notification (e.g. they must be subscribed to your email and/or text messages).
Offer earned — Send a notification when a Member earns a specific campaign offer.
Offer used — Send a notification when a Member uses a specific campaign offer.
Things to Know
You must have a messaging integration – email or SMS – connected for Notifications to be available in your Dashboard. If you do not have any messaging integration connected, reach out to your CSM to enable messaging on your account. When setting up your notifications, you will only be able to configure the integration type(s) that is/are connected in your account.
Some Third-party messaging providers, such as MailChimp, and Infobip, require the Member’s to be opted in to email or SMS to successfully deliver messages. Campaign notifications are meant for marketing purposes and should not be used for critical account related information.
When setting up email notifications, the mailing must be configured in your email provider’s platform. Follow the your partner provider specific steps on how to create an email template:
Create a Text (SMS) Notification
In the Spendgo Dashboard, go to Campaigns / Notifications.
Add + a new notification.
Select the event that will trigger the notification and click Next.
Enter a unique and easy to understand Event Name formatted with no spaces (e.g. welcome_$5_off).
Notes: Additional required fields may vary based on event type, enter all required information.Select Text as the medium.
The Text Medium will only be displayed if an SMS integration is connected in your account. Reach out to your CSM to enable SMS in your account.Enter your text message content. See Text Message Compliance for content guidelines.
Enter the Start Date.
(Optional) Enter an End Date.
Review and Create your new notification.
Create an Email Notification
Follow the steps to create an email notification based on your integrated Email provider. The onscreen instructions will also guide you through the setup based on the provider configured in your account.
Infobip
Before you get started
Create your Broadcast Email Template in your Infobip environment.
Note, Infobip emails triggered from the Spendgo Dashboard do not support substitutions. Make sure your template does not include any substitution placeholders (i.e., {firstName}).
How to set up an Infobip Email Notification
In the Spendgo Dashboard, go to Campaigns / Notifications.
Add + a new notification.
Select the event that will trigger the notification and click Next.
Enter a unique and easy to understand Event Name.
Note, additional required fields may vary based on event type, enter all required information.Select Email as the Medium.
The Email Medium will only be displayed if an Email integration is connected in your account. Reach out to your CSM to enable Email in your account.Enter the Template ID of the mailing you want to send on the event.
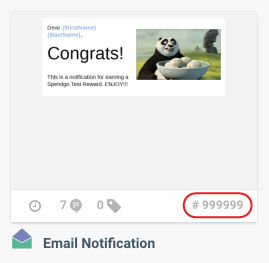
To retrieve your Broadcast Template ID, navigate to your Broadcast Templates and find the ID number ( # ) at the bottom right corner of the template module. If you have not already created your template, create your template. Note, only Infobip “Broadcast” Templates can be used for notifications.
Enter the Start and End dates.
Review and Create.
MailChimp
How to set up a Mailchimp Email Notification
In the Spendgo Dashboard, go to Campaigns / Notifications.
Add + a new notification.
Select the event that will trigger the notification and click Next.
Enter a unique and easy to understand Event Name.
Note, additional required fields may vary based on event type, enter all required information.Select Email as the medium.
The Email Medium will only be displayed if an Email integration is connected in your account. Reach out to your CSM to enable Email in your account.Jot down the event name as you have entered it. You will use this to map your event to the mailing within MailChimp.
Enter the Start Date.
(Optional) Enter the End Date.
Review and Create your new notification.
Log in to your MailChimp and navigate to Automations.
Create an automated Event API email.
Name your campaign and Begin.
Edit the trigger.
Set the delay to immediately.
Enter the the exact event name that you jotted down in Step 5 and click Update trigger.
Design or select your email template, Save And Continue.
Confirm your settings and click Start sending.
Edit a Notification
In the Spendgo Dashboard, go to Campaigns / Notifications.
Select Manage / Edit in the row of the notification you intend to edit.
Enter your updates and Save Changes.
Delete a Notification
In the Spendgo Dashboard, go to Campaigns / Notifications.
Select Manage / Delete in the row of the notification you intend to delete.
Click Delete to confirm.
A Delete cannot be undone once confirmed.